10 Post-Installation Tweaks to Hyper-V
My last blog on post-installation tweaks for vSphere was a hit! So, I thought this would be a great opportunity to do the same for Microsoft Hyper-V. I think these tips are very helpful. In fact, I may find myself making more little tips like this.
You know what I mean here -- the tips here are some of the things that you actually already know, but how often is it that we forget the little things?!
Here are my tips for Hyper-V after it is installed, in no particular order:
1. Install updates, then decide how to do updates. Hyper-V, regardless of how it is installed, will need updates and a decision should be made on how to update it. Hyper-V updates that require the host to reboot when VMs are running on the host will simply suspend the VMs and resume them when the host comes back online. This may not be acceptable behavior, so consider VM migration, SCVMM, maintenance windows and more.
2. Make the domain decision.
There are a lot of opinions out there about putting Hyper-V hosts on the same Active Directory domain as "everything else." I've spoken to a few people who like the separate domain for Hyper-V hosts, and even some people who do not join the Hyper-V hosts to a domain. Give some thought to the risks, management domains and possible failure scenarios and make the best decision for your environment.
This is also the right time to get a good name for the Hyper-V host. Here's a tip: Make the name stand out within your server nomenclature. You don't want to make errors on a Hyper-V host, as the impact can be devastating.
3. Configure storage.
If any MPIO drivers, HBA drivers or SAN software are required, get them in before you even add the Hyper-V role (in the Windows Server 2012 installation scenario). You want to have those absolutely right before you even get to the VM discussions.
4. Set administrators.
Does this require the same administrator pool as all other Windows Servers? Then see point 2.
5. Name network interfaces clearly.
If you are doing virtualization well, you will have multiple network interfaces on the hosts. Having every interface called "Local Area Connection" or "Local Area Connection 2" doesn't help you at all. You may get lucky if there are a mix of interface types, so you could see the Broadcom or Intel devices and know where they go. Still, don't chance it. Give each interface a friendly name, "Host LAN," "Management LAN," etc. Maybe also go so far as to indicate the media used. Like "C" for copper or "N" for CNAs, etc.
6. Disable unnecessary protocols.
Chances are for your Hyper-V hosts running in your datacenter, you won't be using all of the fancy Windows peer-to-peer networking technologies, much less IPv6. I always simplify things and disable things like IPv6, the Link-Layer Topology services and anything else that I know I won't use. I keep it simple.
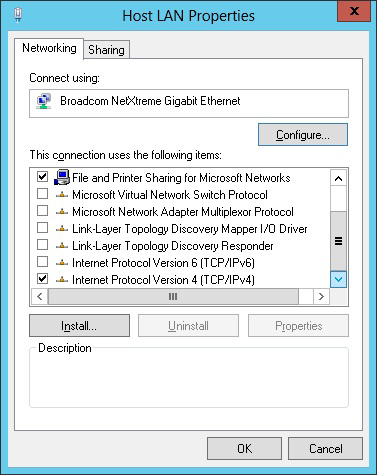 |
Figure 1. Disable protocols you aren’t using for Hyper-V host. |
7. Ensure Windows is activated.
Whether you are using a Key Management Server (KMS), Multiple Activation Key (MAK), OEM installed version of Windows or whatever, make sure Windows won't stop at the start-up process asking the console to activate Windows now. This is less of a factor when using Hyper-V Server 2012, the free hypervisor from Microsoft.
8. Configure remote and local management.
This is a Microsoft best practice, and after holding off myself time and time again; I finally have come around to doing this myself. With the new Server Manager, PowerShell and Hyper-V Manager, you can truly do a lot remotely without having to log into the server directly. That being said, still ensure you have what you need. I still like Remote Desktop to get into servers, even if it is a boring console with only a command line like Windows Server core with Hyper-V or Hyper-V Server 2012.
9. Set default VM and disk paths.
There is nothing more irritating than accidentally coming across a VM on local storage. Oddly, this happens on vSphere as well, due to administrator error. But set both the Virtual Hard Disks and Virtual Machines settings to your desired location. You don't want to fill up the C:\ drive and cause host problems, so even if this one volume isn't your preferred (E:\ in Fig. 2); it will keep the host integrity better off if there is a full situation.
 |
Figure 2. Ensure the VMs don’t fill up the C:\ drive on the Hyper-V host from the get-go. (Click image to view larger version.) |
10. Test your out-of-band remote access options.
This tip goes for both Hyper-V and vSphere -- Ensure you have what you need to get in when something doesn't go as planned. Tools such as a KVM, Dell DRAC, HP iLO can get you out of a jam.
These tips are some of the more generic ones I use in my virtualization practice, but I'm sure there are plenty more out there. In fact, the best way to learn is to implement something and then take notes of what you have to fix/correct post installation.
What tips do you have for Hyper-V, post-installation? Share them here.
Posted by Rick Vanover on 01/28/2013 at 3:34 PM