How To Minimize Backup Data by Maximizing vRanger
In recognition of the great demand for “how-to” information, I am starting my first blog by hitting on a very hot topic: How companies can save costs by reducing storage footprints. Quest vRanger Pro 5.0 features a number of tools designed to reduce the amount of data you back up by leveraging technologies that filter out unchanged and deleted data. Exploiting vRanger's ability to minimize backup data requires enabling a few functionalities in the proper manner. This blog will take you through the steps required to fully leverage vRanger's data reduction capabilities.
Before delving into the specific details of how to enable those key functionalities, let's begin with a quick overview of the difference between VMware's Change Block Tracking (CBT) feature and vRanger's patent-pending Active Block Mapping (ABM) feature, as both are critical to exploiting vRanger's data reduction capabilities. CBT tracks changed blocks and tells vRanger directly what has changed, so only those changed blocks are backed up. It does not, however, prevent deleted or zeroed data from being backed up. This is where vRanger's ABM technology steps in to augment the process, identifying and skipping over blocks of deleted and zeroed data. Enabling ABM is critical to getting the most out of your vRanger backup.
Now, let's walk through the actual set-up process.
You'll want to begin by enabling the CBT function. As noted in the screen shot below, you can do this from the My Inventory screen by right clicking on a given VM. From there, you will have the option to Enable Change Tracking. With CBT enabled, vRanger only backs up the portion of a disk that has changed since the last backup. Note that vSphere supports CBT, and most VMs running in this environment can utilize it. The VMs must be Hardware Version 7, and have been created and hosted in ESX4 or 4i hosts. VMs that are created in ESX3.5 or below must be migrated to Hardware Version
7 for CBT to be supported.
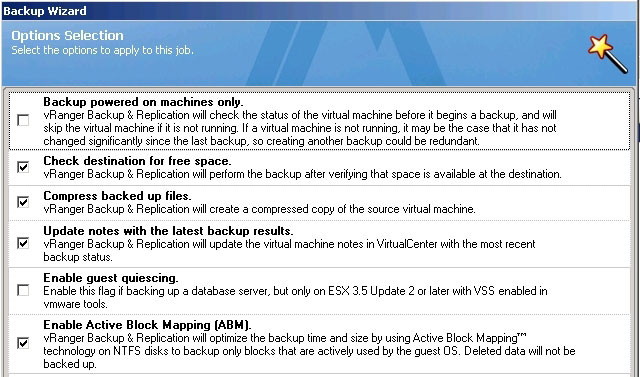 |
Figure 1. Enabling CBT. (Click image to view larger version.) |
The next step is to enable ABM functionality. This is imperative to leveraging vRanger's ability to minimize the size of your backup. To enable ABM, bring up the Options Selection menu on your vRanger backup, and check the Enable Active Block Mapping (ABM) box, as noted in the screen shot below. The process is 100 percent agentless and does not require login access to the running VM, but you must be running ESX, and your file system must be basic and of MFT type. Note that you can also enable vRanger to Compress backed up files from that same Option Selection menu, which we recommend.
 |
Figure 2. Selecting the ABM option in vRanger. (Click image to view larger version.) |
The last step on the path to maximizing space savings is to select either an incremental or differential backup. This is done through the Retention Policy feature on your Backup Wizard, as noted in the screen shot below. This functionality enables you to establish the number of “save points” you'd like to retain and define the type of backup you want to run. Selecting Incremental will save only data changed since the last backup job of any kind, whereas selecting Differential will save any data changed since your last full backup. Both are good options for shrinking both your backup windows and storage footprint.
 |
Figure 3. Setting your retention policy is one of the most important steps in getting the most from your vRanger backups. (Click image to view larger version.) |
By following the steps outlined above, you'll be able to fully leverage the tools vRanger provides, and reduce the amount of data you back up. Next time, we'll discuss how to use vRanger to back up and recover multiple VMs at the same time.
Posted by John Maxwell on 07/26/2011 at 12:49 PM