How To Enable New Deduplication Option in vRanger 5.3
Data growth is unquestionably one of the most formidable challenges IT departments are grappling with on a daily basis. For all its benefits, virtualization has added to the data growth challenge, as large amounts of redundant data often reside within virtual machine disk files. To address this growing end-user concern, Quest recently introduced NetVault SmartDisk--vRanger Edition (NVSD vRanger Edition), which provides a new deduplication option for users of vRanger 5.3. You may recall NetVault SmartDisk (NVSD) as the software-based deduplication technology Quest inherited as part of the Bakbone acquisition in early 2011.
In addition to walking users through how to add NetVault SmartDisk as a repository within vRanger, this blog will also take a closer look at how the vRanger and NetVault SmartDisk instances work together to deliver deduplicated backup and restore processes.
Adding NetVault SmartDisk as a vRanger Repository
Once the NVSD vRanger Edition server has been licensed, configured and is up and running (which requires following the basic NVSD installation procedures), it can then be added as a deduplication repository within vRanger.
To get started, within your vRanger UI, navigate to the My Repositories pane and right click anywhere in the pane. From there, select Add and then NVSD. You'll next need to populate a handful of fields within the Add NVSD Repository dialog (see Fig. 1), including:
- Repository Name -- a descriptive name for the repository
- Description -- an optional, long-form descriptor of the repository
- DNS Name or IP
- User Name / Password -- this will be based on the WebDAV credentials you initially used to install NVSD
- Target Directory -- you can select an existing NVSD repository if one exists, or enter a name for your new repository to have it created
- Port -- the default port that vRanger will use to connect to the NVSD repository is 37453.
- Timeout -- the value you enter will determine how long to wait before terminating an idle connection
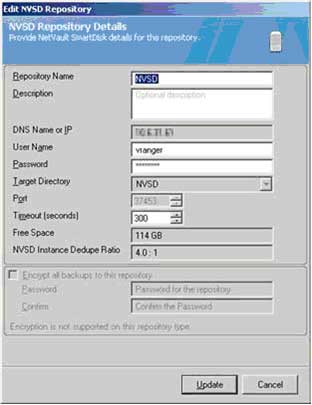 |
Figure 1. Use the Add NVSD repository dialog to provide critical details for the new repository within vRanger. (Click image to view larger version.) |
Once you've populated all of the aforementioned fields, click OK. You'll then click OK again, and the connection to the repository will be tested and added to the My Repositories pane. From there, you can view pertinent information about the NVSD repository you have just configured, including the amount of free space remaining and the repository's deduplication ratio.
The Deduplicated Backup Process
Now let's take a look at how the deduplication backup process between vRanger and NetVault Smart Disk actually functions.
After you initiate a backup job targeted to the NVSD repository, vRanger streams data on the user-defined port to the storage service (see Fig. 2) , which then stores the backup stream from vRanger in the staging store. The storage service updates the content index to indicate where the backup is stored in the staging store, and then updates vRanger to indicate that the backup stream has been successfully stored. Meanwhile, during the user-defined deduplication window, backup data is retrieved from the staging store and sent to the deduplicator, which performs byte-level, variable-block length deduplication by breaking data streams into unique chunks.
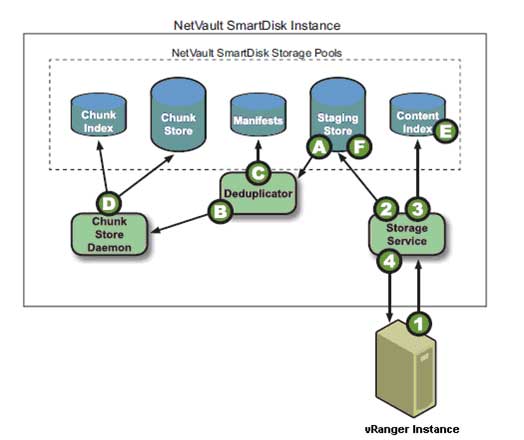 |
Figure 2. Deduplicating data in the NVSD Repository. (Click image to view larger version.) |
The Deduplicated Restore Process
After the user initiates a restore of a deduplicated backup that is stored on the NVSD repository (see Fig. 3), vRanger requests the data on the user-defined port from the storage service, which then queries the content index to determine whether the backup is stored in the staging store for non-deduplicated backups or the chunk store for deduplicated backups. The storage service then queries the backup's manifest for the first or next batch of chunk names in the backup. Ultimately, the storage service retrieves the chunks from the chunk store and streams them to vRanger. On completion of restoring all data chunks in the manifest, vRanger returns a restore completed job status.
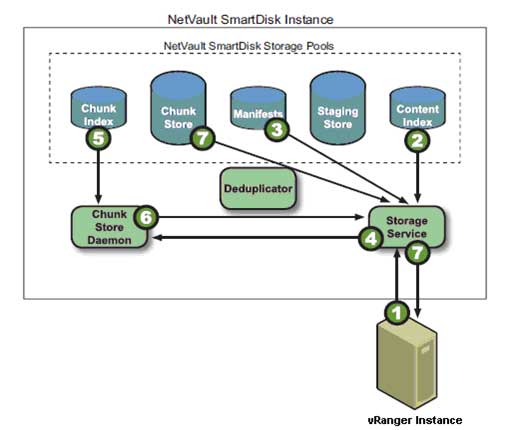 |
Figure 3. Restoring deduplicated data. (Click image to view larger version.) |
Understanding Global and Variable Block Deduplication
One other important note before I conclude: NVSD vRanger Edition enables global, variable-block deduplication. In order to get the most of your deduplication implementation, it's important to understand how global deduplication differs from job-level deduplication, and how variable-block deduplication differs from fixed-block deduplication.
Job-level deduplication acts on data being backed up by a specific job. Global deduplication acts on data from multiple instances. In other words, if you have two vRanger instances writing to the same NVSD instance, with global deduplication, the data will be treated as if it came from a single source, and thus data from all ESXi hosts involved will be deduplicated.
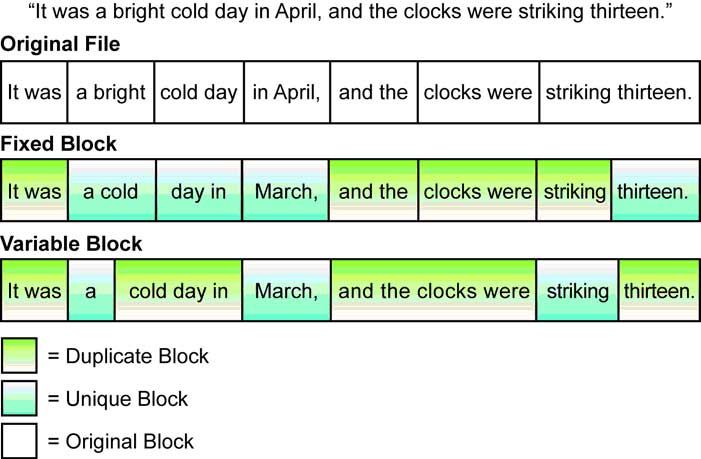 |
Figure 4. Fixed-Block vs. Variable-Block Deduplication. (Click image to view larger version.) |
Regarding fixed- versus variable-block deduplication, the key difference, as noted in figure 4 below, is in how the deduplication engine accounts for file shifts (see Fig. 4). With fixed-block deduplication, when data in a file shifts, all subsequent blocks in the file will be rewritten and are likely to be considered as unique. With variable-block deduplication, segments are anchored based on their interior data patterns, leading to more significant levels of compression.
Posted by John Maxwell on 02/08/2012 at 12:49 PM