The traditional workplace, dominated by Windows-based desktops and laptops, has suddenly given way to a new workspace featuring a hybrid blend of form factors, platforms and work styles. We refer to this new world as the User Workspace, and it covers mobile devices, tablets, desktops, laptops, Windows, Mac, Android, iOS and much more. Today's users are no longer restricted to one device or one platform, or even one application - they expect to be able to work on every device, whether it is personally owned or provided by their company.
Of course, this brings with it a whole new world of challenges and concerns - what about security, liability, privacy, access and support? In this article, I will take a look at the challenge of managing the User Workspace, and some approaches that might work for you.
Why even consider BYOD? Until now, IT has been built on a history of carefully planned and prepared computing devices, centrally managed with understood limits on personal use and accepted liability exposure, right? Well, that might be the perceived wisdom, but the reality is that putting any device in the hands of a user is a risk, and users have found ways to circumvent controls and do it for themselves, forever.
Today's wave of tech-savvy users who employ cloud-hosted, low-cost services for everything from e-mail to file storage, CRM to travel, as well as productivity apps in their personal lives, don't think twice about circumventing IT if they need something to get the job done in their professional lives. This wave of consumerization extends to devices too. In their personal lives, users alternate between tablets, phones and various types of desktops, and increasingly use browser and mobile apps. They expect the same in the workplace, and progressive employers encourage this more flexible style of working, because it attracts the brightest, most free-thinking employees, and enables greater productivity and extended working hours.
The fact is that consumerization and new devices are coming whether you like them or not. Extreme commentators will say that no matter what security controls you put in place, users will always circumvent them as long as they have web access, or even just wireless internet. I've heard it said that attempting to manage every endpoint is a pointless strategy, so the focus should be on identity and data access policy. These are important, but some organizations simply have to go further, whether to comply with government regulations or legal requirements, or to reduce the risk of losing confidential information.
The first thing you have to decide is what balance of user freedom and corporate control will work for your organization. Privacy and security concerns are paramount, so the first decision is whether to allow corporate data to be stored and accessed by unmanaged devices, or whether you are going to lock everything down and extend the security perimeter onto devices outside the network in a very controlled way. For example, you might provide an e-mail gateway that allows access to corporate email and attachments on employee-owned devices, but you must understand this means corporate data can be easily copied and lost. Alternatively, you might use a client-hosted desktop virtualization solution with encryption and secure communication to place a sandbox on the end-user device (a PC or Mac laptop) that can be remotely wiped, and does not allow data in or out, except to connect to the corporate HQ.
Another way to enforce strong corporate control, when appropriate, is to provide employees with corporate-owned laptops, but remove the administrator rights except for preapproved operations through careful policy control. This not only provides more security (since users cannot make changes to make laptops less secure) but also reduces help desk costs. It is, however, likely to be unpopular since it takes away a lot of user freedom.
An approach I like very much is keeping corporate data in the datacenter at all times, rather than at the endpoint. Using remote display technology (which is now well advanced), it is possible to securely access applications and data from anywhere, on any device, but without communicating anything other than the user interface of the application. This technique is nothing new, but is gaining a new wave of awareness with the buzz around BYOD and desktop virtualization, in general. It requires investment in server hardware and licensing, and works only for Windows applications, but it does provide a tried-and-proven solution to the security and access problems, and enables safe use of BYOD and non-traditional devices. Another downside is that some Windows applications don't behave well in these environments, but there now are automated testing and remediation tools to help prepare these apps for all types of virtualization.
Another part of the balancing act between user freedom and corporate control is determining how much the devices are managed, especially when you extend existing desktop and network management solutions to reach mobile devices and non-Windows computers. For example, you might implement a corporate policy allowing the use of employee-owned devices, but only if they are added to an inventory of managed and protected devices with secure remote wipe capability in the event of theft or loss. Not all employees will agree to have their personal devices managed in this way, but if it's a condition of being able work more productively and is minimally invasive, it might be an acceptable compromise that protects the interests of the organization.
The final consideration here is cost. Some organizations have suggested that since the majority of their employees own smart phones anyway, corporate services should be made available in a BYOD program, and employees should no longer be provided with company phones. On the face of it, this saves hardware and support costs, and shifts the burden to the employees. However, this has to be balanced with loss of control and exposure to liability. Some lawyers have even questioned where the ownership of data lies once it has been willingly transferred outside of corporate control, and whether this violates things like supplier contracts, customer privacy notices and government regulations. A risk analysis should definitely be part of any cost analysis when introducing a BYOD program, since the hidden costs might outweigh the hardware savings.
In summary, consumerization and the increase in computing power of user-owned devices are here to stay, and your choice is how much to embrace them. I've tried to outline some of the User Workspace Management solutions that can be used to define the balance between user freedom and corporate control so that BYOD can be embraced in a controlled and productive way. With the right policy decisions and selection of management solutions, you can take your organization into the future and embrace the new user workspace.
Posted by Jon Rolls on 08/08/2012 at 12:49 PM4 comments
The impending release of Windows 8 brings a range of new benefits, opportunities and challenges for organizations of all shapes and sizes. The wave of new technology coming from Redmond in the coming months includes not just Windows 8 on the client, but also Windows RT, Windows Server 2012, Hyper-V Server 2012, App-V 5.0, Office 14, and Internet Explorer 10. All of these releases promise major advances in business efficiency and agility, with more features than ever in the out-of-the-box platform bringing the promise of reduced costs.
So, what are some of the key considerations as organizations look to exploit Windows 8?
1. Application Readiness
The promise is that applications that are compatible with Windows 7 will work unmodified on Windows 8; but, we know from experience that many apps were crow-barred onto Windows 7 with compatibility fixes and patches that will need re-evaluation on Windows 8. In addition, security model changes and deprecated parts of the Windows operating system mean that all applications should be retested. In addition, Windows Server 2012, Internet Explorer 10, App-V 5.0 and Office 14 all affect an organization's application readiness. Automated application readiness solutions are available that can deliver an accurate risk assessment of the readiness of your application estate, without the need to install and run each application.
2. Desktop Virtualization (hypervisor)
With Hyper-V 3.0, Microsoft has really taken the game to VMware, making Hyper-V even more attractive as an alternative hypervisor at considerably lower costs. While Hyper-V 2008 R2 SP1 was already a fantastic platform for desktop virtualization, the expected increased acceptance of Hyper-V 3.0 for server virtualization -- both as a free, standalone product and also in Windows Server 2012 -- leads us to expect to see even more desktop virtualization projects based on Hyper-V. For lowest cost, look for a broker and management software that do not require any extra layers of management above the hypervisor, but can interface and manage Hyper-V Server directly.
3. Desktop Virtualization (protocol)
With Remote Desktop Protocol version 8.0, Microsoft has really upped its game compared to Citrix's HDX/ICA and VMware/Teradici's PCoIP, offering dramatic performance and other user experience improvements out of the box. Expect to see the desktop virtualization conversation shift away from protocol and toward cloud-style management and automation!
4. Windows RT tablets
The latest edition of Windows, optimized for ARM tablet devices, promises to add a third way for the tablet market to be dominated by iPad and Android. As these new devices creep their way into the enterprise, users will expect to be able to use corporate apps and data on them. However, Windows RT cannot be domain-joined, so has little in the way of centralized security control. Identity and access management, where the user identity carefully controls their privileges and access, will be a must-have in this new world.
In addition, desktop virtualization is worthy of a closer look as a way to get Windows apps and desktops onto these new devices. Look for solutions with Metro UI interfaces, since third-party apps cannot be installed into the Windows 7-style UI in Windows RT. In addition, look for advanced identity and access management solutions that granularly control access and privilege based on the user's identity and policies. With reduced control over the endpoint, and an increasingly consumerized world, management of the user, rather than the device, is increasingly important and, in some situations, the only option.
5. User Environment Management
Although Windows 8 comes with new and extended technologies providing control of the user's environment within Windows, and even optionally stores some of those settings and preferences in a cloud store, there still is a need for corporate centralized control for both security and productivity. The ideal solution provides granular, central control over every aspect of the user's experience, based on a wide range of location, platform, organizational, and policy criteria. This capability remains as important as ever in Windows 8, especially with the expanded user interface and integration with file cloud storage options.
Third-party management solutions continue to be essential to delivering a productive, secure, managed environment including Windows 8, Windows RT and Windows Server 2012. Of course, Windows 8 is just part of the modern "user workspace," so, for a truly complete management solution, the organization should select a vendor that also can reach out and deliver this workspace across multiple devices and platforms, including Mac, Android, iOS, and other devices.
Posted by Jon Rolls on 06/05/2012 at 12:49 PM1 comments
Data growth is unquestionably one of the most formidable challenges IT departments are grappling with on a daily basis. For all its benefits, virtualization has added to the data growth challenge, as large amounts of redundant data often reside within virtual machine disk files. To address this growing end-user concern, Quest recently introduced NetVault SmartDisk--vRanger Edition (NVSD vRanger Edition), which provides a new deduplication option for users of vRanger 5.3. You may recall NetVault SmartDisk (NVSD) as the software-based deduplication technology Quest inherited as part of the Bakbone acquisition in early 2011.
In addition to walking users through how to add NetVault SmartDisk as a repository within vRanger, this blog will also take a closer look at how the vRanger and NetVault SmartDisk instances work together to deliver deduplicated backup and restore processes.
Adding NetVault SmartDisk as a vRanger Repository
Once the NVSD vRanger Edition server has been licensed, configured and is up and running (which requires following the basic NVSD installation procedures), it can then be added as a deduplication repository within vRanger.
To get started, within your vRanger UI, navigate to the My Repositories pane and right click anywhere in the pane. From there, select Add and then NVSD. You'll next need to populate a handful of fields within the Add NVSD Repository dialog (see Fig. 1), including:
- Repository Name -- a descriptive name for the repository
- Description -- an optional, long-form descriptor of the repository
- DNS Name or IP
- User Name / Password -- this will be based on the WebDAV credentials you initially used to install NVSD
- Target Directory -- you can select an existing NVSD repository if one exists, or enter a name for your new repository to have it created
- Port -- the default port that vRanger will use to connect to the NVSD repository is 37453.
- Timeout -- the value you enter will determine how long to wait before terminating an idle connection
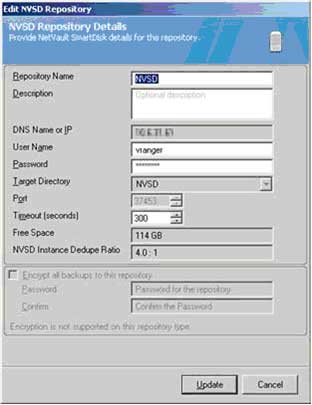 |
Figure 1. Use the Add NVSD repository dialog to provide critical details for the new repository within vRanger. (Click image to view larger version.) |
Once you've populated all of the aforementioned fields, click OK. You'll then click OK again, and the connection to the repository will be tested and added to the My Repositories pane. From there, you can view pertinent information about the NVSD repository you have just configured, including the amount of free space remaining and the repository's deduplication ratio.
The Deduplicated Backup Process
Now let's take a look at how the deduplication backup process between vRanger and NetVault Smart Disk actually functions.
After you initiate a backup job targeted to the NVSD repository, vRanger streams data on the user-defined port to the storage service (see Fig. 2) , which then stores the backup stream from vRanger in the staging store. The storage service updates the content index to indicate where the backup is stored in the staging store, and then updates vRanger to indicate that the backup stream has been successfully stored. Meanwhile, during the user-defined deduplication window, backup data is retrieved from the staging store and sent to the deduplicator, which performs byte-level, variable-block length deduplication by breaking data streams into unique chunks.
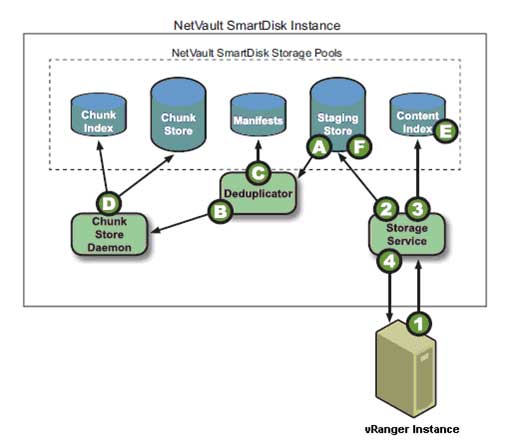 |
Figure 2. Deduplicating data in the NVSD Repository. (Click image to view larger version.) |
The Deduplicated Restore Process
After the user initiates a restore of a deduplicated backup that is stored on the NVSD repository (see Fig. 3), vRanger requests the data on the user-defined port from the storage service, which then queries the content index to determine whether the backup is stored in the staging store for non-deduplicated backups or the chunk store for deduplicated backups. The storage service then queries the backup's manifest for the first or next batch of chunk names in the backup. Ultimately, the storage service retrieves the chunks from the chunk store and streams them to vRanger. On completion of restoring all data chunks in the manifest, vRanger returns a restore completed job status.
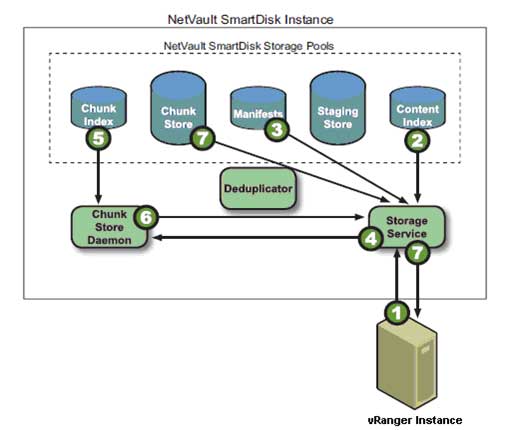 |
Figure 3. Restoring deduplicated data. (Click image to view larger version.) |
Understanding Global and Variable Block Deduplication
One other important note before I conclude: NVSD vRanger Edition enables global, variable-block deduplication. In order to get the most of your deduplication implementation, it's important to understand how global deduplication differs from job-level deduplication, and how variable-block deduplication differs from fixed-block deduplication.
Job-level deduplication acts on data being backed up by a specific job. Global deduplication acts on data from multiple instances. In other words, if you have two vRanger instances writing to the same NVSD instance, with global deduplication, the data will be treated as if it came from a single source, and thus data from all ESXi hosts involved will be deduplicated.
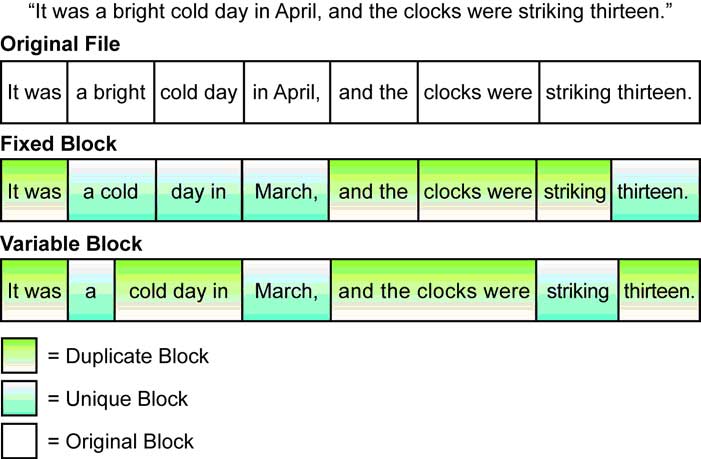 |
Figure 4. Fixed-Block vs. Variable-Block Deduplication. (Click image to view larger version.) |
Regarding fixed- versus variable-block deduplication, the key difference, as noted in figure 4 below, is in how the deduplication engine accounts for file shifts (see Fig. 4). With fixed-block deduplication, when data in a file shifts, all subsequent blocks in the file will be rewritten and are likely to be considered as unique. With variable-block deduplication, segments are anchored based on their interior data patterns, leading to more significant levels of compression.
Posted by John Maxwell on 02/08/2012 at 12:49 PM0 comments
Beginning with its 5.1 release, Quest vRanger (now at version 5.3) includes support for VMware's HotAdd disk transport functionality. HotAdd is a critical feature in that it allows you to perform LAN-free backups with vRanger installed inside a virtual machine. It also enables faster backup speeds for network backups of ESXi. This specifically is where the primary performance benefit of HotAdd is realized. In a LAN-free configuration, HotAdd yields similar result to the standard vRanger Fibre backups.
Before walking through the details of how to configure this functionality, let's quickly look at how vRanger specifically works with HotAdd.
Provided that the vRanger VM has access to the source VM's datastores, vRanger will mount the source disk directly to its own VM, allowing direct access to the data through the I/O Stack rather than through the network. This is similar to standard LAN-free backups, only in this instance, the vRanger VM is used as a proxy server rather than a physical system. Fig. 1 shows the process in action.
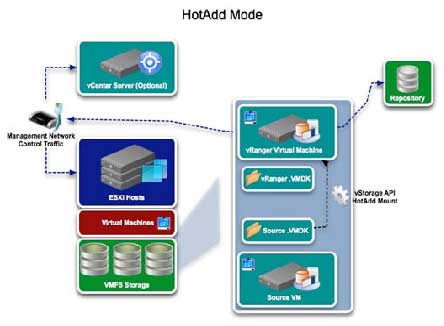 |
Figure 1. The process for configuring vRanger for HotAdd. (Click image to view larger version.) |
Configuring vRanger for HotAdd
Proper configurations are necessary to use vRanger with HotAdd, so let's walk through the configurations we recommend in order to fully leverage the benefits of HotAdd. First, vRanger must be installed in a VM, and that VM must be able to access the source VM's datastores. In addition, all hosts that the vRanger VM can be vMotioned to must be able to see the storage for all VMs that vRanger will be configured to backup.
Next, make sure to disable automount on the vRanger machine. This will prevent Windows on the vRanger VM from assigning a drive letter to the source VMDK. In ordert o disable automount, you'll need to take the following steps:
- From the start menu, select "run" and enter diskpart.
- Run the automount disable command to disable automatic drive letter assignment.
- Run the automount scrub command to clean any registry entries pertaining to previously mounted volumes.
CPU Configuration
Regarding CPU configuration, we recommend that you configure the vRanger VM with four vCPUs. This will allow one vCPU for the OS and vRanger server, and three vCPUs for backup activity. We also recommend allowing two concurrent backups per vCPU. With this configuration in place, you can run six concurrent backups without affecting performance.
Second SCSI Controller
VMware vSphere VMs support a maximum of 15 SCSI targets per controller. With vRanger using one of those target IDs, you will have 14 available SCSI IDs for HotAdd activity. If multiple source VMs are being backed up concurrently using HotAdd, all of the disks for those VMs will be added to the vRanger VM at once. With a single SCSI controller on the vRanger VM, the 14 target limit may be reached. Thus, we recommend configuring the vRanger VM with at least two SCSI controllers to accommodate multiple SCSI targets in the form of source VM disks. In order to add a second SCSI controller, you will need to add an additional disk to the vRanger VM. The second disk should have a SCSI ID of 1:0.
LAN-Free Configurations
Remember that for HotAdd to work in LAN-Free mode, the vRanger repository needs to be configured on storage zoned to the vRanger host, as well as to any host that vRanger could be vMotioned to. To perform a LAN-Free backup, you must select the Perform LAN-free backup option during the backup job configuration. When testing LAN-Free backups, it is important to ensure that the backup traffic is not flowing over the network. In order to do this, clear the Perform Network Backup on LAN-free Failure option (see Fig. 2). This will ensure that if there is a configuration problem with your SAN environment, you will be alerted by a backup failure.
 |
Figure 2. When testing LAN-Free backups, clear the Perform Network Backup on LAN-free Failure option so that backup traffic doesn't flow over the network. (Click image to view larger version.) |
After you have verified your SAN configuration and LAN-Free backups are running correctly, select the "Perform Network Backup on LAN-free Failure" option to ensure that your backups occur uninterrupted.
Posted by John Maxwell on 12/12/2011 at 12:49 PM7 comments
Deploying Internet Explorer 6 to Windows 7 desktops is an extremely hot and somewhat controversial topic in IT right now. There are a few approaches, but not all of them are in compliance with Microsoft's license agreement. This blog post will attempt to cut through some of the confusion by discussing the various methods being used to deploy IE6 to Windows 7 desktops, and perhaps more importantly, will look at which methods are in compliance Microsoft's license agreement, and which are not.
Approach 1: Application Virtualization
Some vendors have attempted to get IE6 working inside their application streaming/virtualization solution, so it can be run on Windows 7. This approach completely isolates the application from the Windows OS, so that it runs inside a virtual bubble and overcomes the challenges of getting IE6 installed on Windows 7. However, this is a clear violation of Microsoft's license agreement, as noted in Microsoft's guidelines.
Approach 2: App "Embedding"
Introduced by Browsium, this approach involves embedding the IE6 runtime into IE8 or IE9 for rendering selected URLs as centrally configured by the administrator. This is not technically virtualization, at least not without a little stretching of the definition. However, it does require you to download the IE6 components, and Browsium's product then munges them into a portable format. Whether or not this is an acceptable approach per Microsoft's guidelines is open to question, and I can only recommend that you make inquiries with your Microsoft rep before proceeding. But this is potentially a very appealing approach.
Approach 3: Local Desktop Virtualization
Another approach is to run a complete Windows XP desktop inside Windows 7. Windows 7 has XP Mode available, which gives you a virtualized Windows XP instance and the ability to publish specific applications, so as to appear to be running locally in the Windows 7 desktop. This means you get an IE6 experience, and since you're not virtualizing IE6 itself, there are no compliance issues.
Of course, XP Mode has no central management and is based on Virtual PC (a so-called type 2 hypervisor), meaning this approach requires you to have spare RAM to run two Windows desktop operating systems on top of each other. If you want central management, consider Microsoft MED-V, or a third-party solution like the Quest vWorkspace/MokaFive Suite, which also brings other management benefits, including image updates that preserve user-installed applications, as well as hardened security.
Approach 4: Hosted Desktop Virtualization (aka VDI)
In this approach, you run a complete Windows XP in a virtual machine in the datacenter, and remote display it to your Windows 7 desktop (or, indeed, any other device!). Unlike local desktop virtualization, this means you can use a more resource-constrained client device (desktop, laptop, tablet, thin client, whatever), and you also get benefits like disconnect/reconnect when moving between terminals and workstations. However, it does require that you have a network connection at all times, and is expensive in terms of hardware and licensing, which brings us to ...
Approach 5: Remote Desktop Session Host/Terminal Server
This is our recommended approach. Running Windows Server 2003 in Terminal Server mode gives you the ability to deploy IE6 remotely onto any device, including Windows 7 desktops and low-powered devices. It offers much higher density than VDI, and licensing costs are much lower. If you're interested in this approach, Quest currently has a special offer with Microsoft that dramatically reduces the cost of this solution. You can ask your Quest rep about the vWorkspace Internet Explorer 6 Compatibility Edition, and your Microsoft rep about special licensing.
Let's see approach 5 in action. Fig. 1 shows IE6 deployed by vWorkspace and integrated with the Windows 7 desktop, direct from the Start Menu.
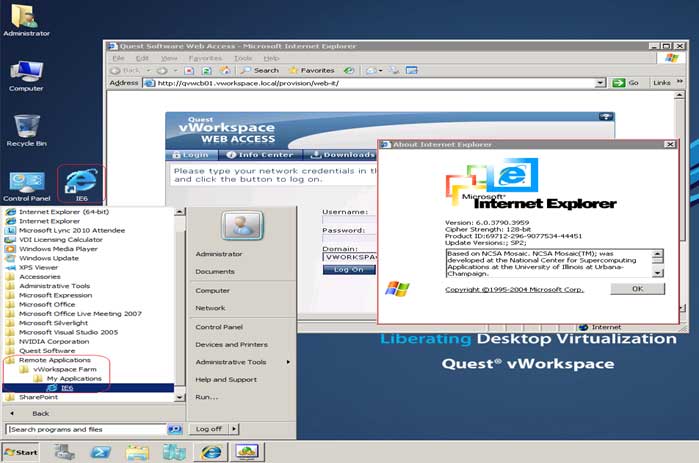 |
Figure 1. Here, IE 6 is deployed by vWorkspace and integrated with the Windows 7 desktop; it's done directly from the Start Menu. (Click image to view larger version.) |
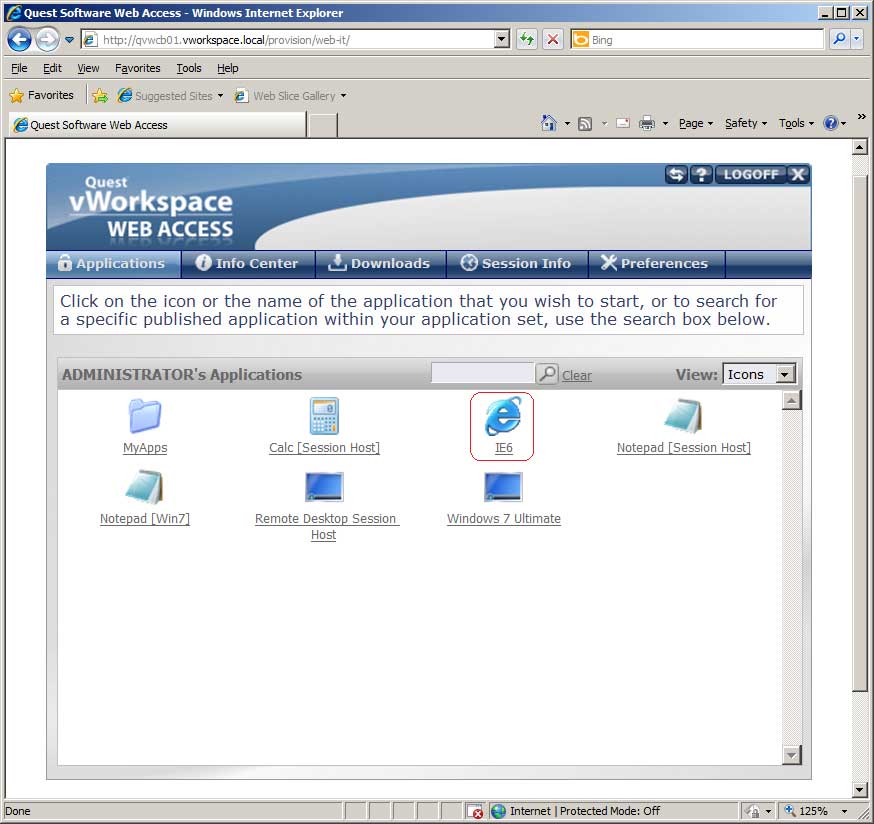 |
Figure 2. IE 6 running in IE 8 via vWorkSpace Web Access. (Click image to view larger version.) |
Fig. 2 shows IE6 available in vWorkspace Web Access, which runs in pretty much any browser (IE8 is shown here).
Posted by Jon Rolls on 12/09/2011 at 12:49 PM3 comments
In recognition of the great demand for “how-to” information, I am starting my first blog by hitting on a very hot topic: How companies can save costs by reducing storage footprints. Quest vRanger Pro 5.0 features a number of tools designed to reduce the amount of data you back up by leveraging technologies that filter out unchanged and deleted data. Exploiting vRanger's ability to minimize backup data requires enabling a few functionalities in the proper manner. This blog will take you through the steps required to fully leverage vRanger's data reduction capabilities.
Before delving into the specific details of how to enable those key functionalities, let's begin with a quick overview of the difference between VMware's Change Block Tracking (CBT) feature and vRanger's patent-pending Active Block Mapping (ABM) feature, as both are critical to exploiting vRanger's data reduction capabilities. CBT tracks changed blocks and tells vRanger directly what has changed, so only those changed blocks are backed up. It does not, however, prevent deleted or zeroed data from being backed up. This is where vRanger's ABM technology steps in to augment the process, identifying and skipping over blocks of deleted and zeroed data. Enabling ABM is critical to getting the most out of your vRanger backup.
Now, let's walk through the actual set-up process.
You'll want to begin by enabling the CBT function. As noted in the screen shot below, you can do this from the My Inventory screen by right clicking on a given VM. From there, you will have the option to Enable Change Tracking. With CBT enabled, vRanger only backs up the portion of a disk that has changed since the last backup. Note that vSphere supports CBT, and most VMs running in this environment can utilize it. The VMs must be Hardware Version 7, and have been created and hosted in ESX4 or 4i hosts. VMs that are created in ESX3.5 or below must be migrated to Hardware Version
7 for CBT to be supported.
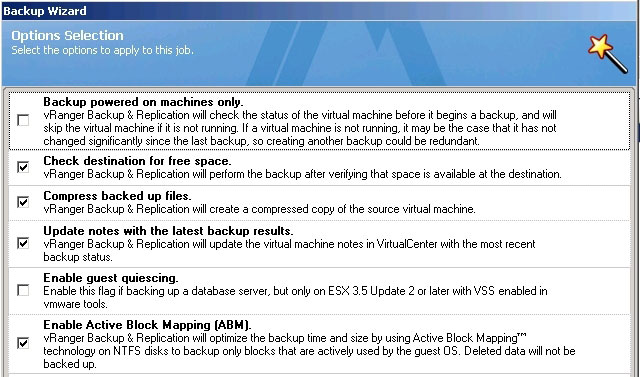 |
Figure 1. Enabling CBT. (Click image to view larger version.) |
The next step is to enable ABM functionality. This is imperative to leveraging vRanger's ability to minimize the size of your backup. To enable ABM, bring up the Options Selection menu on your vRanger backup, and check the Enable Active Block Mapping (ABM) box, as noted in the screen shot below. The process is 100 percent agentless and does not require login access to the running VM, but you must be running ESX, and your file system must be basic and of MFT type. Note that you can also enable vRanger to Compress backed up files from that same Option Selection menu, which we recommend.
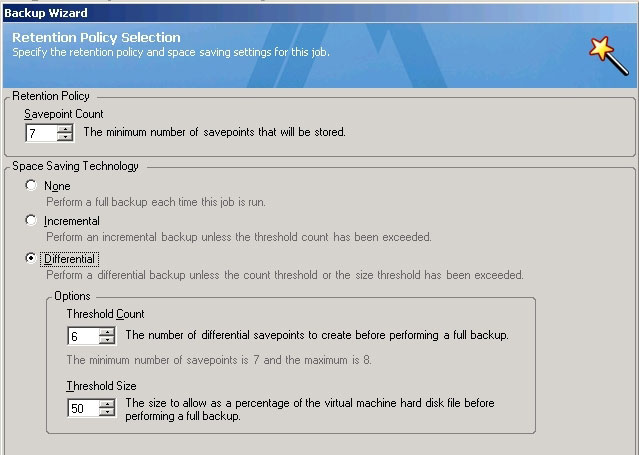 |
Figure 2. Selecting the ABM option in vRanger. (Click image to view larger version.) |
The last step on the path to maximizing space savings is to select either an incremental or differential backup. This is done through the Retention Policy feature on your Backup Wizard, as noted in the screen shot below. This functionality enables you to establish the number of “save points” you'd like to retain and define the type of backup you want to run. Selecting Incremental will save only data changed since the last backup job of any kind, whereas selecting Differential will save any data changed since your last full backup. Both are good options for shrinking both your backup windows and storage footprint.
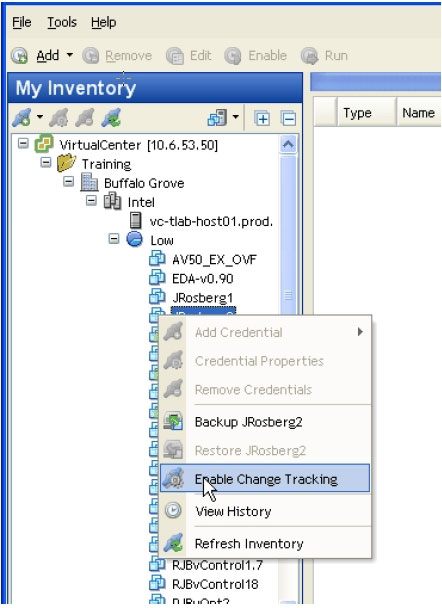 |
Figure 3. Setting your retention policy is one of the most important steps in getting the most from your vRanger backups. (Click image to view larger version.) |
By following the steps outlined above, you'll be able to fully leverage the tools vRanger provides, and reduce the amount of data you back up. Next time, we'll discuss how to use vRanger to back up and recover multiple VMs at the same time.
Posted by John Maxwell on 07/26/2011 at 12:49 PM3 comments