In-Depth
External Applications with VMware Horizon Workspace and SAML
How to leverage Security Assertion Markup Language to pass authentication information to Salesforce.
With VMware's Horizon Suite 6.0/6.1, it's awesome to be able to use Workspace as a 'dashboard' of sorts, to give access to published applications (via RDSH), full desktops and user files. Since the latest version of the Horizon Client has support for both full desktops and published applications, the use case for Workspace is in accessing other resources. One of the most impressive things that can be done with Workspace is providing single sign-on services for a business's external applications.
Any external application can be integrated with Workspace if you have the development muscle to make it happen. The integration is made possible by leveraging Security Assertion Markup Language (SAML) to pass authentication information to the external service.
There's a list of applications (called the Cloud Application Catalog) already prepared and tested by VMware for integration with Workspace. I'm going to show how one of these applications can easily be configured to allow users already authenticated to Workspace to connect without the need to log in again. In this tutorial, I'm going to use Salesforce as the external application, because it's a widely used platform, and is relevant to many organizations.
Preparation
This process can seem fairly intimidating if you don't have a development background. Rest assured that although the process is somewhat complex in the background, most of the legwork is already done by VMware and the external service. An integration with an application from the cloud application catalog can be done in 15 minutes or less, in the easier cases. There are only a few requirements to get this working:
- Administrative access to the organization's Salesforce portal
- Administrative access to Workspace
Depending on the platform, this process may or may not be entirely self-service. Some platforms like ADP do work, but require intervention from folks at the other end. In the case of Salesforce, however, it can all be done by internal IT staff.
Prepare the Workspace
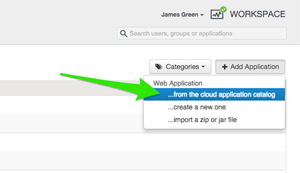
This configuration will take place in three steps: prepare the Workspace, configure Salesforce, and finally configure the Workspace. To configure the Salesforce integration with Workspace, you first need to add the Salesforce app from the cloud application catalog (as shown in Figure 1). This is done from the Workspace Administration Console.
 [Click on image for larger view.]
Figure 1. Downloading the app from the Cloud Application Catalog.
Choosing Salesforce from the list of tiles is all it takes to add the application. A universally unique identifier (UUID) is generated for this particular application. One important note is that this would allow connections to multiple Salesforce portals from within one Workspace instance. If different departments in an enterprise have their own Salesforce platform (hopefully not!), then the UUID would allow multiple integrations to co-exist.
The next step is to entitle a user or group from the Entitlements section. In my case, I'm using an AD group called 'Salesforce_users' to grant access, as seen in Figure 2. I've also got the Deployment mode set to Automatic, which will cause the application to appear in the users' dashboard without needing to be added manually. Don't forget to hit "Done" on the entitlements page after adding a user/group to make sure that the change is applied.
 [Click on image for larger view.]
Figure 2. Granting access to an external application based on its Active Directory group.
Get the SAML Certificate
The last step before configuring the Salesforce side is to grab the SAML certificate and Identity Provider (IdP) metadata. This is the way Salesforce will know that requests to authenticate are coming from Workspace, and are legitimate.
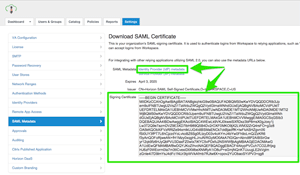
Browse to the Settings tab > SAML Metadata section. You should see a 'Signing Certificate' in the pane on the right (Figure 3). Copy this into a text editor and save it as Workspace-SAML.cer. This certificate will get uploaded on the Salesforce side shortly. Also, download the IdP metadata XML file from the same screen. This will provide a URL string needed on the Salesforce side. Go ahead and name this IdP.xml for future reference.
 [Click on image for larger view.]
Figure 3. Downloading the SAML signing certificate and IdP metadata XML file.
Configure Salesforce Single Sign-On
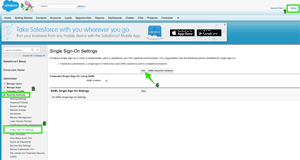
Salesforce is a behemoth of a platform, and the possibilities of what you can do with it are as varied as they are exciting. Because of its sheer breadth, navigating around the interface can be a bit daunting. The steps in
Figure 4 should help you get to the right place.
Begin by clicking the 'Setup' link in the top right corner. Under the 'Administer' section, expand the Security Controls area, and select Single Sign-On Settings. Finally, click the Edit button and check the box to set "SAML Enabled."
 [Click on image for larger view.]
Figure 4. The steps within Salesforce to enable SAML federation.
Now it's time to configure a SAML federation with Workspace. Click on the New button, and say hello to the most daunting screen of this whole process. But have no fear, it's really not as bad as it looks, and all of the required details can be found in information gathered earlier. I'll walk through each field, and show a completed screenshot at the end.
- Name. Name it whatever you want.
- API Name. This should be automatically populated based on what is entered in the Name field.
- Issuer. Grab this from IdP.xml; there's a field called 'entityID' on one of the first few lines. That goes here, and it will look something like this: https://workspace.virtadmin.local/SAAS/API/1.0/GET/metadata/idp.xml
- EntityID. Enter the same URL as the Issuer field
- Identity Provider Certificate. Upload the SAML signing certificate that was downloaded, called Workspace-SAML.cer
- Request Signature Method. Leave this alone unless you know enough to know why you want to change it.
- Assertion Decryption Certificate. Because of the configuration, this doesn't change.
- SAML Identity Type. Leave this at the default: Assertion contains User's salesforce.com username.
- SAML Identity Location. The default here will also work well: Identity is in the NameIdentifier element of the Subject statement.
- Identity Provider Login URL. This will be /POST/sso following the Workspace API URL. Mine looks like this: https://workspace.virtadmin.local/SAAS/API/1.0/POST/sso
- Identity Provider Logout URL. This is where users will be directed when signing out of Salesforce. I sent them back to the dashboard. https://workspace.virtadmin.local/SAAS/API/1.0/POST/sso
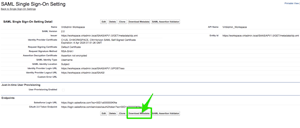
That's it. The last thing to do before heading back to Workspace is download the Metadata XML. This can be imported on the Workspace side to simplify the configuration. Figure 5 provides an example.
 [Click on image for larger view.]
Figure 5. Downloading the Metadata XML file.
Configure the Workspace
The last step is to go back to Workspace and configure the application with the endpoint created on the Salesforce Web site. This would usually entail some manual configuration, but since we downloaded the metadata XML for the endpoint from Salesforce, it's really simple.
Go to Catalog > Salesforce app > Configuration in the Administration Console. Halfway down the page, select the middle of three blue buttons, opting to Configure Via Meta-data XML. Once the view has flipped, paste in the contents of the XML file that was just downloaded from Salesforce, as shown in Figure 6.
 [Click on image for larger view.]
Figure 6. Inserting the configuration metadata XML to automatically configure Workspace.
Then click Save. Click back to the User Portal and give it a shot. You should be able to click the Salesforce application, get redirected to Salesforce and be logged in as your user without entering credentials. In this tutorial, it's assumed that the Salesforce login ID is the user's e-mail address. This is the default for Salesforce. If something different is in use, the Name ID Value field will have to be modified on the Workspace side to pass the correct login information.
Hope this has been helpful in showing that SSO configuration of an external application with Workspace isn't as painful as you might think.
About the Author
vExpert James Green has roughly a decade of experience as an IT administrator, architect and consultant in a variety of organizations. He's highly certified, and continues to purse professional certifications to increase his breadth and depth of knowledge. He has always been passionate about writing and speaking, and discussing the marriage of cutting-edge technology and business is one of his favorite activities. He works for ActualTech Media, www.actualtech.io.