How-To
How To Install Hyper-V on Windows 10 on vSphere 6.5
Here's how you can expose the CPU features needed to run Hyper-V on Windows 10 instance being virtualized on VMware vSphere 6.5.
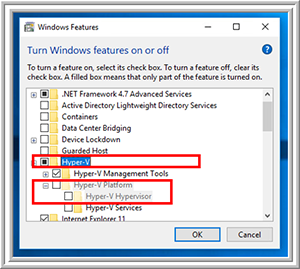
Recently, I needed to try out some of the new Microsoft Hyper-V features on the Windows 10 system. However, when I tried to enable Hyper-V on Windows 10, which was running as a virtual machine (VM) on my vSphere 6.5 environment, the Hyper-V Hypervisor feature was grayed-out (see Figure 1). Then, when I hovered the cursor over it, I received a message stating that "Hyper-V cannot be installed. The processor does not have the required virtualization capabilities." If you, like me, are running your Windows 10 instance on a hypervisor, the CPU virtualization features might be masked off in the VM, but it is in fact possible to run Hyper-V on a Windows 10 instance being virtualized on VMware vSphere 6.5 in just a few steps. In this article, I'll show you how I exposed the CPU features needed to run Hyper-V on my system.
 [Click on image for larger view.]
Figure 1. Hyper-V Hypervisor feature grayed-out.
[Click on image for larger view.]
Figure 1. Hyper-V Hypervisor feature grayed-out.
While I'm not sure that everything I did was necessary, following these steps did allow me to run Hyper-V on a Windows 10 VM being hosted on vSphere 6.5. Please note, however, that this process is not officially supported by VMware or Microsoft.
When I ran systeminfo on my Windows 10 VM, it indicated that Hyper-V wouldn't work on the system (Figure 2).
 [Click on image for larger view.]
Figure 2. Running Systeminfo on my Windows 10 virtual machine.
[Click on image for larger view.]
Figure 2. Running Systeminfo on my Windows 10 virtual machine.
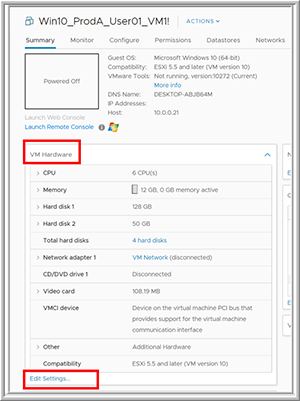
To enable the VM to allow Hyper-V to work on this VM, I first powered down the Windows 10 system, and then logged on to my vSphere client. I selected the Summary tab of the Windows 10 VM, expanded the VM Hardware tab, and expanded the CPU section; I then verified that the hardware virtualization feature was disabled (Figure 3).
 [Click on image for larger view.]
Figure 3. Verifying that Hardware virtualization is disable.
[Click on image for larger view.]
Figure 3. Verifying that Hardware virtualization is disable.
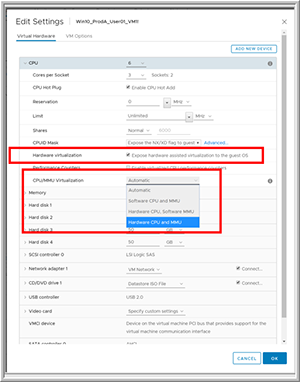
Next, I selected Edit Settings (Figure 4), expanded the CPU section, clicked the Expose hardware assisted virtualization to the guest OS function, and set CPU/MMU Virtualization to Hardware CPU and MMU (Figure 5).
 [Click on image for larger view.]
Figure 4. Editing the settings.
[Click on image for larger view.]
Figure 4. Editing the settings.
 [Click on image for larger view.]
Figure 5. Hardware CPU and MMU.
[Click on image for larger view.]
Figure 5. Hardware CPU and MMU.
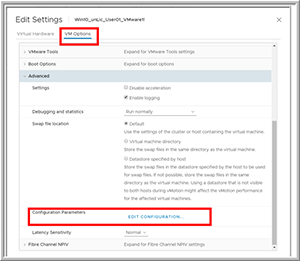
I then selected the VM Options tab, expanded the Advanced section and selected Edit Configuration (Figure 6).
 [Click on image for larger view.]
Figure 6. Edit configuration.
[Click on image for larger view.]
Figure 6. Edit configuration.
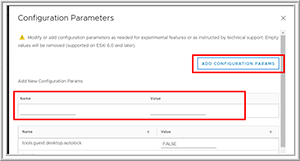
Once the Configuration Parameters box opened, I clicked Add Configuration Params and entered the following names and values and selected OK (Figure 7):
hypervisor.cpuid.v0 = "FALSE"
vhv.enable = "TRUE"
mce.enable = "TRUE"
 [Click on image for larger view.]
Figure 7. Adding configuration parameters.
[Click on image for larger view.]
Figure 7. Adding configuration parameters.
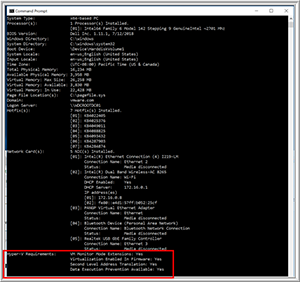
After powering the VM back on, the output of systeminfo indicated that Hyper-V would now work on the system (Figure 8), and I was then able to install the Hyper-V Hypervisor.
 [Click on image for larger view.]
Figure 8. Systeminfo indicating that Hyper-V can run.
[Click on image for larger view.]
Figure 8. Systeminfo indicating that Hyper-V can run.
Wrapping Up
As I mentioned earlier, the steps that I took to enable Hyper-V to run on a VM running on an ESXi 6.5 server aren't officially supported by VMware or Microsoft, but this solution outlined seems to work fine.
About the Author
Tom Fenton has a wealth of hands-on IT experience gained over the past 30 years in a variety of technologies, with the past 20 years focusing on virtualization and storage. He currently works as a Technical Marketing Manager for ControlUp. He previously worked at VMware in Staff and Senior level positions. He has also worked as a Senior Validation Engineer with The Taneja Group, where he headed the Validation Service Lab and was instrumental in starting up its vSphere Virtual Volumes practice. He's on X @vDoppler.