How-To
How To Install and Use the VMware Photon OS
This first article of a three-part series on Photon OS steps you through how to install and use the lightweight Linux distribution as a base OS for your Linux project.
Photon OS, a lightweight Linux distribution created and maintained by VMware, is designed specifically to run as a container host and has been optimized for cloud-native applications and cloud platforms, and has been optimized to run on VMware infrastructure and in public clouds. Many VMware components, such as vCenter Server Appliance (VCSA), use it as a base OS. It's freely available, easy to install on vSphere, and can be used as a base OS for your Linux project. In this article, I'll walk you through how I installed and used Photon OS.
This is the first article in a three-part series on Photon OS; I will later show you how I extended its capabilities and used it for some primitive testing of Apposite NetropyVE, a WAN emulator.
Installation
Photon OS has been optimized to run on VMware infrastructure and public clouds; as such, it has been stripped down and includes only the drivers necessary to run on a VMware hypervisor (ESXi, Workstation and Fusion), or on one of the supported public clouds—Amazon Web Services (AWS), Google Cloud Platform (GCP) and Microsoft Azure. In this article, I'll be installing Photon OS on an ESXi 6.5 host being managed by a 6.7 U1 VCSA. Photon OS can be installed on ESXi from either an ISO image or an Open Virtual Appliance (OVA). The OVA image only includes a minimal environment, while the ISO image lets you choose between a full install or the minimal environment. In my example here, I'll be installing Photon OS from the OVA and then adding additional packages to it as needed.
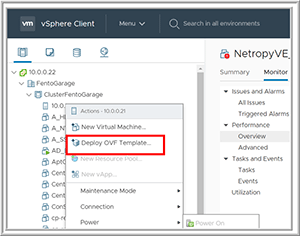
After downloading the 108MB OVA image from its GitHub repository to my laptop, I used the vSphere Web client to install the OVA by right-clicking my ESXi host and selecting Deploy OVF Template (Figure 1). Then, I selected the OVA file I downloaded (photon-custom-hw11-2.0-304b817.ova), specified a name for the virtual machine (VM) to be created, and indicated the ESXi server on which I wanted it to run, as well as the datastore on which it would reside, and the network connection that I wanted it use.
 [Click on image for larger view.]
Figure 1. Deploying Photon OS OVA.
[Click on image for larger view.]
Figure 1. Deploying Photon OS OVA.
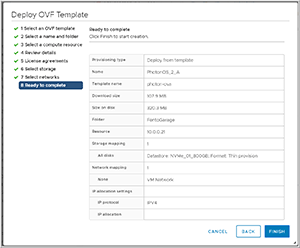
Upon looking over the VM's settings (Figure 2), I noticed that the VM's initial disk size would be 320MB, and that it would have a dynamic IP address; I was not asked if I wanted to use a static IP address when deploying the template. After reviewing my settings, I clicked Finish.
 [Click on image for larger view.]
Figure 2. Photon OS VM details.
[Click on image for larger view.]
Figure 2. Photon OS VM details.
It took eight minutes in total to create the Photon VM from the template. After starting the VM, I launched a VMware Web Console to the VM and logged in to it as root with the default password of changeme. I was then prompted to change the password—the password requirements are very strict and must be a complex string containing no common words or names. Photon OS will reject a root password that contains simplistic patterns, common words or words derived from the name of your account.
Usage
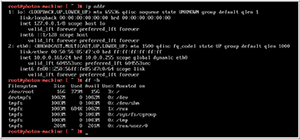
Once I was logged in as root, I checked the IP address by entering ip addr (ifconfig has been deprecated in Photon OS), and then checked the space used by entering df -h. However, when I tried to check network connectivity by using the ping command, I found that ping was not installed; this really was a minimal installation (Figure 3).
 [Click on image for larger view.]
Figure 3. The commands.
[Click on image for larger view.]
Figure 3. The commands.
Photon OS uses the tdfn package manager. I entered tdfn list to display the packages that were installed on the system, and then entered tdfn repolist to display a list of repositories being used.
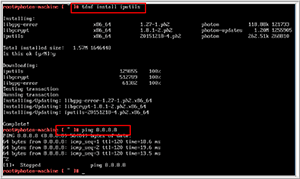
To install the package that has the ping command in it, I entered tdnf install iputils, and after doing so I could use the ping command (Figure 4).
 [Click on image for larger view.]
Figure 4. Installing the ping utility.
[Click on image for larger view.]
Figure 4. Installing the ping utility.
After ping was installed, I entered tdnf bindutils to install the Linux host, dig, nslookup and nsupdate utilities.
Wrapping Up
It took me less than 15 minutes to download and install Photon OS on my ESXi server using the OVA template. The VM that was created from the OVA template was very small (less than 400MB), and I look forward to using it in my vSphere environment. In my next articles on Photon OS, I'll show you how I added a user, enabled my system to respond to ping, and installed and used both netcat and iperf to work with Apposite's new virtual WAN emulator, NetropyVE.
About the Author
Tom Fenton has a wealth of hands-on IT experience gained over the past 30 years in a variety of technologies, with the past 20 years focusing on virtualization and storage. He currently works as a Technical Marketing Manager for ControlUp. He previously worked at VMware in Staff and Senior level positions. He has also worked as a Senior Validation Engineer with The Taneja Group, where he headed the Validation Service Lab and was instrumental in starting up its vSphere Virtual Volumes practice. He's on X @vDoppler.