How-To
How To Install and Use the VMware Photon OS, Part 3: Testing the NetropyVE WAN Emulator
The final part of this three-part series shows you not only how to disable the firewall using netcat and iperf, but how to test Apposite's new virtual WAN emulator.
This is the third and final article in a series on Photon OS. In the first article, I showed you how I was able to download and install Photon OS on my ESXi server in less than 15 minutes. I also showed you how I listed and installed packages on Photon OS by using tdfn. In my second article, I showed you how I added a second user to my Photon OS system, how I edited the firewall on Photon OS to accept ping responses and how I resolved the networking issues I had when I cloned my Photon OS system.
In this article, I'll show you how I was able to disable the firewall on Photon OS, and how I installed and used netcat and iperf. Finally, I'll show you how I limited the bandwidth between two systems by using Apposite's new virtual WAN emulator, NetropyVE.
Installing and Using Netcat Iperf
As I wanted to test the network connection, I first installed netcat (a utility for reading from and writing to network connections by using TCP or UDP) and iperf (a tool used for TCP and UDP benchmarking) by entering:
tdnf install netcat
tdnf install iperf
This installed iperf 3.1.7 and netcat 0.7.1-5.
Using Iperf To Test the WAN Emulator
Netcat can be used to test whether ports are open and send data from one system to another on a specific port. I used netcat to ensure that iptables wouldn't be blocking any of the ports that I'd be using. I allowed connections to all the ports by modifying my firewall; to do so, I entered:
iptables -P INPUT ACCEPT
iptables -P OUTPUT ACCEPT
iptables -P FORWARD ACCEPT
iptables –F
It's a very bad thing to open up all your ports like this on a public system -- and an even stupider thing to do so in a production environment -- so do not do this unless you are sure that your environment is secure.
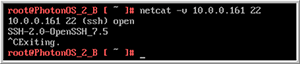
I then checked to make sure that netcat was working by verifying that the SSH port (21) was open on one of my Photon OS systems. To check this, I entered netcat -v 10.0.0.0.161 22 (10.0.0.161 is the IP address of my other Photon OS server); net cat verified that this port was open and SSH was listening in on it (Figure 1).
 [Click on image for larger view.]
Figure 1. Netcat on SSH port.
[Click on image for larger view.]
Figure 1. Netcat on SSH port.
I then used netcat to pass a file (tjf.file) from one system to another over port 2121 by entering netcat -l -p 2121 on one system to start the listener. On the other system, I entered netcat 10.0.0.111 2121 < tjf.file. Figure 2 and Figure 3 show the two systems.
 [Click on image for larger view.]
Figure 2. The sending system.
[Click on image for larger view.]
Figure 2. The sending system.
 [Click on image for larger view.]
Figure 3. The listening system.
[Click on image for larger view.]
Figure 3. The listening system.
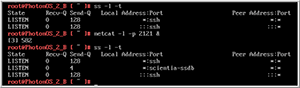
As a final test, I used the ss command (netstat has been depreciated in Photon OS) to verify that the port was in fact opened (Figure 4).
 [Click on image for larger view.]
Figure 4. Using ss to view open ports.
[Click on image for larger view.]
Figure 4. Using ss to view open ports.
Once I was satisfied that the two systems were networked correctly, I used iperf to test the speed between them. On one of the systems, I started the iperf server by entering iperf3 –s, and on the other I started the client by entering iperf3 -c 10.0.0.111 -d (10.0.0.111 is the IP address of the server system). The output from the client system (Figure 5) indicated that a bandwidth of ~8.4Gbps was seen between the two systems.
 [Click on image for larger view.]
Figure 5. Using ss to view open ports.
[Click on image for larger view.]
Figure 5. Using ss to view open ports.
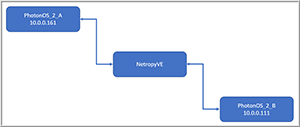
I then inserted the NetropyVE virtual machine (VM) between the two systems by connecting each of the Photon VMs on the same port groups as each of the interfaces of the NetropyVE VM (Figure 6). The NetropyVE VM acts like a network bridge.
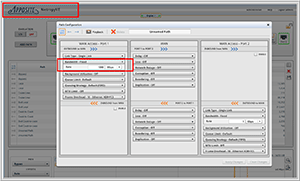
Next, I set NetropyVE to limit the transmission rate to 1000Mbps (Figure 7).
 [Click on image for larger view.]
Figure 6. The NetropyVE VM networking.
[Click on image for larger view.]
Figure 6. The NetropyVE VM networking.
 [Click on image for larger view.]
Figure 7. The NetropyVE interface.
[Click on image for larger view.]
Figure 7. The NetropyVE interface.
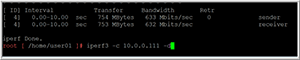
When I reran the iperf command, I observed that iperf now reported the bandwidth between the two VMs, which was 669Mbps (Figure 8).
Figure 8.
 [Click on image for larger view.]
Figure 8. Iperf limited bandwidth.
[Click on image for larger view.]
Figure 8. Iperf limited bandwidth.
 [Click on image for larger view.]
Figure 9. Iperf with 64K window size.
[Click on image for larger view.]
Figure 9. Iperf with 64K window size.
I wasn't concerned that the traffic didn't match exactly what I had specified in the NetropyVE interface as overhead and less-than-optional window sizing can affect network performance. In fact, when I changed the iperf window size to 64K, iperf reported a bandwidth of ~950Mbs (Figure 9).
Wrapping Up
VMware has done a commendable job with Photon OS: It has a small footprint, it's easy to work with and packages can be easily installed on it. In this series of articles, I walked you through using Photon OS as a basis to test NetropyVE, a WAN emulator. I had only one issue with Photon OS while doing this (IP address conflict) -- but I was able to quickly resolve that issue. Overall, I'm looking forward to adding Photon OS to my tool set and to using it for future projects.
About the Author
Tom Fenton has a wealth of hands-on IT experience gained over the past 30 years in a variety of technologies, with the past 20 years focusing on virtualization and storage. He currently works as a Technical Marketing Manager for ControlUp. He previously worked at VMware in Staff and Senior level positions. He has also worked as a Senior Validation Engineer with The Taneja Group, where he headed the Validation Service Lab and was instrumental in starting up its vSphere Virtual Volumes practice. He's on X @vDoppler.