How-To
How To Install and Use NetropyVE
The software version of the WAN emulator hardware appliance Netropy is installed as a virtual appliance on vSphere, has a GUI interface, and can inject jitter, latency, and packet loss into a network stream. Here's how to get started.
When testing virtual desktop infrastructure (VDI) clients, I try to test and observe how they behave under the range of network conditions that a VDI user could encounter. In order to achieve this in the past, I would set up a FreeBSD virtual machine (VM) to inject jitter and latency into the network stream between a VDI client and a virtual desktop. The downside to this method, I found, was that it was both time consuming to set up and it didn't behave as reliably as would be ideal for a controlled test environment.
At Dell Technologies World last year, I stumbled across Apposite's booth, which immediately caught my interest. Apposite was releasing a software version of Netropy, its well-regarded WAN emulator hardware appliance. An Apposite representative told me that NetropyVE, the software version of Netropy, has a GUI interface and can inject jitter, latency and packet loss into a network stream, and is installed as a virtual appliance on vSphere. Even more, the rep said that I could have NetropyVE up and running in less than one hour -- so of course I wanted to test this product out for myself. Following is a summary of my experience setting up and using NetropyVE.
Installing NetropyVE
I installed NetropyVE in my vSphere lab environment. The lab was running vCenter Server Appliance (VCSA) 6.7 with a single ESXi 6.5 server. The server was a Dell R610 server that had two Xeon CPU X5660s running at 2.80GHz (12 physical/24 logical processors) and 96GB of RAM. All the VMs used in this article were stored on a Micron 9100 PRO Enterprise HHL NVMe drive in order to minimize any delays due to storage.
The initial test environment that I wanted to set up would have the NetropyVE appliance sit between two Windows 10 systems (Figure 1).
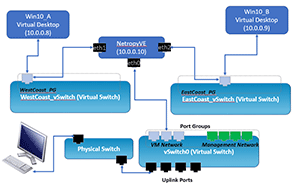 [Click on image for larger view.] Figure 1. The test configuration.
In preparation to install NetropyVE, I used my ESXi client to create two vSwitches, EastCoast_Switch and WestCoast_Switch. I created these vSwitches without any uplinks and allowed promiscuous mode, MAC address changes, and forged transmits (Figure 2).
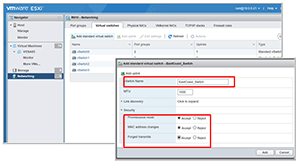 [Click on image for larger view.] Figure 2. Setting up the virtual switches.
I then added a port group to each of the vSwitches called EastCoast_PG and WestCoast_PG (Figure 3).
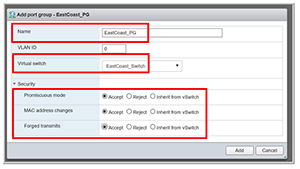 [Click on image for larger view.] Figure 3. Setting up the port groups.
Next, I downloaded NetropyVE from here. The NetropyVE installation package comes as an .ova package. I used my vSphere Client to install the product, and when I got to the deployment options, I specified the port groups that I had created earlier (Figure 4).
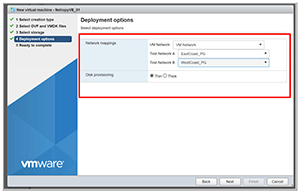 [Click on image for larger view.] Figure 4. Deploying NetropyVE.
After NetropyVE finished installing, I opened a VMware Remote Console to the VM (Figure 5) to look at the network configuration.
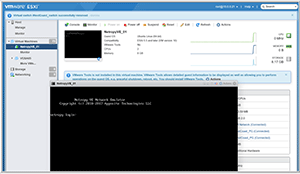 [Click on image for larger view.] Figure 5. The NetropyVE virtual machine.
After logging in to the VM's console as admin, I then issued the following commands to examine the networking, and set the IP address, net mask and gateway of the appliance:
mgmt show
mgmt show which mgmt set addr 10.0.0.10 netmask 255.255.255.0
mgmt set gw 10.0.0.60
mgmt show
I used a Chrome Web browser to connect to the NetropyVE GUI, using the IP address that I set for the appliance. I was then presented with a dialog to enter the trial license (Figure 6), which I had received earlier from Apposite. Then, after acknowledging a warning about the emulator being dependent on underlying hardware, I was able to start using the NetropyVE GUI.
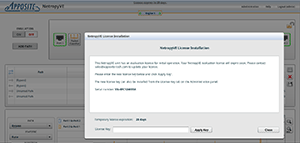 [Click on image for larger view.] Figure 6. The NetropyVE license dialog.
Using NetropyVE
For my initial testing with NetropyVE, I configured two Windows 10 VMs, Win10_A and Win10_B, for one to use WestCoast_PG and the other to use the EastCoast_PG port group. As the Windows VMs weren't attached to the external network, I used the vSphere Remote Console to log on to them.
When I pinged Win10_B from Win10_ A, the latency was 10ms. When I placed both Windows VMs on the same port, the latency was less than 1ms, which indicated to me that the NetropyVE appliance itself injects a small amount of latency into the system; this isn't an issue, but it is something of which you should be aware. After I put the Windows VMs back on the coast ports, I used the NetropyVE GUI to create a path called "Coast to Coast" that had an outgoing and incoming latency of 50ms (Figure 7), which is about the same latency from the East Coast to the West Coast of the United States. The latency between the two systems was then measured at 102ms.
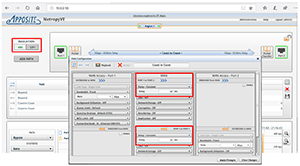 [Click on image for larger view.] Figure 7. The "Coast to Coast" path.
Wrapping Up
My first encounter with NetropyVE was positive, and although I only used NetropyVE to insert jitter and latency in the network between two VMs, NetropyVE is capable of much, much more. For instance, looking though the menus and documentation, recording is one of the features that I find most intriguing as this allows you to profile a network condition and then use NetropyVE to emulate the network condition.
NetropyVE is priced for a one-year and for a three-year license with customer support, and it supports up to a 1Gbs connection.
About the Author
Tom Fenton has a wealth of hands-on IT experience gained over the past 30 years in a variety of technologies, with the past 20 years focusing on virtualization and storage. He currently works as a Technical Marketing Manager for ControlUp. He previously worked at VMware in Staff and Senior level positions. He has also worked as a Senior Validation Engineer with The Taneja Group, where he headed the Validation Service Lab and was instrumental in starting up its vSphere Virtual Volumes practice. He's on X @vDoppler.