How-To
How to Create OS Images in AWS with Image Builder
If you create a lot of EC2 virtual machines, then it is likely going to be worth your time to create custom operating system deployment images. These images allow you to deploy EC2 instances that are already configured with the software and configuration settings that you use in your own organization.
In the past, creating custom images has commonly involved the use of complex and sometimes expensive tools. However, Amazon's Image Builder service allows you to create custom OS images directly through the AWS GUI environment. In this series of blog posts, I will show you how this process works.
Begin the process by selecting the EC2 Image Builder option from the list of services. It's located in the Compute section. Now, click on the Create Image Pipeline button. When you do, you will be taken to the screen that is shown in Figure 1. As you can see in the figure, the first thing that you will need to do is to choose the operating system that you want to use as the basis of the image. Your choices include Windows and Amazon Linux.
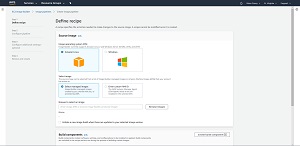 [Click on image for larger view.] Figure 1: Choose the operating system that you want to use.
Next, you will need to choose the type of imager that you want to use. You should choose the Select Managed Images option if you want to use an image that you created or that someone shared with you. You should also choose the Select Managed Images option if you want to use an image that was provided by AWS. On the other hand, you should go with the Enter Custom AMI ID option if you want to use an existing AMI and you have already installed the AWS System Manager Agent into that AMI. I am going to write the remainder of this blog post based on the selection of an image that has been provided by AWS.
So with that said, click on the Browse Images button. This will take you to a screen that displays the available Windows or Linux images (based on the options that you have already chosen). You can see what the selection screen looks like in Figure 2.
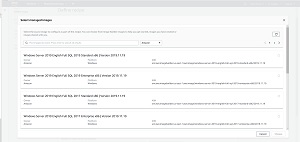 [Click on image for larger view.] Figure 2: Select the managed image that you want to use.
If you look back at Figure 1, you will notice that there is a checkbox that you can use to initiate a new image build if there are updates to your selected image version. The advantage to selecting this checkbox is that doing so will help to ensure that your image is always current. The disadvantage however, is that these automated changes can lead to an inconsistent experience when using the image.
Scroll down and you will see an option to select the build components that you want to use. Build components include image transformations such as software applications, custom settings, or configuration options. You can create your own build components by clicking on the Create Build Components button. However, Amazon provides several build components that you don't have to create yourself. To see a list of the available build components, just click on the Browse Build Components button. The list of available components varies based on whether you are creating a Windows image or a Linux image. You can see a partial list of the available Windows build components in Figure 3.
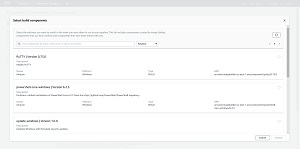 [Click on image for larger view.] Figure 3: These are a few of the Windows build components that Amazon provides.
The next thing that you will probably want to do is to select one or more tests to perform against the image that you are creating. These tests are used to validate your image. Once again, you can create your own tests, but Amazon provides a number of built-in tests that you can access by clicking on the Browse Tests button. As you can see in Figure 4, these tests include things like a simple boot test, or a reboot test. Some of the other available tests include an EBS volume usage test and a Windows activation test. Remember, you are not limited to choosing a single test type. You can run whatever combination of tests you deem to be necessary for validating your image.
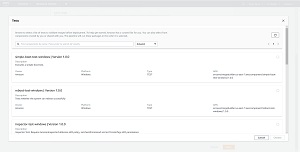 [Click on image for larger view.] Figure 4: Amazon provides a wide variety of built-in tests for validating images.
Once you have finished selecting the tests that you want to use, click Next, and you will be taken to the Configure Pipeline screen. I will be discussing the pipeline configuration process and the remaining image builder steps in Part 2 of this blog post.
About the Author
Brien Posey is a 22-time Microsoft MVP with decades of IT experience. As a freelance writer, Posey has written thousands of articles and contributed to several dozen books on a wide variety of IT topics. Prior to going freelance, Posey was a CIO for a national chain of hospitals and health care facilities. He has also served as a network administrator for some of the country's largest insurance companies and for the Department of Defense at Fort Knox. In addition to his continued work in IT, Posey has spent the last several years actively training as a commercial scientist-astronaut candidate in preparation to fly on a mission to study polar mesospheric clouds from space. You can follow his spaceflight training on his Web site.