How-To
How to Create OS Images in AWS with Image Builder, Part 2
In my previous blog post in this series, I explained that the EC2 Image Builder allows you to create a recipe for building custom EC2 images. In that blog post, we worked through the first step, which involved selecting an OS image, and various build and test components. Now that we have done that, let's move on to the second step in the process.
As you can see in
Figure 1, the next thing that you need to do is to provide a name and an optional description for the image pipeline that you are creating. It's also necessary to choose an IAM role to associate with the instance profile. Remember, the EC2 Image Builder will be creating EC2 instances, and it needs to have the appropriate permissions in order to do so.
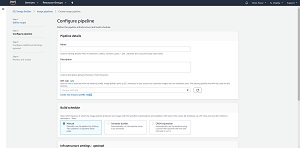 [Click on image for larger view.] Figure 1: Enter a name for the pipeline and choose the IAM role that you want to use.
The next thing that you will need to do is to select a build schedule. This schedule determines how often the pipeline produces new images. In most cases, you will probably want to set the schedule to manual.
As you scroll down the page, you will find a number of optional infrastructure settings. Even though these settings are optional, I strongly recommend taking the time to populate them, because these settings have a major impact on the usability of the images created from the pipeline. As you can see in Figure 2, the infrastructure settings control things like the instance type, the VPC and subnet selection, the security group that is used, and what happens if the instance fails. For these settings, you will need to choose values that are appropriate for your organization's needs.
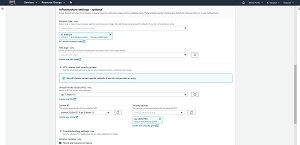 [Click on image for larger view.] Figure 2: Select infrastructure settings that match your organization's requirements.
When you finish populating the infrastructure settings, click Next and you will be taken to Step 3, which allows you to configure some additional optional settings. As you can see in Figure 3, this screen allows you to choose the license configuration that you want to associate with the image. It also allows you to specify a name for images that are generated from the pipeline, and you can also assign tags if you want. If you scroll further down the page, you will find a setting to associate the resulting images with specific regions, and there is also a setting that you can use to control the AMI launch permissions.
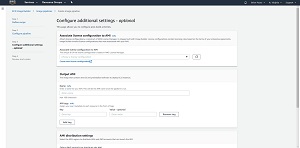 [Click on image for larger view.] Figure 3: This screen contains additional settings that can be configured for images that are generated from the pipeline.
Once you finish going through the various settings that are found on this screen, click the Review button. When you do, the console will display the Review and Create screen, which is shown in Figure 4. Take a moment and review all of the settings that are displayed on this screen. Assuming that all of the settings are correct, you can click on the Create Pipeline button to initiate the build process.
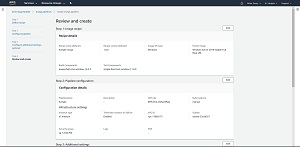 [Click on image for larger view.] Figure 4: Take a moment to review your settings.
At this point, AWS will create an image pipeline. You can see what the pipeline looks like in Figure 5.
[Click on image for larger view.] Figure 5: This is what the new image pipeline looks like.
So far we have created an image pipeline, but we haven't actually created any images. To create an image from the pipeline, select the pipeline and then choose the Run Pipeline command from the Actions menu. It takes a bit of time to create the new image, but once completed, the image will be displayed within the EC2 Image Builder's Images tab. At that point, the image is ready to use.
About the Author
Brien Posey is a 22-time Microsoft MVP with decades of IT experience. As a freelance writer, Posey has written thousands of articles and contributed to several dozen books on a wide variety of IT topics. Prior to going freelance, Posey was a CIO for a national chain of hospitals and health care facilities. He has also served as a network administrator for some of the country's largest insurance companies and for the Department of Defense at Fort Knox. In addition to his continued work in IT, Posey has spent the last several years actively training as a commercial scientist-astronaut candidate in preparation to fly on a mission to study polar mesospheric clouds from space. You can follow his spaceflight training on his Web site.