How To Set Up Microsoft Clustering on vSphere 4.1
As virtualization sets in even further within organizations and administrators are comfortable with the usual daily tasks, some have started to look at a bit more advanced tasks. Some are setting up Microsoft Clustering to provide even higher availability than what is built into the virtualization hypervisor for those important services that an organization needs.
There seems to be some confusion how to setup Microsoft clustering in a vSphere environment. I have been asked how to perform this task several times in the last three weeks, so I figured I would blog about it in case others were looking for answers and a simple straight forward step-by-step.
While there are many different types of Microsoft clustering available, I will focus on clustering multiple VMs across different vSphere hosts. For the purposes of this example, we will use Raw Device Mappings presented directly to the VMs.
What I am trying to portray here is exactly the same scenario you would face if you were clustering in the physical world. So for our example, we have provisioned 2 LUNs, one which will act as our "quorum" LUN and another which will act as our "data" LUN.
Now keep in mind, for the purposes of this exercise we will not discuss how to configure Microsoft clustering services, as you should be familiar with that or you should seek detailed documentation to get you up to speed. What we will cover is the underlying infrastructure and how to prepare the VMs to see both LUNs.
I'll break up the process into three sections. First, we'll focus on general configuration, so that we can set up the nodes in sections two and three.
So, let's first do some general configuration:
- Provision the LUNs needed for your clustering needs. In our case, we're provisioning two LUNs and we present them to the vSphere cluster so that all ESX hosts can see these LUNs.
- If you are using DRS in the your vSphere cluster, create an affinity rule that separates the VMs, which are part of the cluster. That way, they never exist on the same ESX host at the same time.
- It is important to note that you must have your VMDK in Eagerzeroedthick format when using any form of clustering. If you are deploying a new VM, you can select the check box next to "Support clustering features such as Fault Tolerance"; this will force the Hard Disk to be in Eagerzeroedthick format. If you are deploying from a template, the easiest way to zero out your disk is to browse to it in your datastore, find the VMDK in question, right-click it and click inflate. One other method which will force Eagerzeroedthick is to initiate a Storage vMotion and change the disk mode to Thick. The Thick option during a storage vMotion is Eagerzeroedthick.
Let's now configure Node 1:
- Right-click the VM and select Edit Settings.
- Click on Add and select Hard Disk.
- Select Raw Device Mappings.
- In the following window, you should see both your LUNs. (If you don't you need to rescan your HBA cards and try again. If you still can't see them, consult your storage administrator, before proceeding here.)
- Select one of the LUNs and click Next.
- This next screen prompts for a location where it can store a stub (pointer file) that points to this RDM. I recommend storing it with the VM for simplicity.
- The next window prompts for the compatibility Mode; select Physical.
- Up next is the Advanced Options window. This is important! You need to select a new SCSI controller and to do that, click on the drop-down menu and choose a different SCSI controller. This automatically creates a new SCSI controller and associates the new LUN to it (see Fig. 1).
- Click Next and Click Finish.
- At this point you should be back at the Edit Settings window. Select the newly added SCSI controller, which should be labeled SCSI Controller 1 and set the SCSI Bus Sharing to Physical (see Fig. 2).
- Repeat these steps to add the second LUN.
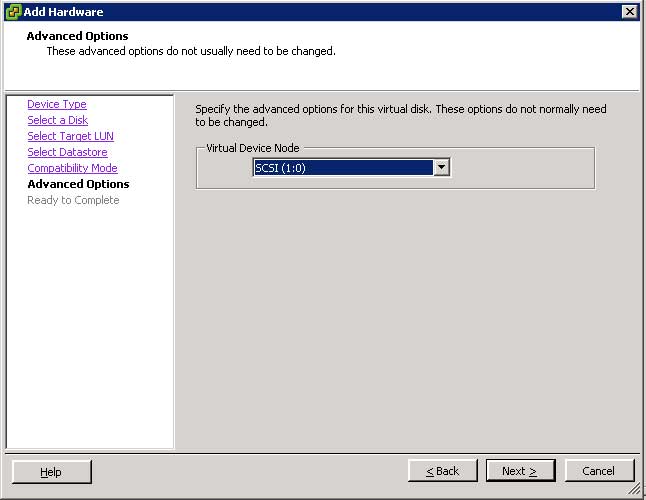 |
Figure 1. Selecting a new SCSI controller. (Click image to view larger version.) |
 |
Figure 2. On SCSI Controller 1, set SCSI Bus Sharing to Physical. (Click image to view larger version.) |
When you complete all these steps, you should end up with three SCSI Controllers: 0, 1 and 2. Only SCSI Controllers 1 and 2 should be set to SCSI Bus Sharing Physical. SCSI Controller 0, which typically is associated with the Hard Disk that has the OS, should not be modified.
Node 2 is not difficult to configure but is detail-oriented, so follow these steps closely:
- Right-click the VM and select Edit Settings.
- Click Add and select Hard Disk.
- Select Use an existing virtual disk.
- Browse to the location where the LUNs were added on Node 1. If you don't know where the LUNs were added on Node 1, right-click that VM, click Edit Settings and click Select Hard Disk 2. On the right side you will see the location where it is stored. This will give you enough information to find the datastore and locate the VMDK.
- The next screen should be the Advanced options screen again. IT IS CRITICALLY IMPORTANT that you make sure to associate the Hard Disk with the same SCSI Controller on Node 1. So, if you used SCSI Controller 1:0 for the quorum LUN on Node 1, make sure you are using the same SCSI Controller in these steps as well.
- Once finished, you should be at the VM Edit Settings window. Select the newly added SCSI Controller and set its Bus Sharing to Physical.
- Repeat the steps to add the second hard disk.
At the successful completion of these steps, both your quorum LUN and your data LUN should be visible by both nodes of the cluster and ready for further configuration.
Now, it is worth noting here that vSphere does provide an easier way of deploying clustering, known as Fault Tolerance. FT, for those of you that are not familiar, protects a VM by creating a secondary VM in its shadow and configures the second VM in lockstep with the first. This means that every task executed on VM1 will immediately be executed on VM2. In the event of a failure, VM2 will assume the identity and role of VM1 without any loss in service. FT, however, is a first generation technology and has several limitations. In any case, it's technology that is very much worth following especially since we are on the heels of vSphere 5--it's bound to have improvements to FT.
Posted by Elias Khnaser on 05/03/2011 at 12:49 PM