How To: Use VMXNET3 with Citrix Provisioning Services 6.1
At Citrix Synergy this past May, I presented a session on best practices for using XenDesktop on vSphere. Later on, I also recorded a webinar on the topic. In one of my recommendations, I stress the importance of using the VMXNET3 adapter when using Provisioning Services server and target devices. As a matter of fact, I take that further by proclaiming that there should be no reason at all that your virtual machines are not running on the VMXNET3 adapter -- whether they are Citrix related or not, it should be the default.
Many of you took my recommendations and used the configuration I specified, only to be welcomed by the infamous Windows BSOD when trying to stream the vDisk to a target device. Naturally, I was going to bear the brunt of your fury (j/k) and get bombarded with e-mails, to which I responded with a solution. When the number of e-mails got higher, I figured it was time to blog the solution. So, if you are using my recommended configuration and you are experiencing symptoms, here is your fix.
The cause of this problem is the fact that as you are creating your VMs using the different wizards that PVS or XenDesktop provides, and the virtual Ethernet PCI slot for the network interface card is in a different slot number than the original master image VM (which is the VM you used to create the vDisk).
To resolve the issue, compare the virtual Ethernet PCI slot number of the original master image VM with the VM you intend on using as your template, then set the values to match. To do that, follow these steps:
- Edit the properties of the original master VM and click on the Options tab.
- Click on General and then click on Configuration Parameters.
- Locate Ethernet##.pci… (see Fig. 1) and note its value.
- Exit out of all the windows you are currently in without making any changes.
- Edit the properties of the VM you intend on using as a template and follow the same steps above.
- At the Ethernet##.pci value, you will notice a different value. Double-click in that line and edit the value to match the master image VM, then click OK and find your way out of all the screens.
- Stream your target devices and you should not have any issues.
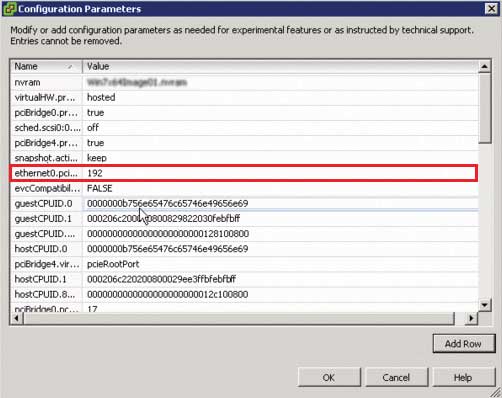 |
Figure 1. Find the Ethernet PCI slot value and then exit out of the screens without commiting any changes. (Click image to view larger version.) |
I have seen this happen with both PVS 6.0 and 6.1 running on both VMware vSphere 4.1 and vSphere 5. Hopefully you found this article before you deployed a large number of VMs, so you don't have to go through and change a lot of values or delete the VMs and recreate them.
Posted by Elias Khnaser on 08/08/2012 at 12:49 PM