How To Enable Shared ISOs in Hyper-V
I'm wrapping up my TrainSignal course (shameless plug) on Microsoft Exam 70-247: Configuring and Deploying a Microsoft Private Cloud with System Center 2012 and I've come across a few tips that I thought would be useful. Let's start off with a useful how-to around ISOs.
When you create a VM, the default behavior of an ISO attached as a virtual CD/DVD is to copy that ISO into the VM's directory. This is Microsoft's way of avoiding Live Migration failures when you try to move a VM with an attached virtual CD/DVD from host to host. As you should be aware, in both Hyper-V and ESX/ESXi an attached ISO would prevent a vMotion or a Live Migration.
Personally, I prefer that the VM fail the migration -- it would then force me to change my configuration rather than implement this overly over-thought and very space-inefficient method. Luckily, Microsoft has provided a work-around that is much better: Why copy the ISO image? Instead, share the ISO image from the VMM library, end of story. Of course, I wish it was that simple. The checkbox in Fig. 1 enables the sharing of the ISO image (as opposed to copying it), but you still have to perform some added steps in the background to make it work:
- Grant the VMM Service Account Read access on the share that is hosting the ISO image in the library.
- Grant each one of your Hyper-V hosts Machine Account read access to the shared location of the ISO.
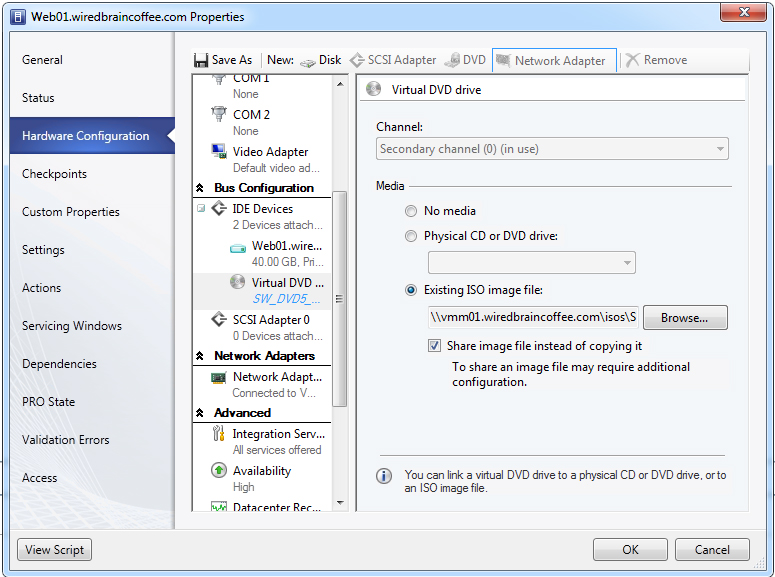 |
Figure 1. In Hyper-V, enable sharing of the ISO and then perform the extra steps. (Click image to view larger version.) |
Once you complete the two steps, you have to configure constrained delegation. You can do this from any computer that has the Active Directory Users and Computers console or from a Domain Controller.
Constrained delegation basically instructs every Hyper-V host's machine account to present delegated credentials for the CIFS/SMB protocol to the VMM server where the library hosting the ISO file resides. You will have to perform these steps on each Hyper-V host's machine account in AD separately:
- Open Active Directory Users and Computers.
- Locate the Hyper-V host machine account, right-click and go to Properties.
- Select the Delegation tab and click Select this computer for delegation to specified services only.
- Click Use any authentication protocol.
- Click Add.
- Add the VMM Library servers that contain the ISO you want to share and click OK.
- In the Available Services list, click cifs (see Fig. 2) and click Add.
 |
Figure 2. In the Available Services list, click cifs and click Add. (Click image to view larger version.) |
This should now allow you to share the ISO image each time you attach it. This will also allow you to have successful Live Migrations while a CD/DVD virtual drive is attached.
Posted by Elias Khnaser on 01/09/2013 at 2:57 PM