How To Guy
How to Configure EVO:RAIL Out of the Box
Is it easy to set up VMware's hyper-convergence appliance? James Brown finds out.
I had the opportunity to visit the EVO:RAIL booth at VMworld 2014; while there, I received a one-on-one overview of the hyper-converged EVO:RAIL platform, which automates the building of a vSphere infrastructure with customized variables. What I learned was that the goal of EVO:RAIL is provide simplicity to a software-defined datacenter (SDDC), remote offices, branch offices, virtual private clouds and virtual desktop infrastructures. EVO:RAIL also allows businesses to employ more generalists to operate and maintain datacenters with a better ROI, lower CAPEX, OPEX and a very flexible and scalable infrastructure.
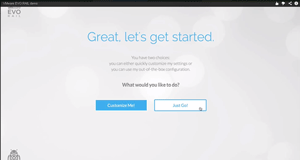
Let's take a look at the initial configuration. From there, you can explore the product in more detail at your leisure. After accepting the EULA, you'll be presented with "Customize Me!" or "Just Go!" configuration options (see Figure 1).
 [Click on image for larger view.]
Figure 1. The EVO:RAIL customization screen.
[Click on image for larger view.]
Figure 1. The EVO:RAIL customization screen.
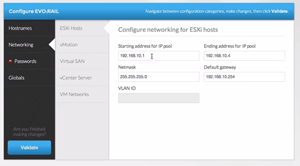
The Just Go! option is recommended, since it requires minimal configuration inputs. The Customize Me! option allows for configuration of the following parameters, as shown in Figure 2:
- Hostnames for vCenter Server and ESXi hosts naming scheme
- Networking (IP ranges and/or VLAN ID): ESXi, Virtual SAN, vSphere vMotion, vCenter Server, VM Networks
- Passwords: ESXi hosts and vCenter Server; optional Active Directory authentication
- Globals: Time zone; your existing NTP, DNS, and Proxy servers; logging: vCenter Log Insight or third-party syslog server
 [Click on image for larger view.]
Figure 2. Configuration parameters for EVO:RAIL.
[Click on image for larger view.]
Figure 2. Configuration parameters for EVO:RAIL.
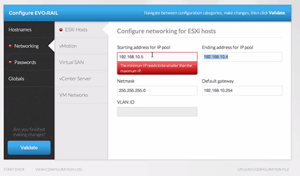
There are four IP addresses per EVO:RAIL appliance, because it has four ESXi hosts per appliance. There are no Save buttons, since everything is created and saved in real time. When your configuration doesn't look correct, the appliance warns you and offers suggestions for correcting the problem, as
Figure 3 shows.
 [Click on image for larger view.]
Figure 3. A warning about a potential configuration error.
[Click on image for larger view.]
Figure 3. A warning about a potential configuration error.
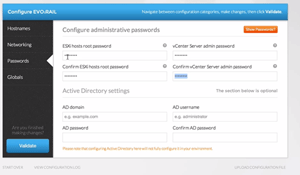
You can have as many VM networks as you want. The only required passwords are for the ESXi root and vCenter admin accounts (see
Figure 4). EVO:RAIL doesn't store these passwords.
 [Click on image for larger view.]
Figure 4. Setting the EVO:RAIL passwords.
[Click on image for larger view.]
Figure 4. Setting the EVO:RAIL passwords.
The Global section includes all the remaining settings such as NTP, HTTP Proxy and Logging. The logging feature allows you to choose which type of logging, and add in an IP address. The Logging hostname has been provided for you. EVO:RAIL will configure the logging for you to include licensing.
 [Click on image for larger view.]
Figure 5. The validated configuration for the appliance.
[Click on image for larger view.]
Figure 5. The validated configuration for the appliance.
The appliance also provides a feature that allows you to upload a configuration file if you don't want to go through the step-by-step process of supplying IPs and passwords.
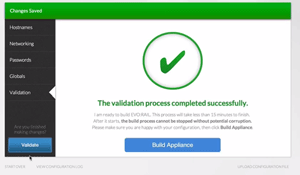
Once you validate your configuration (Figure 5), it's ready to be built within your infrastructure.
 [Click on image for larger view.]
Figure 6. Tracking the progress of EVO:RAIL's build.
[Click on image for larger view.]
Figure 6. Tracking the progress of EVO:RAIL's build.
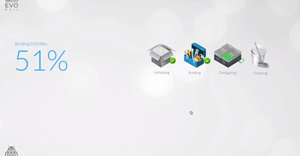
During the build process, EVO:RAIL takes the configuration inputs and automates the appliance's build. The user interface, seen in
Figure 6, tracks the progress. The ESXi hosts and vCenter server are being built without having to connect to a console and build them as per conventional methods.
 [Click on image for larger view.]
Figure 7. The fully-configured appliance.
[Click on image for larger view.]
Figure 7. The fully-configured appliance.
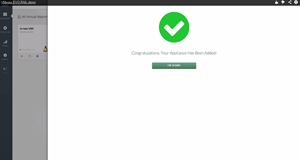
As
Figure 7 shows, EVO:RAIL is now fully configured, so you can now configure your own virtual machines (VMs). VMware provides a lot more information about configuring VMs, accessing EVO:RAIL content, and
resources here.
About the Author
James Brown, vExpert, VCP, MCSE, is a senior virtualization engineer and CEO of Virtuxperts and VMware Users Group Leader in Las Vegas, NV. James' area of expertise includes virtualization, infrastructure and Windows systems.