Sean's Virtual Desktop
How to Configure Virtual Desktop and Horizon View Pools for NVIDIA GRID vGPU
A new vSphere feature lets multiple virtual machines share a PCI card.
More In This Series
Installing the NVIDIA GRID vGPU software on an ESXi host, which I covered in my last post, is just the first step in enabling vGPU 3D acceleration for Horizon View desktops. The next steps are to configure both the desktops and the desktop pool to utilize the GRID card for 3D acceleration.
vGPU utilizes a new feature in vSphere 6.0 called a Shared PCI Device. This allows multiple virtual machines (VMs) to share a PCI device, and it's only available for VMs that have been upgraded to hardware version 11/ESXi 6.0.
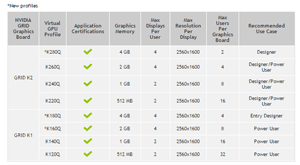
vGPU also utilizes profiles to control each VM's access to the resources on the video card; they determine the amount of video RAM, number of monitors, and max resolution for each VM. Figure 1, from NVIDIA, outlines the different profiles and number of VMs that each profile can support per card.
 [Click on image for larger view.]
Figure 1. The capabilities of each NVIDIA graphics board. Courtesy NVIDIA.
[Click on image for larger view.]
Figure 1. The capabilities of each NVIDIA graphics board. Courtesy NVIDIA.
GRID cards contain multiple GPUs, so it's possible to have multiple profiles. For instance, a GRID K2 card has two GPUs, so I can have one VM using the K280Q profile and four VMs using the K240Q profile. This allows you to tailor your GPU use to your use case, without having to dedicate an entire GRID card to one profile.
GRID vGPU is only supported on Windows VMs, and the Windows drivers are included with the vGPU software download from the NVIDIA Web site.
Configuring A Virtual Desktop for GRID vGPU
Here are the steps for configuring a VM template, or gold image, for a vGPU:
- Create a new VM, or clone an existing template where the vGPU will be utilized.
- vMotion the VM to the host that has the GRID vGPU configured.
- Upgrade to hardware version 11.
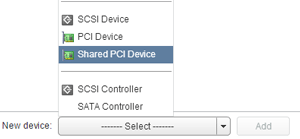
- Add a shared PCI device (Figure 2).
 [Click on image for larger view.]
Figure 2. Adding a shared PCI Device to the template.
[Click on image for larger view.]
Figure 2. Adding a shared PCI Device to the template.
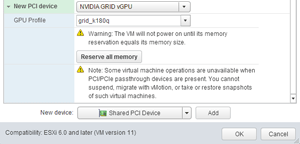
- Select NVIDIA GRID vGPU from the drop-down.
- Select one of the available profiles (Figure 3).
 [Click on image for larger view.]
Figure 3. Choosing a profile for the vGPU.
[Click on image for larger view.]
Figure 3. Choosing a profile for the vGPU.
- Click "Reserve all memory."
- Power on the VM.
- Log in and install the NVIDIA driver.
- Reboot the machine.
- Shut down and create a snapshot (for linked clones) or convert it to a template (for full clones).
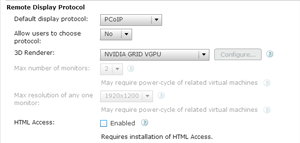
- Configure Horizon View Pool:
- Set default display protocol to PCoIP
- Set Allow users to select protocol to No
- Set 3D Renderer to NVIDIA GRID vGPU (Figure 4)
 [Click on image for larger view.]
Figure 4. Picking the protocol and 3D renderer.
[Click on image for larger view.]
Figure 4. Picking the protocol and 3D renderer.
About the Author
Sean Massey is a systems administrator from Appleton, Wisc. He blogs about VDI, Windows PowerShell, and automation at http://seanmassey.net, and is active on Twitter as @seanpmassey.