In-Depth
Real-Life Azure, Part 2: Branch Office Setup
Click here for Part 1
In Part 1 of this series, I introduced Just Another Big Business (JABB) Systems International, a fictitious company, and their journey toward a hybrid cloud using Microsoft Azure.
JABB has now divided up administrative access and set up a central subscription to Azure, created a virtual network and linked this to their on-premises datacenter, and set up storage for VMs. With all that in place they're now ready to start populating their "branch office in the cloud," which we'll cover in this part.
Note that I don't provide detailed step-by-step instructions for the procedures here; because Azure changes on a constant basis, it's better to link to the documentation for the most up-to-date information.
Understanding Azure IaaSOnce storage, networking and WAN connectivity is set, the next step is authentication and name resolution. JABB decides that because they'll be migrating LOB applications to their virtual network, an Active Directory Domain Controller (DC) and DNS server will be needed in Azure.
Before creating VMs, there are a couple of unique Azure concepts that need to be understood.
Let's start with IP addressing, which can be a bit confusing if you aren't used to it. Once you've set up the virtual network, any new VMs you create will be assigned the next available IP address as a DHCP lease with an "unlimited" lifetime.
As long as the VM's running or restarted, or if you shut it down from within the OS, it'll keep that IP address. But if you shut down the VM from the Azure console, the state becomes Stopped (deallocated) -- and it might be assigned a different IP address when it's started again. (Note that if you just shut it down from within the OS, it'll be in a Stopped state and you'll still be charged per minute for the VM.) Luckily, it's easy to set up a fixed IP address for the VM. You can do this either when the VM is created or by updating an already existing VM.
Another concept is Availability sets. Azure does not use Live Migration; this means if you house a business-critical service in a single VM in Azure IaaS, it will be restarted regularly (about every two to three months, in my experience) as the underlying fabric is updated. This will cause an outage. If you only have a single VM for a service, it won't be covered by the Azure SLA. If, however, you put two (or more) VMs into an Availability set, Azure will be aware of this during updates and keep these VMs on separate hosts (and racks); the result is that only one will be shut down during the update process.
A third concept is Cloud Services. In some ways, this is a leftover from the time when Azure was a PaaS-only offering. For VMs, it's just a container name, and you can put one or more VMs into a Cloud Service.
Finally, there's the VM agent. This is an optional installation for new, or existing, VMs; it allows you to manage IaaS VMs more easily. The VM agent allows you to inject Anti-Virus (Microsoft's is free, but Symantec and Trend Micro are also offered); there's also Puppet, Chef or a custom script that will let you manage the VM using those DevOps tools.
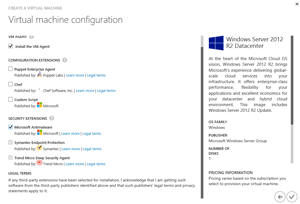 [Click on image for larger view.]
Figure 1. The options for anti-malware and management when the VM agent is installed in an Azure VM.
Picking a Size
[Click on image for larger view.]
Figure 1. The options for anti-malware and management when the VM agent is installed in an Azure VM.
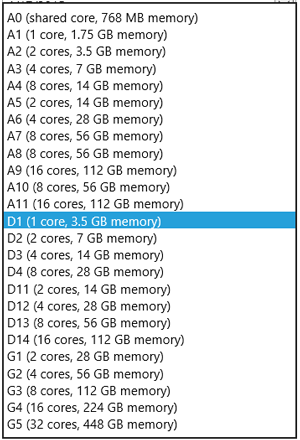
Picking a SizeAn interesting difference between on-premises virtualization and Azure (or any public cloud) is that you only get to pick from the types and sizes of VMs "on the menu" (
Figure 2). When you create a VM on-premises and you're determining how many virtual CPUs and how much memory to give it, you probably err on the side of caution; after all, reserving more resources than needed doesn't really cost you, at least not visibly. In Azure you can pick from a wide range of VMs, but they all have a cost per minute, which will be a waste if you pick one that's too big.
 [Click on image for larger view.]
Figure 2. The A, D and G series VMs available in Azure today.
[Click on image for larger view.]
Figure 2. The A, D and G series VMs available in Azure today.
There are two tiers: basic and standard. The former is suitable for development and testing, as it doesn't support scaling out or high availability; in addition, each disk attached to it will supply only 300 IOPS. The standard tier, on the other hand, can scale out and supports high availability; and with 500 IOPS per disk guaranteed, it's the tier of choice for production workloads.
The standard tier offers four levels of VMs, which they call "series":
- The A series will be the default for most
- The D series stores the temporary disk on SSD and comes with faster processors
- The DS series can use Premium Storage
- The G series offers the biggest sizes (up to 32 cores and 448 GB of memory).
For infrastructure VMs I would recommend A series unless you find them too slow, in which case the D series might be of interest. The higher-performing series are for application servers or computationally demanding workloads. Recently, the ability to have multiple virtual NICs in a VM was added. This is related to the number of cores: 2 cores gives you one NIC, 4 cores gives you two NICs and 8 cores supplies up to four NICs. Additional NICs have to be added when you create the VM.
If a VM needs high IOPS supplied from its disks, you can simply attach more data disks to it and then use Storage Spaces with a simple Storage Layout (striping) inside the VM to aggregate the IOPS from multiple disks in one volume. Remember that data redundancy is provided by the underlying Azure fabric (at least three copies of your data), so striping is done for performance only.
While it's possible to use PowerShell to create VMs in Azure, I've found that unless you have many of them to create, it's generally easier to use the console.
Setting Up a Domain Controller
There are some considerations for setting up a VM in Azure that's going to run as a DC; you'll want to assign a fixed IP address that'll survive a full shutdown, create a separate data disk to house the AD database and designate the new server as the DNS server for the virtual network.
Every Windows IaaS VM in Azure is assigned two disks at creation: a C: drive for the OS and a D: drive for temporary storage. It's vital to set up another separate data disk for the AD database and log files.
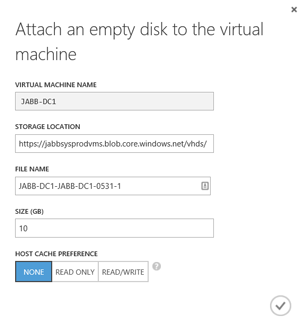 [Click on image for larger view.]
Figure 3. Attaching data disks to Azure VMs. For the AD database, make sure to select "None" for the host caching.
[Click on image for larger view.]
Figure 3. Attaching data disks to Azure VMs. For the AD database, make sure to select "None" for the host caching.
At a high level, here are the steps JABB would use to configure a DC that's part of its on-premises forest:
- Define a site in AD on-premises with a suitable name (i.e. JABB Azure US East) and a subnet in AD that matches the virtual network created in Part 1 (172.16.28.0/18).
- Create a new VM with a suitable OS. Windows Server 2012 R2 will work for JABB; check with your AD administrators for your environment. You can create a new Cloud Service for the VM, but store it in the existing storage account from Part 1. Then create a new availability set and install the VM agent.
- Attach a data disk through Azure (Figure 3), and then create a volume on this disk in Disk Manager (Figure 4).
- Install the AD DS role with DNS, making sure to select the Global Catalog role as well, and configure the databases to be housed on the new data drive.
- Reconfigure the virtual network in Azure to use your new DC as a DNS server -- not the Azure supplied DNS, as it doesn't support AD SRV records.
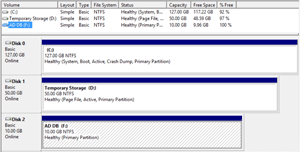 [Click on image for larger view.]
Figure 4. Once the data disk is added to a VM, simply use Disk Manager in the VM to create and format a volume.
[Click on image for larger view.]
Figure 4. Once the data disk is added to a VM, simply use Disk Manager in the VM to create and format a volume.
For detailed instructions; see this article. More technical background on DCs in Azure can be found here, and this blog post details the process of networking and setting up the DC. There's no need to consider Read Only Domain Controllers (RODC), as their main use case is in scenarios with weak physical security, something that's certainly not the case with Azure's datacenters. As JABB's needs grow they may consider adding another DC; this would be put into the same availability set, to make sure only one of them is restarted at the same time by Azure fabric patching.
JABB also needs to document in its operating procedures that the DC should never be shut down and deallocated, because this will trigger a new VM generation ID (a function of the underlying hypervisor). This will cause the DC to perform a non-authoritative restore upon reboot, which may take quite some time, depending on the bandwidth to the datacenter.
Note that in Part 1 we covered how JABB will use Azure Active Directory (AAD) and synchronize it with their on-premises AD. That's for managing user accounts and access to cloud resources in an easy and secure way. They still need a DC/DNS server in their virtual network, however, to manage server authentication and name resolution for workload VMs.
Migrating LOB Systems
For their proof of concept stage, JABB has selected two different LOB applications to migrate to Azure. The first one is a file sharing system, in which staff upload data files gathered from site visits. It has a simple Web interface with backend file storage. The server is running as a Hyper-V VM today, connected to a backend NAS. JABB will
upload the VM to Azure, with minimal re-configuration necessary.
For the file storage, they can either configure a VM as a file server with attached data disks, or use Azure Files. The latter is a service provided by Azure (without having a dedicated VM), which provides SMB 2.1 file sharing. It's currently in preview (Azurespeak for beta), but it's very stable. Read more here.
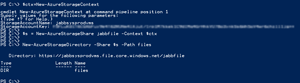 [Click on image for larger view.]
Figure 5. Adding Azure Files and a shared folder using PowerShell.
[Click on image for larger view.]
Figure 5. Adding Azure Files and a shared folder using PowerShell.
Azure Files is an example of one of those times when the GUI isn't enough and your PowerShell skills will be tested. Using PowerShell with Azure is relatively easy -- read about how to download, install and connect here. At a high level, these are the steps involved:
- Enable Azure Files Preview.
- Use PowerShell to create a new file share and add a directory to it (Figure 5).
- Add the credentials for the file share to a VM using cmdkey (so you don't need to put them in every time you restart the VM), as shown in Figure 6.
- Mount the file share using a drive letter.
The second LOB application is an internal expense logging application used by staff all over the world. It's currently running on a single, aging, physical server in the datacenter. This one will be migrated to Azure RemoteApp.
 [Click on image for larger view.]
Figure 6. Use cmdkey to add credentials for your Azure Files share, then map the share to a drive letter using NET USE.
[Click on image for larger view.]
Figure 6. Use cmdkey to add credentials for your Azure Files share, then map the share to a drive letter using NET USE.
RemoteApp hosts one or more Remote Desktop Services (RDS) VMs in Azure, to which clients then connect from anywhere using the free client for Android, iOS/Mac or Windows. Note that RemoteApp is a direct equivalent to the feature with the same name in Windows Server -- users don't see a full desktop when they connect; rather, just the particular application that's been shared.
RemoteApp comes in two flavors: one managed by Microsoft that provides Office 2013 applications, in which you control (including patching) what's installed on the VM. There's also a hybrid deployment option where user data and resources in your on-premises network can be accessed through RemoteApp.
JABB will need to create a Windows Server 2012 R2 VM configured with the LOB application, which has the following characteristics: A generation 1 VM with a dynamic (fixed works, but takes longer to upload) VHD (not VHDX) that's 127 GB or smaller, with RD Session Host (RDSH) and Desktop Experience. Detailed steps here.
Once the template image is in Azure, you need to select which applications to publish and which users should have access. Authorization is controlled through Azure Active Directory (AAD) or Federation Services; in JABB's case they'll look to take the initial directory synchronization they set up in Part 1 for administrator access to Azure one step further, to easily define which users should be able to use the LOB application.
The ability to house your RemoteApp server in your normal virtual network instead of in a separate virtual network recently became available, which makes sense for JABB.
BackupUntil recently, JABB's choices for backing up and protecting their production VMs in Azure was somewhat limited. Data Protection Manager, or DPM, (which JABB uses) is supported on Azure VMs, and you could certainly use that for backing up VMs. There are also, of course, other third-party products, but they all require significant upfront setup.
In March, however, Microsoft released a built-in feature for backing up VMs using Azure Backup. JABB needs to create a backup vault using the console, which is then used as a target for Azure VM backups, and can also be used as a target for backups from on-premises Windows Server or DPM.
 [Click on image for larger view.]
Figure 7. Before a VM can be backed up in Azure, it first needs to be discovered and registered.
[Click on image for larger view.]
Figure 7. Before a VM can be backed up in Azure, it first needs to be discovered and registered.
Once the backup vault is created, head to the dashboard and click the link to discover your VMs, then click the discover button at the bottom of the console, as shown in Figure 7. This will find all eligible VMs; JABB will pick their DC and other VMs in the virtual network, and register them with the backup service. The last step is configuring your backup schedule (Figure 8).
 [Click on image for larger view.]
Figure 8. Backups can be kept for up to 30 days, and can be configured to run daily or weekly.
Next Steps
[Click on image for larger view.]
Figure 8. Backups can be kept for up to 30 days, and can be configured to run daily or weekly.
Next StepsJABB's virtual branch office is starting to take shape, with DNS and AD in place, along with a file share and a VM for one LOB application as well as a RemoteApp server to provide access through remote desktop. These VMs are also protected using Azure Backup against malicious attacks or configuration mistakes.
Next time we'll look at SQL server, using PowerShell DSC with VMs, tools for assessing workloads before moving them to Azure and a system for dramatically simplifying the migration as well as disaster recovery.
Article Resources