How-To
How To Back Up a vCenter Server Appliance
The new version of vSphere includes a simple, easy backup tool.
One of the tasks I used to neglect in my lab was backing up my vCenter Sever appliance (VCSA). I did so because I always figured the time it took to back it up was greater than the time it would take to reinstall it.
In a production environment, not backing up a critical piece of infrastructure such as your vCenter Server is a career limiting move, which is why there are a lot of tools, such as Veeam and Avamar, that offer enterprise-level backup protection to virtual machines (VMs). For my lab, however, leaving it unprotected and having to rebuild it was a tradeoff I was willing to make.
While working on the VMware vSphere 6.5: What's New course, I discovered that vSphere 6.5 includes a convenient and inexpensive way to back up my VCSA. The backup utility isn't very sophisticated or feature-rich, but it will gather and back up all the information needed to restore a VCSA. It doesn't back up the appliance itself, as the restoration process creates a new VCSA and then restores critical data to it. This technique minimizes the space needed for a backup and ensures a fresh base operating system when you restore your VCSA.
Here's what I did to back up and restore my VCSA.
Backing up the VCSA
My environment consists of a Dell R610 server running ESXi 6.5 and hosting various VMs, including my VCSA. The FTP target to store the backup was an HP ProLiant MicroServer running FreeNAS 9.3.
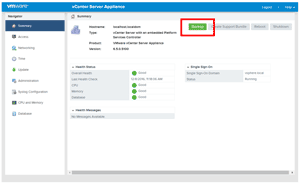
The VCSA backup utility is located on the VCSA management interface, which I accessed by appending port 5480 to my vCenter's IP address (Figure 1) from a Web browser (outlined here in red).
 [Click on image for larger view.]
Figure 1. Initiating a VCSA backup.
[Click on image for larger view.]
Figure 1. Initiating a VCSA backup.
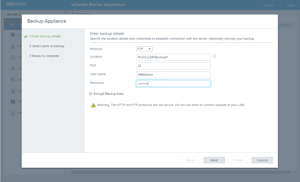
Once I started the backup process, I was presented with a Backup Appliance wizard that queried me for my file server information and which protocol to use (FTP SFTP, HTTP, HTTPS or SCP) and the option to encrypt the backup (Figure 2).
 [Click on image for larger view.]
Figure 2. The backup wizard.
[Click on image for larger view.]
Figure 2. The backup wizard.
The backup appliance calculated the amount of space required and let me select if whether or not I wanted to back up the vCenter's stats, events, alarms, and tasks as well as the data required for a restoration.
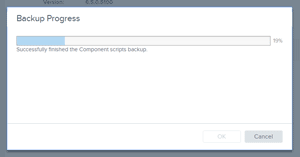
While the backup took place, a status bar showed its progress (Figure 3). It took less than fewer minutes to transfer my backup to my FTP server.
 [Click on image for larger view.]
Figure 3. The backup progress bar.
[Click on image for larger view.]
Figure 3. The backup progress bar.
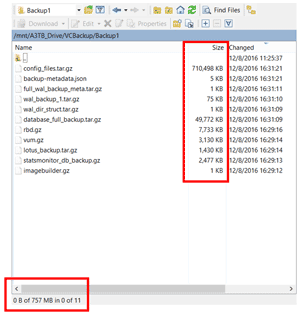
After the backup finished, I found that my FTP folder contained 11 files that took up 757 MB of storage (Figure 4). The amount of storage that a production VCSA requires will be larger. That's all I had to do to back up my VCSA. There were no backup programs or agents to install, and no backup manager console; it was fast and easy to use.
 [Click on image for larger view.]
Figure 4. The backed-up files.
Restoring a VCSA
[Click on image for larger view.]
Figure 4. The backed-up files.
Restoring a VCSA
There's an old saying: backups are good, but restores (when needed) are better. The vCenter Server install CD is needed if you need to perform a restore; when a VCSA is restored it installs a new VCSA, then writes the backed-up information to it. Here are the steps to restore a VCSA.
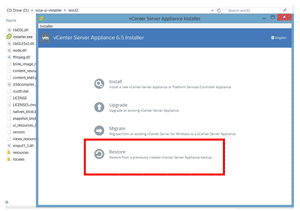
The restored VCSA uses the same IP information as the original VCSA, so if you're still running the existing VCSA it will need to be powered off. After I powered down the original VCSA, I downloaded the vCenter Server Appliance installer ISO from VMware and mounted it on my laptop as my D: drive. I traversed to D:\vcsa-ui-installer\win32 and double-clicked installer.exe to bring up the vCenter Server Appliance 6.5 Installer (Figure 5).
 [Click on image for larger view.]
Figure 5. The VCSA installer.
[Click on image for larger view.]
Figure 5. The VCSA installer.
After I clicked the "Restore" option, it started the first stage of the restoration process; the wizard asked me for information about the FTP server my backup was stored on, the ESXi server that it will be restored to, the name I would like to give to my recovered VCSA, the VM datastore, and the VCSA's network information. It took about 15 minutes to finish stage 1 of the recovery (installing a new VSCA), which was tracked by a progress bar.
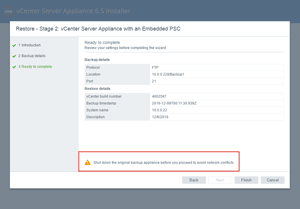
After stage 1 completed, I was prompted to press "Continue" to go to stage 2, in which the information from the backup files is injected into the new VM. I was warned to shut down the original appliance during the process (Figure 6). It took less than 10 minutes to complete stage 2 (Figure 7).
 [Click on image for larger view.]
Figure 6. Completing the VCSA restore.
[Click on image for larger view.]
Figure 6. Completing the VCSA restore.
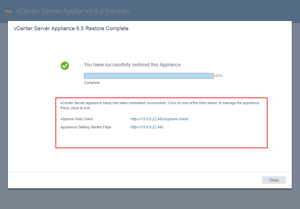
Once the VCSA was restored, I was able to access it via the vSphere Web Client and manipulate all the hosts and files that were present in the original VCSA. I encountered one hitch: when I tried to go back into the vCenter Server Appliance Management Interface, I would log in and get kicked right out. Clearing the cookies and cache of my browser fixed the problem.
 [Click on image for larger view.]
Figure 7. The restoration completed.
Quick and Easy Backup
[Click on image for larger view.]
Figure 7. The restoration completed.
Quick and Easy Backup
For years I neglected backing up my vCenter Server because it was easier to reload it in the case of failure, but with the recent inclusion of VCSA backup with vSphere 6.5, I can finally back it up inexpensively, quickly, and easily. For larger or production environments, there are more efficient solutions to protect your vCenter server, but in the case of small and relatively static vCenter Servers, the inclusion of this backup utility makes it easy and convent to back up your VCSA.
About the Author
Tom Fenton has a wealth of hands-on IT experience gained over the past 30 years in a variety of technologies, with the past 20 years focusing on virtualization and storage. He currently works as a Technical Marketing Manager for ControlUp. He previously worked at VMware in Staff and Senior level positions. He has also worked as a Senior Validation Engineer with The Taneja Group, where he headed the Validation Service Lab and was instrumental in starting up its vSphere Virtual Volumes practice. He's on X @vDoppler.