How-To
vCenter High Availability in vSphere 6.5: a Tutorial
Of all the new features included in vSphere 6.5, the one that will be most useful to small and mid-sized vSphere deployments is vCenter High Availability (VCHA). I was working on VMware Education's "vSphere 6.5: What's New" course when I was first exposed to VCHA, and was impressed with how powerful it was, and how easy it was to set up and use.
Previous to VCHA, it was somewhat painful to set up a backup vCenter Server in a datacenter. Sure, it could be done, but it took a fair amount of planning and work to implement and maintain, so a lot of companies just didn't do it. But VCHA changes everything, making it much easier and quicker to implement a backup server. To be sure, this may not be the best solution for larger enterprises, but for SMBs this is great solution.
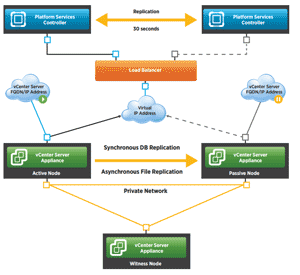
VCHA, as shown in Figure 1, replicates the database and files from the active vCenter Server Appliance (vCSA) to a backup (passive) vCenter. In the event of a full failure, or if key services are lost on the active vCenter Server, the passive vCenter Server takes over.
This won't happen instantaneously, but within a few minutes all vCenter services and functions will transfer to the passive node, and you'll be able to connect to it using the same IP address or FQDN. When the first node comes back online, it will re-sync the data and take on the role as the passive node. The witness node is needed to prevent a split-brain situation in which both nodes are active.
 [Click on image for larger view.]
Figure 1. VCHA topography.
Installation
[Click on image for larger view.]
Figure 1. VCHA topography.
Installation
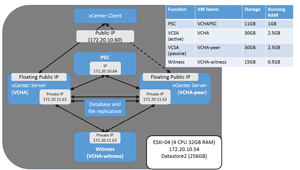
VCHA will only work with the VCSA; it won't work with vCenter installed on a Windows system. VCHA requires a private network over which the three nodes can communicate. (VMware's vSphere 6.5 documentation will have the full and latest requirements in order to implement VCHA.) The topography of the VCHA deployment discussed in this article is shown in
Figure 2. To install and test VCHA, I installed a vCenter server called VCHA on my ESXi host, and set up a 172.20.11/24 network for the private network for the VCHA nodes.
 [Click on image for larger view.]
Figure 2. The VCHA topography used for this article.
[Click on image for larger view.]
Figure 2. The VCHA topography used for this article.
The VCHA wizard allows VCHA to be installed in two modes: basic or advanced. With a basic install, the wizard will create and configure a second network adapter on an existing 6.5 VCSA and automatically clone it to create a passive and witness VM. The advanced installation option requires the end-user to reconfigure an existing 6.5 VCSA and manually clone the passive and witness VM. The advanced setup requires more work, but it does give more flexibility during the installation process. This article will deal with installing VCHA in basic mode, as I feel that 80 percent of small to mid-sized businesses will be able to easily use the basic install method. For testing purposes, I used a single ESXi server to host all the components, but best practice would be to host the three VCHA VMs on different ESXi servers.
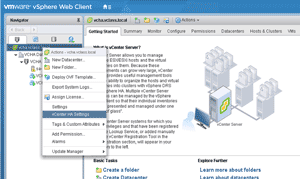
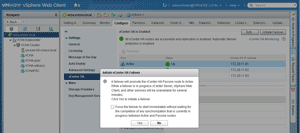
The process of installing VCHA involves logging on to an existing vCenter 6.5 Web client and selecting vCenter HA Settings (Figure 3). This brings up the VCHA wizard which guides you through the installation process. The wizard asks if this will be a basic or advanced installation, and then it queries for the information of the private network to be used for VCHA, as well as the IP addresses for the passive and witness nodes. After clicking "Finish," the process of adding a NIC to the active node and creating the passive and witness node VMs is started.
 [Click on image for larger view.]
Figure 3. Initiating the VCHA install.
[Click on image for larger view.]
Figure 3. Initiating the VCHA install.
vCenter then creates the VCHA environment. It took about five minutes for my system to create the two additional VMs and add a second NIC to the existing VCSA.
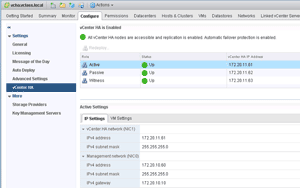
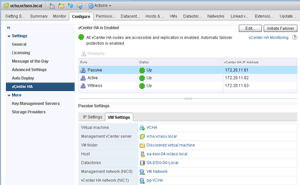
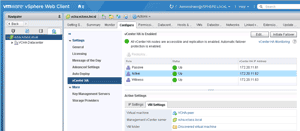
When the VCHA has been completely installed, the vCenter Web client will show the status of the active, passive and witness nodes (Figure 4).
 [Click on image for larger view.]
Figure 4. Status of VCHA nodes.
[Click on image for larger view.]
Figure 4. Status of VCHA nodes.
The total time it took for me to install and configure VCHA was less than 20 minutes. I found the process to be simple and intuitive.
Installing VCHA will create two VMs, both of which will automatically take the name of the original VM, while appending "-peer" and "-witness" to distinguish the two.
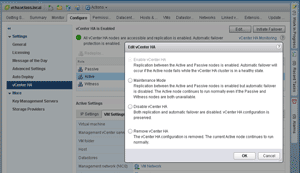
VCHA can be placed in various modes by selecting "Edit." By selecting "Maintenance Mode," automatic failovers will be prevented, but the replication of data will continue. If VCHA is put in disabled mode, automatic failovers will be prevented and the replication of data will be stopped. If "Remove vCenter HA" is selected, the passive and witness nodes will be removed (Figure 5).
 [Click on image for larger view.]
Figure 5. VCHA modes.
Manual Failover
[Click on image for larger view.]
Figure 5. VCHA modes.
Manual Failover
The vCenter Web client can be used to manually initiate a vCenter failover (
Figure 6). When this happens, both the active and passive nodes remain up, but the passive node will take over all vCenter duties and the active node will become the passive node. While the failover is taking place, a message will be displayed indicating that the connection to the vCenter has been lost, and the vCenter Web client will show that a failover is in progress. After the failover has completed, the vCenter Web client will be available once again. It can take up to five minutes for a failover to complete.
 [Click on image for larger view.]
Figure 6. Initiating a failure.
[Click on image for larger view.]
Figure 6. Initiating a failure.
Looking carefully at Figures 7 and 8, you'll see that once the failover completes, the active node will become the VCHA-peer (the node that was automatically created when VCHA was installed) and the passive node will become the VM VCHA, which was the original vCenter.
 [Click on image for larger view.]
Figure 7. The original VCSA is now passive node.
[Click on image for larger view.]
Figure 7. The original VCSA is now passive node.
 [Click on image for larger view.]
Figure 8. The peer node is now active.
[Click on image for larger view.]
Figure 8. The peer node is now active.
The "Task & Events" tab (Figure 9) shows that a failover was initiated.
 [Click on image for larger view.]
Figure 9. The Tasks & Events tab.
[Click on image for larger view.]
Figure 9. The Tasks & Events tab.
Automated Failovers
Manual failovers are handy if vCenter needs to be patched or updated, or if a physical server needs to go down for scheduled maintenance or updates. The real benefit of VCHA, however, is dealing with unexpected outages.
To test automatic failover, I powered off the active vCenter. After powering off the active vCenter a "This page could not be displayed" error message appeared; but then pages similar to those displayed during the manual failover appeared until the failover completed.
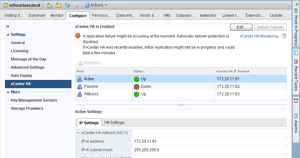
Once the system was back up, the vCenter HA indicated that the passive node was down and automatic failover protection was disabled (Figure 10).
 [Click on image for larger view.]
Figure 10. Automatic failover protection is disabled.
Figure 11
[Click on image for larger view.]
Figure 10. Automatic failover protection is disabled.
Figure 11 shows that a node is no longer available.
 [Click on image for larger view.]
Figure 11. The top Message indicates that a node has been lost.
[Click on image for larger view.]
Figure 11. The top Message indicates that a node has been lost.
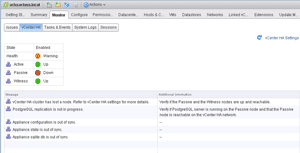
When the passive node was powered back on, I was informed that VCHA was healthy and all the nodes were enabled (Figure 12).
 [Click on image for larger view.]
Figure 12. The fully-recovered VCHA.
A Game-Changer
[Click on image for larger view.]
Figure 12. The fully-recovered VCHA.
A Game-Changer
Many companies are dependent on vCenter Sever to keep their datacenter operational; unfortunately, protecting it has always been problematic. VCHA has changed all that. It's now very easy to protect a datacenter from unexpected outages. If you're looking for a reason to upgrade to vSphere 6.5, this could be it.
About the Author
Tom Fenton has a wealth of hands-on IT experience gained over the past 30 years in a variety of technologies, with the past 20 years focusing on virtualization and storage. He previously worked as a Technical Marketing Manager for ControlUp. He also previously worked at VMware in Staff and Senior level positions. He has also worked as a Senior Validation Engineer with The Taneja Group, where he headed the Validation Service Lab and was instrumental in starting up its vSphere Virtual Volumes practice. He's on X @vDoppler.