How-To
How To Protect Your AWS Images Against Accidental Data Loss
Brien Posey drills down on how to set up termination protection in the Amazon EC2 dashboard to prevent mission-critical instances from being accidentally deleted.
By its very nature, cloud-based virtual machine (VM) environments such as Amazon Elastic Compute Cloud (EC2) are highly dynamic. In many organizations, new VMs are constantly being created, while other VM instances are being deprovisioned and removed. Given the constant activity around VM creation and deletion, what's to stop an administrator from accidentally deleting the wrong VM instance?
When it comes to protecting your VMs against accidental loss, by far the most important thing you can do is create regular backups. The EC2 snapshot feature provides a degree of data protection, but I personally recommend using a third-party backup solution to protect your EC2 VM instances.
Another thing that you can do is to modify the root volume persistence setting. Normally, when you delete a VM instance, Amazon Web Services (AWS) will also automatically delete the VM's volumes. That's great if your goal is to prevent orphaned storage volumes from being retained. After all, AWS bills its customers based on the storage that they're using. However, if an administrator were to accidentally delete an instance, then automatically deleting the underlying storage volume probably would not be desirable behavior.
The way that you can prevent the root storage volume from being automatically deleted if the VM is terminated is to open the AWS console, and then go in to the EC2 dashboard. From there, click on the VM image that you wish to configure. At this point, make sure the VM's Description tab is selected. This tab provides you with a detailed summary of the various VM configuration settings. As you look through the list of settings, you'll notice a setting called Root Devices. Clicking on the Root Devices setting's value causes the console to display a pop-up window with information about the storage device. Figure 1 shows what this pop-up looks like. In the figure, the Root Devices setting is just beneath the pop-up window.
 [Click on image for larger view.]
Figure 1. Clicking on the root device causes the AWS console to display a pop-up containing detailed storage information.
[Click on image for larger view.]
Figure 1. Clicking on the root device causes the AWS console to display a pop-up containing detailed storage information.
As you look at Figure 1, you'll notice that the pop-up window indicates that the Delete on termination setting is set to True.
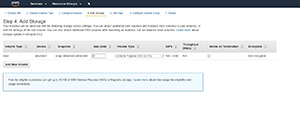
Unfortunately, you cannot modify the Delete on Termination setting from the GUI on a running VM. If you want to use the GUI, then you'll need to configure the Delete on Termination setting as a part of the VM creation process. As you can see in Figure 2, the Delete on Termination setting exists in Step 4 (Add Storage) of the VM creation process.
 [Click on image for larger view.]
Figure 2. You can configure the Delete on Termination setting during the VM creation process.
[Click on image for larger view.]
Figure 2. You can configure the Delete on Termination setting during the VM creation process.
For existing VM instances, the only way to modify the Delete on Termination setting is to use the command-line interface to modify a configuration file named MAPPING.JSON. You'll need to set the file's Delete on termination setting to False. You can find instructions for doing so on the Amazon EC2 documentation page.
One more way that you can protect your EC2 instances against accidental data loss is to enable termination protection. Termination protection guards your instances against accidental deletion, although it is worth noting that termination protection can be overridden.
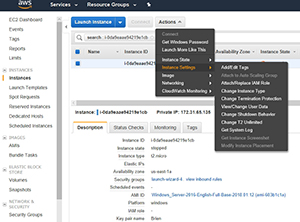
To enable termination protection for an EC2 instance, open the EC2 dashboard and click on the instance you want to protect. Next, choose Instance Settings from the Actions menu, and then choose the Change Termination Protection option from the resulting menu, as shown in Figure 3.
 [Click on image for larger view.]
Figure 3. Choose Instance Settings, followed by Change Termination Protection.
[Click on image for larger view.]
Figure 3. Choose Instance Settings, followed by Change Termination Protection.
At this point, you'll see a simple pop-up that asks you if you want to enable termination protection. Click the Yes, Enable button, and termination protection will be enabled for the instance. Now, if you attempt to terminate the instance, you'll see a message similar to the one shown in Figure 4, indicating that you cannot terminate the instance unless you go back to the Change Termination Protection option and allow the instance to be terminated.
 [Click on image for larger view.]
Figure 4. You cannot terminate a protected instance without first disabling termination protection.
[Click on image for larger view.]
Figure 4. You cannot terminate a protected instance without first disabling termination protection.
Ultimately, the best way to protect your instances is to create regular backups. Even so, termination protection is helpful for preventing mission-critical VM instances from being accidentally deleted.
About the Author
Brien Posey is a 22-time Microsoft MVP with decades of IT experience. As a freelance writer, Posey has written thousands of articles and contributed to several dozen books on a wide variety of IT topics. Prior to going freelance, Posey was a CIO for a national chain of hospitals and health care facilities. He has also served as a network administrator for some of the country's largest insurance companies and for the Department of Defense at Fort Knox. In addition to his continued work in IT, Posey has spent the last several years actively training as a commercial scientist-astronaut candidate in preparation to fly on a mission to study polar mesospheric clouds from space. You can follow his spaceflight training on his Web site.