How-To
How To Configure Linux Desktops for VMware Horizon with Ubuntu
Tom Fenton shows how to use an Ubuntu VM as a full clone guest on VMware Horizon.
VMware has supported Linux desktops running on its VDI platform since VMware Horizon 6.2. In fact, last year I wrote an article on how to use CentOS as a Linux desktop on VMware Horizon 6.2, and another article outlining five reasons for using Linux as a desktop. Because VMware now supports Linux Instant Clone desktop with the release of VMware Horizon 7.4, I wanted to revisit the topic of creating Linux desktops, but this time by creating an Ubuntu desktop that can be used with instant clone technology. Although instant clone technology has been available since VMware Horizon 7.0, it has been limited to Windows 7 and Windows 10 desktops. However, now it can be used to provision Linux desktops. The use of instant clones permits Linux desktops to deploy faster, scale easier and perform maintenance more efficiently.
In a previous article, I showed you how to create an Ubuntu 16.04 virtual machine (VM). In this article, I'll show you how to use this VM as a full clone guest on VMware Horizon.
Creating a Linux Horizon Desktop
Installing Ubuntu 16.04 as a VM on ESXi is a relatively simple process, but it does have a few gotchas. I'll be modifying the Ubuntu 16.04 VM that I a built earlier for the Linux Horizon desktop system in this article.
I first brought up a command line on the Ubuntu VM and installed a supported gnome session manager by entering: sudo apt install gnome-session-flashback.
I then rebooted the system and logged back into it.
Installing the VMware Horizon Agent
The VMware Horizon agent uses the python programming language, which needs to be installed before being able to install the agent itself. I installed the language by entering: sudo apt install python-dbus python-gobject.
After doing so, I downloaded the VMware Horizon agent for Linux to my Linux desktop from here.
Then, I extracted it and installed it by running:
sudo bash
mkdir agent
cd agent
tar -xzf VMware-horizonagent-linux-x86_64-7.4.0-7380911.tar.gz.
cd VMware-horizonagent-linux-x86_64-7.4.0-7380911/
./install_viewagent.sh -A yes
Finally, I rebooted the system.
Creating a Linux Desktop Pool
After the agent was installed on my Linux desktop, I created a Linux desktop pool. To do this, I logged on to the VMware Horizon Administrator portal, created a new desktop pool and added the Linux desktop to it.
To do this, I first created the Linux desktop pool from the VMware Horizon administrator by going to Catalog | Desktop Pools | Add | Manual Desktop Pool | vCenter virtual machines.
Next, I created a pool named LinuxDesktop, allowed HTML access, selected my Linux VM, and entitled the View Users Active Directory Group to keep all other defaults (Figure 1).
 [Click on image for larger view.]
Figure 1. The The Linux desktop pool.
[Click on image for larger view.]
Figure 1. The The Linux desktop pool.
Accessing the Linux Desktop
Because the Linux VM wasn't a member of the domain, I couldn't log in to the Linux desktop as an AD user, so I needed to first log in to the VMware Horizon client as an AD user in the View Users Group and then, from the Linux desktop, log in as a Linux user.
Although I could log in to the VMware Horizon client, when I tried to access a Linux desktop I got the message that no desktops were available. When I checked the VM status in VMware Horizon Administrator, I noticed that the agent was reporting as unknown. To correct this problem, I logged back in and checked to make sure that I could ping my connection broker, and I found that I could ping it from its IP address but not by its domain name. To resolve this, I edited the /etc/resolv.conf file and changed the line hosts: files mdns4_minimal [NOTFOUND=return] dns to hosts: files dns.
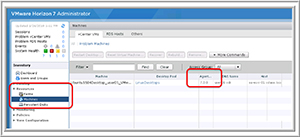
After rebooting the Ubuntu VM, I could see the version of the agent of the Linux desktop in the VMware Horizon Administrator (Figure 2), whereas before changing the resolve.conf file, the agent had reported as unknown.
 [Click on image for larger view.]
Figure 2. The Linux desktop agent.
[Click on image for larger view.]
Figure 2. The Linux desktop agent.
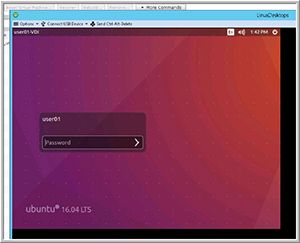
After changing the VM, I could log in to the VMware Horizon client and then, from the Linux desktop, log in as a Linux user (Figure 3).
 [Click on image for larger view.]
Figure 3. The Linux login from VMware Horizon client.
[Click on image for larger view.]
Figure 3. The Linux login from VMware Horizon client.
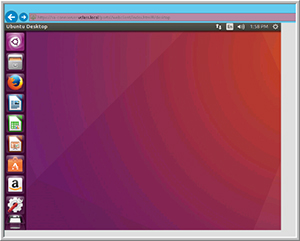
After accessing the Linux desktop from the Horizon client, I tested HTML access by accessing it from the Internet Explorer Web browser running on my Windows 10 laptop (Figure 4).
 [Click on image for larger view.]
Figure 4. The Linux desktop from Internet Explorer.
[Click on image for larger view.]
Figure 4. The Linux desktop from Internet Explorer.
I tested accessing a Linux desktop from other devices running different OSes, and here's a summary of what I found on each device/OS:
- Dell Laptop running Windows 8.1: I was able to access my Linux desktop from both a Web browser and the VMware Horizon client.
- Lenovo X1 Carbon running Windows 7.0: I was able to access my Linux desktop from both a Web browser and the Horizon client.
- Dell Laptop running Windows 10: I could I access my Linux desktop from both a Web browser and the VMware Horizon client.
- MacBook Pro running OS X 10.10 Yosemite: I was able to access my Linux desktop from both a Web browser and the VMware Horizon client.
- Physical Linux system running Centos 6.7: I was able to access my Linux desktop from both a Web browser and the VMware Horizon client.
- Zero Client Samsung "Cloud in a Box" (NX-N2): As expected, the Samsung Zero client worked fine with a Windows virtual desktop; however, when I tried to access a Linux desktop, I received the message "Does not support the requested protocol," as the Samsung client only supports PCoIP connections and not the BLAST protocol, which my Linux desktop supports.
Wrapping Up
Although I had a few initial issues with configuring my Linux desktop in order to allow it to work with VMware Horizon, once I sorted out those issues it performed flawlessly on a wide verity of devices.
In the next article in this series, I'll walk you through upgrading from a VMware Horizon 7.3 to a VMware Horizon 7.4 environment, including how to deploy Linux instant clone desktops.
About the Author
Tom Fenton has a wealth of hands-on IT experience gained over the past 30 years in a variety of technologies, with the past 20 years focusing on virtualization and storage. He previously worked as a Technical Marketing Manager for ControlUp. He also previously worked at VMware in Staff and Senior level positions. He has also worked as a Senior Validation Engineer with The Taneja Group, where he headed the Validation Service Lab and was instrumental in starting up its vSphere Virtual Volumes practice. He's on X @vDoppler.