How-To
Putting CLI Skeletons to Work in AWS
You can script Amazon Web Services tasks using the command-line interface to build a skeleton script.
If you've spent much time working within an Amazon Web Services (AWS) environment, you've probably found that some tasks, such as creating new Amazon Elastic Compute Cloud 2 (EC2) instances, can be repetitive. However, you can script those tasks, thereby taking most of the work out of the process.
If you're not entirely comfortable with developing administrative scripts, then you'll be happy to know that Amazon has made the process surprisingly easy. You can actually use the command-line interface (CLI) to build a skeleton script, and then simply add any required information to the script. Amazon even provides a way of testing the script before you actually run it. Let me show you how the process works.
Step 1. Find the Command to Use
The first step in the process is to look up the command that you'll need to use to accomplish the task at hand. You can usually find the necessary command by doing a simple Web search. If you want to create an EC2 instance, for example, then the command is:
AWS ec2 run-instances
Step 2. Create a Skeleton File
The second step in the process is to build the CLI skeleton. The exact procedure you'll use varies depending on the command you're using. In most cases, however, you can simply append the following command to the command you looked up in step 1:
–generate-cli-skeleton
You'll also have to redirect the output to a file by using the greater than sign, followed by a file name. Because AWS saves skeletons in JSON format, you'll need to specify the .JSON extension with the filename.
To show you how this works, let's suppose I wanted to create a skeleton file that I can use to create an EBS volume. The command that's normally used for this purpose is:
aws ec2 create-volume
If you were executing the command directly, then you'd specify some additional attributes such as the volume size, the region, availability zone and volume type. The full-blown command might look something like this:
Aws ec2 create-volume –size 80 –region us-east-1 –availability-zone us-east-1a –volume-type gp2
If instead you wanted to create a skeleton that could later be used to automate the creation of volumes, then the command to use would look like this:
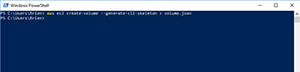
Aws ec2 create-volume –generate-cli-skeleton > volume.json
You can see an example of this in Figure 1.
 [Click on image for larger view.]
Figure 1. This is how you create a CLI skeleton.
[Click on image for larger view.]
Figure 1. This is how you create a CLI skeleton.
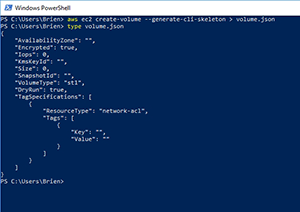
If you want to know what the resulting file looks like, you can enter the type command, followed by the file name. You can see this command and the resulting output in Figure 2. As an alternative, you can open the file in a text editor such as Notepad.
 [Click on image for larger view.]
Figure 2. The Type command can be used to display the JSON file that you created.
[Click on image for larger view.]
Figure 2. The Type command can be used to display the JSON file that you created.
Step 3: Fill in the Blanks
The third step in the process is to populate the file by filling in the blanks, and removing any lines that are unnecessary. You'll probably need to refer to the command's documentation for this process. As a general rule, however, each line of the file contains a key value pair. The key is provided for you and is the phrase that appears within quotation marks. The file then contains a colon and a spot for a value, which is usually also contained within quotation marks (although there are exceptions). All of the values except for the last one are also followed by a comma. Here's an example of a single line:
"AvailabilityZone": "us-east-1a",
Here is what the entire modified file might look like:
{
  "AvailabilityZone": "us-east-1a",
  "Attachments": [],
  "Tags": [],
  "VolumeType": "gp2",
  "VolumeId": "vol-1234567890abcdef0",
  "State": "creating",
  "SnapshotId": null,
  "CreateTime": "YYYY-MM-DDTHH:MM:SS.000Z",
  "Size": 80
 }
Step 4: Test the File
Once you have modified the file, you can test it by appending the –cli-input-json command to the main command that you're using. If, for example, you were using the recently created JSON file to create an EBS volume, then the command might look like this:
Aws ec2 create-volume –cli-input-json file://volume.json
Before you try this yourself, there is one important thing that you need to know about this command. If you look back at Figure 2, you'll notice that one of the lines within the skeleton file is:
"DryRun": true,
This line tells the command interpreter that you only want to test the JSON file, not actually execute it. If the tests are satisfactory, then you can change true to false in order to perform the scripted action. Incidentally, if the DryRun key is set to True, then it's normal to get an error message when you execute the file. The error will look something like this:
A client error (DryRunOperation) occurred when calling the CreateVolume operation: Request would have succeeded, but DryRun flag is set.
About the Author
Brien Posey is a 22-time Microsoft MVP with decades of IT experience. As a freelance writer, Posey has written thousands of articles and contributed to several dozen books on a wide variety of IT topics. Prior to going freelance, Posey was a CIO for a national chain of hospitals and health care facilities. He has also served as a network administrator for some of the country's largest insurance companies and for the Department of Defense at Fort Knox. In addition to his continued work in IT, Posey has spent the last several years actively training as a commercial scientist-astronaut candidate in preparation to fly on a mission to study polar mesospheric clouds from space. You can follow his spaceflight training on his Web site.