How-To
Step-by-Step: Creating VMs in Microsoft Azure
Here's what to do (and what not to do) when you want to move a workload to the cloud using a virtual machine on someone else's metal.
There are many reasons to move workloads to the cloud and there are many ways to move them there. In this article I'm going to focus on the "lift and shift" scenario where you create virtual machines (VMs) on someone else's metal -- in this case Microsoft Azure. In future articles I'm going to expand on that conversation into other types of cloud deployments -- Platform as a Service (PaaS) and so on -- because just lifting and shifting leaves you with a legacy deployment in a new environment.
I'm going to start with a simple VM and then explore why this isn't the best way to deploy Infrastructure as a Service (IaaS) and then show a better way to deploy VMs.
Get Started
Head over to Azure and set up a free trial if you haven't got a subscription already. Go to portal.azure.com, log in and click on Create a resource, top left. Click on Windows Server 2016 VM under Popular. This article is written in June 2018, note that the portal frequently changes the UI for creating VMs so don't be surprised if there are differences between the screenshots and your browser.
Give the VM a name, set up a username (Admin and similar names are not allowed), a complex password (12-123 characters, three out of four: lower/uppercase, numbers and special characters) and give your Resource group a name. It can be the same as your VM name for this test. Choose a region, close to your location. If you have Software Assurance (SA) for Windows Server you can use it to save on licensing cost, using Azure Hybrid Use Benefit (AHUB).
Click OK to go to the second blade to pick a VM size, select a D2s_v3 (availability of size will vary based on the region you selected on blade 1).
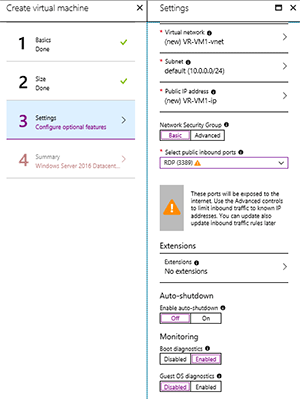
On the third blade pick yes for managed disks and pick RDP for the inbound port and leave all other settings as they are. Note the warning about RDP and Internet access (see Figure 1) -- I'll look at that later. On the Summary blade click Create.
 [Click on image for larger view.]
Figure 1. Creating a virtual machine in Azure -- the wrong way.
[Click on image for larger view.]
Figure 1. Creating a virtual machine in Azure -- the wrong way.
Once the VM has been deployed, click Connect on the dashboard and you'll be offered to download an RDP file (had this been a Linux VM, an SSH connection would be offered instead).
There you have it; a few next, next, next clicks and you have a VM running in Azure. This VM, however, is the equivalent of opening a new branch office by shipping a server there and plugging it into the existing ethernet port on the wall -- hoping it's connected to something.
A better solution is to configure the network, a storage account for diagnostics and security settings first and then deploy one or more VMs in your "virtual branch office." To save yourself some money, click Stop in the dashboard for the VM you just created; click on the RG name and then on the RG Overview page click Delete resource group. You must enter the RG name to confirm the deletion -- then click Delete.
A Better Way to Get Started
A while ago we would have started this conversation around storage -- before you create your VM, you should create a storage account. But that's behind us now -- just say yes to Managed Disks and it's all taken care of for you, including making sure that three copies of the virtual disks in your VM are spread across fault domains/racks.
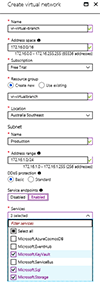
Let's look at networking first: Click the Create Resource button again but this time pick Networking -- Virtual network (vNet). Give it a meaningful name and pick an address space. Plan for connecting this network to your on-premises infrastructure, so make sure you pick a space that isn't in use there, so that you can route between them. A Resource group (RG) is a logical container for your resources in the cloud. You want to group things together that you want to manage as a unit, including assigning permissions. So, a single RG for an application might contain several front-end VMs, back-end SQL database services and a virtual network, for instance. I'm picking the name vr-virtualbranch for the RG for these articles (see Figure 2) and we're going to put all resources that we create in this RG.
 [Click on image for larger view.]
Figure 2. Creating a virtual network.
[Click on image for larger view.]
Figure 2. Creating a virtual network.
Name the first subnet in your vNet, as you'll use different subnets to segregate different types of resources. Basic DDOS protection is built into Azure and is always protecting all resources at no extra cost. If you need to have notification and telemetry for attacks on your deployments, you can enable Standard which will incur a cost.
From a security standpoint it can be beneficial to be able to limit allowed traffic to Azure back-end services; to do this enable Service endpoints and pick Microsoft.KeyVault, Microsoft.SQL and Microsoft.Storage (see Figure 2) and click Create.
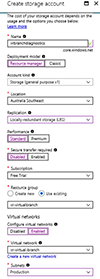
For all production VMs you'll want to enable both Boot and Guest OS diagnostics -- let's create a general-purpose storage account for storing these logs (see Figure 3). Click Create a resource – Storage – Storage account and give it a name. Leave Resource Manager as the deployment model, and pick Storage (general purpose v1) as the kind. Set replication to Locally-redundant storage (LRS) -- which is three copies in your chosen region -- and set Performance to Standard, Disabled for Secure transfer required and Use existing for the RG and pick the RG you created for the vNet. Depending on how you're going to manage VM diagnostics logs you may want to limit access to this storage account from the vNet; if so, enable this and select your vNet and subnet.
 [Click on image for larger view.]
Figure 3. Creating a storage account for diagnostics logs.
[Click on image for larger view.]
Figure 3. Creating a storage account for diagnostics logs.
Next, we'll want to control access to the vNet through a software firewall -- Network Security Group (NSG) in Azure. Click Create a resource again, Networking -- Network security group. Name the NSG, put in the RG you previously created and hit Create. To configure access click on All Resources -- the name of your NSG and then select Inbound security rules - Add. Configure a rule with destination port 3389 and destination VirtualNetwork (see Figure 4) for this test network only. For production workloads we'll cover better ways of accessing VMs next month.
 [Click on image for larger view.]
Figure 4. Configuring an inbound NSG rule.
[Click on image for larger view.]
Figure 4. Configuring an inbound NSG rule.
Finally, we'll want to create a Recovery services vault to store backups. Any VM that holds data that you care about should be backed up. Create a resource -- Management Tools – Backup and Site Recovery, give it a name and pick the RG we've created.
Putting It All Together
Now, go back to the Create a resource and it's time to create a VM using the resources we've deployed.
Pick the Windows Server 2016 VM again, leave the disk type as SSD, set up a username and password as before and pick the RG that you created. Pick the D2s_v3 that we used last time (we'll cover the different VM sizes in the next article), make sure you select the NSG you created (the UI will suggest creating a new one) by clicking Advanced.
Extensions blur the line between pure IaaS and PaaS with options such as agents for PowerShell Desired State (DSC), Chef and Puppet, or AV such as Symantec, ESET, Microsoft AV. You can pick a few but too many can cause the deployment to time out and fail.
For non-production workloads the option to enable auto-shutdown at a specific time can be handy. Enable both Boot and Guest OS diagnostics and pick the storage account we created for this, then enable Backup and pick the Recovery Services vault. Click Create and your new VM should be deployed.
This process is the equivalent of having a contractor run the network cabling in a new branch office, configuring and deploying the WAN link and a router, setting up storage and a firewall with security policies, and then deploying your server and workloads.
Next Steps
This article lays the foundation for what's coming. In the next few articles I'll look at more secure ways of administering and remoting to VMs in Azure, how to automate deployments, how to deploy multiple VMs for high availability, choosing VM sizes, networking for VMs, encrypted VMs, VM backups and integration with Azure Security Center. Make sure you stop the second VM we created using the Stop button in the portal when you're finished so as not to waste your Azure credits.
About the Author
Paul Schnackenburg has been working in IT for nearly 30 years and has been teaching for over 20 years. He runs Expert IT Solutions, an IT consultancy in Australia. Paul focuses on cloud technologies such as Azure and Microsoft 365 and how to secure IT, whether in the cloud or on-premises. He's a frequent speaker at conferences and writes for several sites, including virtualizationreview.com. Find him at @paulschnack on Twitter or on his blog at TellITasITis.com.au.