How-To
How To Install and Use the VMware Photon OS, Part 2: Adding a User
Part two of this three-part series shows you how to add a user to Photon OS and enable it to respond to pings from other systems.
This is the second article in a three-part series on Photon OS. In the first article, I demonstrated how I was able to download and install Photon OS on my VMware ESXi server by using an OVA template in less than 15 minutes. The virtual machine (VM) that was created was very small (less than 400MB) and didn't have a lot of packages installed on it. I also showed you how I installed a few packages on my Photon OS VM by using the tdfn package manager. To continue upon this, in this article I'll show you how to add a user to Photon OS and enable it to respond to pings from other systems. In my next article, I'll show you how I used two Photon OS systems to work with Apposite's new virtual WAN emulator, NetropyVE.
If you aren't yet familiar with Photon OS, I strongly encourage you to start with the first article in this series. As a quick recap, Photon OS is a lightweight Linux distribution created and maintained by VMware, which is designed specifically to run as a container host. It has also been optimized for cloud-native applications, cloud platforms and to run on VMware infrastructure or in public clouds. Many of VMware's components use Photon OS. However, it can be freely used as a base OS for other Linux projects.
Adding Users
Once I created my Photon OS VM (PhotonOS_2_A), I added an additional user (user01) to my PhotonOS_2_A system by entering useradd -m -G sudo user01. The -m switch created a home directory for the user while -G sudo added the user to the sudo group. By adding the user to the sudo group, I was able to use the sudo command to execute commands as root from this user's account
I then set the password for the user by entering passwd user01 and, when prompted, specified the password. I tested to see if the new user was added and to see if ssh was working by entering ssh user01@localhost, and then entering user01 passwords when prompted. Once I was logged in, I entered pwd; this command verified that my present working directory was /home/user01.
I found that sudo wasn't yet installed when I tried to run it, so I installed it by entering tdfn install sudo. I was then able to enter sudo bash to run the bash shell as the root user.
Enabling Ping Responses
When I tried to ping my Photon OS system from my laptop, it failed because the firewall was blocking ping responses. To enable ping responses from the system I listed, modified and then saved the firewall rules running on the system by entering the following:
Iptables --list
iptables -A INPUT -p ICMP -j ACCEPT
iptables -A OUTPUT -p ICMP -j ACCEPT
iptables-save > /etc/systemd/scripts/ip4save
Once I entered these commands, I was able to ping the system from my laptop.
Cloning My Photon OS System
I wanted to test the network connection between two Photon OS systems by using netcat and iperf; in order to do so, I needed to first clone my Photon OS system.
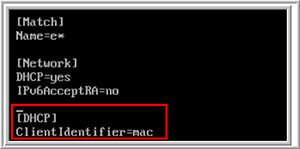
To create a second system, I shut down my Photon OS server, cloned it (PhotonOS_2_B), and then powered on both of the systems. I logged into them using the VMware Web Client, and after doing so, I noticed that they had the same IP address. After taking various measures to get a unique IP address on each of the Photon OS systems, I determined that the problem was that DHCP wasn't using the VM's NIC MAC (each VM has a unique MAC) to assign an IP address. To tell the system to use the MAC of the system, I edited /etc/systemd/network/10-dhcp-en.network (Figure 1) to include the following stanza:
[DHCP]
ClientIdentifier=mac
 [Click on image for larger view.]
Figure 1. Using MAC for DHCP.
[Click on image for larger view.]
Figure 1. Using MAC for DHCP.
I then restarted the network and verified that a new IP address had been assigned to it by entering:
systemctl restart system-networkd
ip addr
Next, I assigned unique host names on my Photon OS system by entering:
hostnamectl set-hostname <unique host name>
Wrapping Up
So far in this series, I've shown you how I installed Photon OS, and then walked you through how I was able to add multiple users to a Photon OS system, as well as how I installed sudo and modified the system's firewall (iptables) to allow ping responses. I also showed you how I had to modify the networking on the system in order to allow a cloned system to obtain a unique IP address by using DHCP server.
In the next and final article in this series, I'll walk you through how I installed and used netcat and iperf to measure the performance of the network between two systems. Furthermore, I'll show you how I limited the bandwidth between two systems by using Apposite's NetropyVE WAN emulator.
About the Author
Tom Fenton has a wealth of hands-on IT experience gained over the past 30 years in a variety of technologies, with the past 20 years focusing on virtualization and storage. He currently works as a Technical Marketing Manager for ControlUp. He previously worked at VMware in Staff and Senior level positions. He has also worked as a Senior Validation Engineer with The Taneja Group, where he headed the Validation Service Lab and was instrumental in starting up its vSphere Virtual Volumes practice. He's on X @vDoppler.