How-To
Step-by-Step: Opsview's [Free!] WSLTools App
The stand-alone application not only monitors the processes and services running on WSL, it also allows you to manage all your WSL instances from a GUI.
Windows Subsystem for Linux (WSL) allows you to run a Linux instance on a Windows system as a process. Although not as fully featured as a true physical or virtual instance of Linux, I've found WSL to be extremely useful in my day-to-day activities. If you aren't familiar with WSL, I've written many articles on it and you may want to read some of them before reading this article -- they can be found here.
Now that WSL has been out for a while, an ecosystem is developing around it to enhance its capabilities and compensate for its short comings. One of the enhancements to WSL I've found interesting is WSLTools from Opsview. Opsview is a company that's focused on monitoring systems inside datacenters; its signature product is Opsview Monitor, which can monitor almost anything from OSes to applications either on-premises or in public clouds. That said, WSLTools is a free, stand-alone application from Opsview that's dedicated to monitoring WSL. WSLTools not only monitors the processes and services running on WSL, it also allows you to manage all your WSL instances from a GUI. After installing WSLTools and also having the chance to speak with Bill Bauman, head of Innovation and Product Strategy at Opsview, I came away impressed with the product and Opsview's overall direction and commitment to making WSLTools a useful extension for WSL.
As a caveat, WSLTools at the time of this article is still in beta release and although it appears to be stable, I did hit a few issues and it still needs a little work.
Installing WSLTools
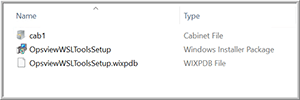
WSLTools needs to be installed on the same Windows system that you're running WSL. In my case, I'll be demonstrating how I did so by using a Windows 10 system. I installed WSLTools by downloading the WSLTools public beta installation .zip file from: ops.vu/wsltools. The zip file was small (636KB) and contained three files: a cabinet file, an installer package and a wixpdb file (Figure 1).
 [Click on image for larger view.]
Figure 1. The WSLTools .zip file.
[Click on image for larger view.]
Figure 1. The WSLTools .zip file.
I extracted the files from the .zip archive and then double-clicked the OpsviewWSLToolsSetup file, accepted the license agreement and then installed it, which took just a few seconds to complete.
Using WSLTools
Once the product was installed, I then went to the Start button on my Windows 10 system and launched WSLTools. Strangely, it started in minimized mode and I needed to maximize it.
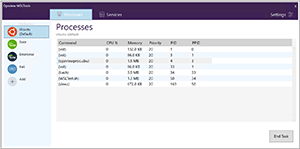
The home screen showed the four WSL Linux instances that I had installed on my system and the processes that were currently running on my default WSL Linux instance. By selecting a process from the list, you can kill it by clicking the End Task button (Figure 2).
 [Click on image for larger view.]
Figure 2. The WSLTools Processes tab.
[Click on image for larger view.]
Figure 2. The WSLTools Processes tab.
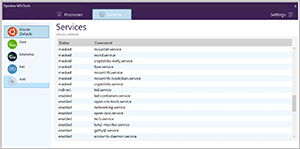
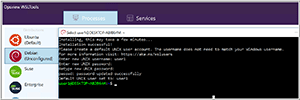
The Services tab shows a list of services running on the WSL instance, which you can sort on the Status or Command columns by clicking the column header (Figure 3).
 [Click on image for larger view.]
Figure 3. The WSLTools Services tab.
[Click on image for larger view.]
Figure 3. The WSLTools Services tab.
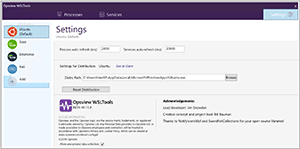
The Settings tab (Figure 4) will allow you to configure the refresh rate for the processes and services. However, Opsview's Bauman warned me not to be too aggressive with these settings; if they're set too low, WSL will start to consume more CPU resources than what's needed. From this same screen, you can also reset the distribution and access a link to the distribution in the Microsoft Store.
 [Click on image for larger view.]
Figure 4. The WSLTools Settings page.
[Click on image for larger view.]
Figure 4. The WSLTools Settings page.
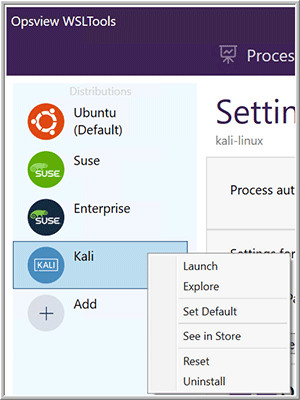
I launched another WSL instance from WSLTools by right-clicking the instance icon and selecting Launch (Figure 5). From this same menu, you can also uninstall or reset the instance, review the distribution in the Microsoft Store, or set the instance as your default WSL instance.
 [Click on image for larger view.]
Figure 5. Launching WSL instances.
[Click on image for larger view.]
Figure 5. Launching WSL instances.
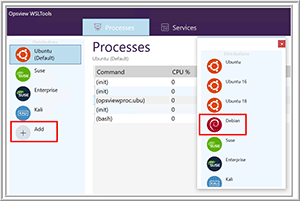
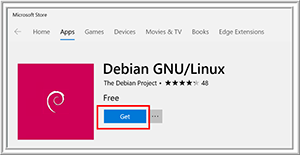
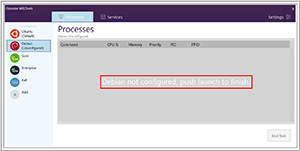
One neat feature in WSLTools is the ability to install additional Linux distributions available on the Microsoft Store from within WSLTools itself. To test this out, I clicked the Add button and then selected Debian (Figure 6). This took me to the Microsoft Store where I clicked Get (Figure 7), which installed the Debian Linux WSL distribution on my system. Then, WSLTools indicated that the Debian instance was installed but not configured (Figure 8).
 [Click on image for larger view.]
Figure 6. Adding a new WSL distribution.
[Click on image for larger view.]
Figure 6. Adding a new WSL distribution.
 [Click on image for larger view.]
Figure 7. Getting the Debian WSL distro.
[Click on image for larger view.]
Figure 7. Getting the Debian WSL distro.
 [Click on image for larger view.]
Figure 8. CWSL Debian installed.
[Click on image for larger view.]
Figure 8. CWSL Debian installed.
I right-clicked the Debian instance and launched it, bringing up a WSL console, which finished the installation and configured the Debian instance. During the configuration process, I needed to set a username and password and was then presented with a Linux prompt (Figure 9).
 [Click on image for larger view.]
Figure 9. Configuring the Debian WSL instance.
[Click on image for larger view.]
Figure 9. Configuring the Debian WSL instance.
Resource Utilization
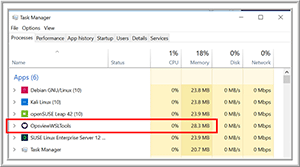
Because monitoring tools can typically be resource-intensive, I wanted to test memory and CPU consumption with WSLTools to see if this was still the case here. To do so, I launched all my WSL instances and then brought up Windows Task Manager. To my surprise, Task Manager showed that WSLTools was only using 21MB of memory and hardly any CPU cycles (Figure 10).
 [Click on image for larger view.]
Figure 10. The Windows Task Manager.
[Click on image for larger view.]
Figure 10. The Windows Task Manager.
Wrapping Up
WSLTools is the first WSL tool that I've had the opportunity to work with. Although WSLTools is still under development and in need of polish, the issues I encountered were relatively minor (such as not being able to relaunch it after I exited it, issues with multi-monitor setups); I didn't experience anything major or anything that affected other tasks running on my Windows system. Opsview is using a community Slack channel and Twitter for feedback.
Overall, WSLTools is an application that I will keep and use, and I recommend that you invest the time and investigate how this WSL tool can help in your environment—after all, it's free, and takes less than a minute to download and install.
About the Author
Tom Fenton has a wealth of hands-on IT experience gained over the past 30 years in a variety of technologies, with the past 20 years focusing on virtualization and storage. He currently works as a Technical Marketing Manager for ControlUp. He previously worked at VMware in Staff and Senior level positions. He has also worked as a Senior Validation Engineer with The Taneja Group, where he headed the Validation Service Lab and was instrumental in starting up its vSphere Virtual Volumes practice. He's on X @vDoppler.