How-To
Creating AWS Web Applications the Easy Way
How to use AWS Elastic Beanstalk to quickly deploy and scale Web applications and services.
One of the more common tasks that administrators seem to find themselves having to perform is that of setting up Web applications. Amazon Web Services (AWS) can act as a platform for your Web applications, but the interface and some of the techniques that you'll have to use may take a bit of getting used to. As such, I wanted to delve into the subject of hosting Web applications on AWS.
The AWS environment for running custom Web applications is called Elastic Beanstalk. I wrote about AWS Elastic Beanstalk a little over a year ago, but AWS Elastic Beanstalk has evolved a bit since that time. More importantly, I wanted to go into Elastic Beanstalk in more depth than I did before, and show you what is really going on behind the scenes.
In order to show you how AWS Elastic Beanstalk works, we need to deploy a Web application. Thankfully, AWS provides a sample application that's perfect for what I have in mind. So let's go ahead and set it up.
To create a sample Web app, log into AWS and then choose the AWS Elastic Beanstalk option from the list of services. When you do, you'll be taken to an introductory screen like the one that's shown in Figure 1. Click the Get Started button to begin.
 [Click on image for larger view.]
Figure 1. Click on the Get Started button.
[Click on image for larger view.]
Figure 1. Click on the Get Started button.
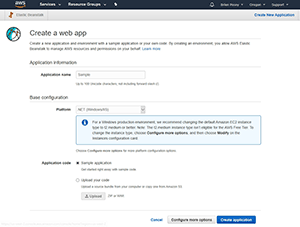
At this point, you'll be taken to a screen that prompts you to provide an application name, and to choose a platform. I will be calling my application Sample, and I will go with .NET as the platform type. This screen also asks you whether you want to upload your own application code or create a sample application. Because my goal in this article is to show you how AWS handles Web applications, let's go with the Sample Application option, as shown in Figure 2.
 [Click on image for larger view.]
Figure 2. Choose the Sample Application option.
[Click on image for larger view.]
Figure 2. Choose the Sample Application option.
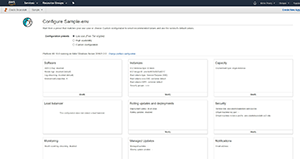
As you probably gathered from Figure 2, you could just click on the Create Application button to create the sample application. Rather than doing that, though, click on the Configure More Options button. This will take you to the screen shown in Figure 3.
 [Click on image for larger view.]
Figure 3. This screen gives you granular control over the application's environment.
[Click on image for larger view.]
Figure 3. This screen gives you granular control over the application's environment.
Whenever you create an application using AWS Elastic Beanstalk, you have to create an environment for that application. The environment determines the particulars of the underlying infrastructure. For example, the environment specifies the size of the Amazon Elastic Cloud (EC2) instance on which the Web application will run. It also lets you specify whether or not you want to load balance the application, and where you want to send notifications. There are quite a few environment-level options that you can configure. Had you simply clicked the Create Application button on the previous screen, AWS would have used its default environment settings. By clicking Configure More Options, however, you're given the opportunity to review the various configuration options, and to make changes if necessary.
If you want to change any of the environmental options, just click on the Modify button located beneath the option. That will take you to a screen that lets you enter values that are more to your liking. If you want to change the application's notification list, for example, click the Modify link found in the Notifications section. You'll then be prompted to provide a notification e-mail address.
When you're done configuring the environment, click on the Create Environment button found at the bottom of the screen. It takes AWS several minutes to create the environment for the application. The reason for this is that AWS has to deploy Amazon EC2 servers, load balancers and any other infrastructure components that you might have chosen.
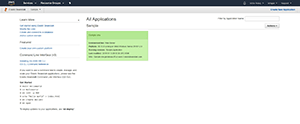
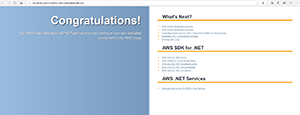
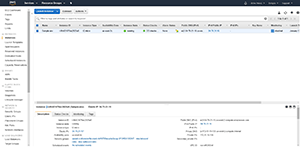
Once the setup process completes, click on the AWS Elastic Beanstalk tab at the top of the screen. When you do, you'll see a list of your Web applications, as shown in Figure 4. As you can see in the figure, you're given a bit of information about the platform, as well as the application's URL. In case you're wondering what the sample application does, you can see it in Figure 5.
 [Click on image for larger view.]
Figure 4. This is how AWS Elastic Beanstalk displays your newly created application.
[Click on image for larger view.]
Figure 4. This is how AWS Elastic Beanstalk displays your newly created application.
 [Click on image for larger view.]
Figure 5. This is my sample Web application.
[Click on image for larger view.]
Figure 5. This is my sample Web application.
So now that we have a sample Web app up and running, let's take a look at the app's inner workings. As previously mentioned, deploying a Web app causes AWS to create one or more Amazon EC2 virtual machines. In this case, I created a .NET-based Web app, so my app is running on top of a Windows Server that has been configured to run IIS. All of this was confirmed back in Figure 4.
If you open the Amazon EC2 dashboard, you can actually see the Amazon EC2 instance that was created during the application deployment process. Notice in Figure 6, that the Amazon EC2 instance's name matches the name of the environment that I created during the application deployment process.
 [Click on image for larger view.]
Figure 6. The Web application is running on an Amazon EC2 instance that was created automatically.
[Click on image for larger view.]
Figure 6. The Web application is running on an Amazon EC2 instance that was created automatically.
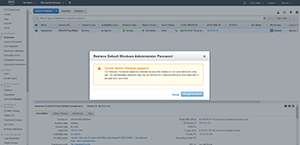
The one thing that's important to understand about this instance is that it's treated as an application component, rather than as a standalone entity. Normally, when you create an Amazon EC2 instance, you can log into the instance and configure it to meet your needs. You might have noticed during the instance creation process, however, that Amazon EC2 didn't ask for a key pair to associate with the instance. This means that you cannot log into the instance. In fact, Figure 7 shows what happens when you try to retrieve a password for the instance.
 [Click on image for larger view.]
Figure 7. You cannot log into the Web app's instance.
[Click on image for larger view.]
Figure 7. You cannot log into the Web app's instance.
Although you can't log into the Web app's underlying instance, there are still plenty of things that you can do to modify and control your Web app. I'll show you a few techniques in my next installment.
About the Author
Brien Posey is a 22-time Microsoft MVP with decades of IT experience. As a freelance writer, Posey has written thousands of articles and contributed to several dozen books on a wide variety of IT topics. Prior to going freelance, Posey was a CIO for a national chain of hospitals and health care facilities. He has also served as a network administrator for some of the country's largest insurance companies and for the Department of Defense at Fort Knox. In addition to his continued work in IT, Posey has spent the last several years actively training as a commercial scientist-astronaut candidate in preparation to fly on a mission to study polar mesospheric clouds from space. You can follow his spaceflight training on his Web site.