How-To
Drilling Down on VMware Code Capture
The VMware fling lets you create PowerCLI code from the actions that you perform on your vCenter Server.
Not all takeaways from a tech conference, such as VMworld, are the big announcements; sometimes it is just a small utterance during a presentation that can help you solve a problem or make one of your processes more efficient. For example, during one of the sessions I attended at VMworld Europe 2018, the presenter mentioned a VMware fling called Code Capture that allows you to create PowerCLI code from the actions that you perform on your vCenter Server. I've been looking to automate some vSphere functions, and it looks like this fling may save me some time doing this. In this article I give a brief introduction to Code Capture, walk you through how I installed and used it, and then give my final thoughts.
Code Capture Fling
Code Capture allows you to record the actions that you take in vSphere Client as PowerCLI code, and then replay the code back using PowerCLI. As a course developer and columnist, I find that I need to go through the labs or articles that I've created repeatedly in order to write codes; I'm hoping that by using Code Capture, I can record each lab step and then simply play them back using PowerCLI to verify them. I'm also hoping that examining the code that Code Capture outputs will help me figure out how to write code in PowerCLI.
Code Capture is a fling; as such, it's not officially supported by VMware, nor is it generally recommended to run flings on your production machines.
The requirements for the fling are straightforward: The resources to create it are a 2 vCPU, 4GB RAM, 14GB virtual disk VM, an existing 6.0 or 6.5 (it currently does not work with 6.7) vCenter Server (Windows or VCSA). The recommended browsers to connect to the client are Chrome, Firefox, IE11 and Microsoft Edge, although other browsers may work.
Installing Code Capture
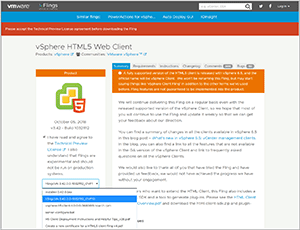
Code Capture is not a stand-alone product or a plug-in; it's part of the vSphere HTML5 Web Client fling (Figure 1). To use it, you'll first need to download and install the vSphere HTML5 Web Client. The fling will create a VM that you'll need to configure to point to your existing VCSA appliance. For this article, I used the vSphere HTML5 Web Client v3.42 (Build 10321112).
 [Click on image for larger view.]
Figure 1. The fling download.
[Click on image for larger view.]
Figure 1. The fling download.
I deployed the HTML5 Web Client appliance following the steps in the "H5 Client Deployment Instructions and Helpful Tips" (PDF download) guide. Following is a summary of those steps.
Because the vSphere HTML5 Web Client communicates with your existing VCSA, you'll need to configure the VCSA to accept the autoconfiguration script. To do this, enable SSH on vCenter (VCSA) to set up the appliance, which you can do from the VCSA VAMI screen, and then enable bash as the default shell by logging in to the VCSA console and entering /usr/bin/chsh -s "/bin/bash" root.
The vSphere HTML5 Web Client vApp (h5ngcVA-3.42.0.0-10321112_OVF10.ova) that I downloaded from the fling Web site was 925MB in size.
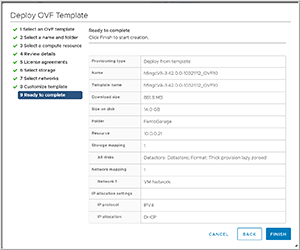
Once the OVF was downloaded, I installed the OVF from my existing vSphere client by following the prompts. From the last prompt, I reviewed the configuration (Figure 2) and clicked Finish.
 [Click on image for larger view.]
Figure 2. Deploying the OVF.
[Click on image for larger view.]
Figure 2. Deploying the OVF.
After a few minutes, the OVF had installed and I powered on the VM from the vSphere client. I made a note of the VM's IP address and pointed my Web browser to https://<H5_Appliance_IP_Address>:5490 at which point the Fling Appliance Management Interface (FAMI) asked me for my login credentials. I entered root with the default password of the VM of demova (Figure 3). Be careful when entering the username and password as the documentation says that if you enter the wrong password too many times, you will get locked out and will need to redeploy the appliance from the OVF.
 [Click on image for larger view.]
Figure 3. First login.
[Click on image for larger view.]
Figure 3. First login.
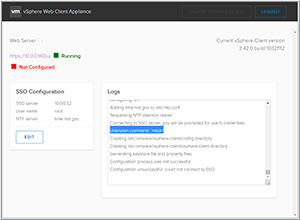
I then entered my SSO server information, the NTP server that I was using and clicked Configure. It's important that you enter the NTP information for the same the time zone you're using for the VCSA for the new client to work. The FAMI indicated that the configuration failed, and in the Logs section it reported "Unknown command: `mkdir'" (Figure 4). I corrected this issue by using ssh to log in to the FAMI console and entered /etc/init.d/configui configure --start yes --user root --vc <IP_Address_Of_vCenter>. This fix is documented on p. 6 of the "H5 Client Deployment" guide.
 [Click on image for larger view.]
Figure 4. Configuration error.
[Click on image for larger view.]
Figure 4. Configuration error.
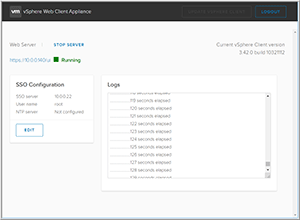
After 130 seconds, the log indicated that the vSphere Client Web Server had successfully started and the upper-right-hand corner of the FAMI had a link to the Web server (Figure 5).
 [Click on image for larger view.]
Figure 5. Installed vSphere Client Web server.
[Click on image for larger view.]
Figure 5. Installed vSphere Client Web server.
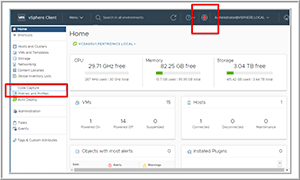
When I clicked the link to the Web server, a new browser tab opened and took me to the Web client, which looked similar to vSphere Client except that it had a red button on the top and Code Capture was included on the left-side menu (Figure 6).
 [Click on image for larger view.]
Figure 6. vSphere Client with Code Capture in left menu.
[Click on image for larger view.]
Figure 6. vSphere Client with Code Capture in left menu.
Using Code Capture
To test Code Capture, I clicked the red button (which caused it to start flashing, indicating that it was recording), cloned a VM, changed the memory allocation of the cloned VM and then powered on the cloned VM (Figure 7).
 [Click on image for larger view.]
Figure 7. Creating and configuring a VM.
[Click on image for larger view.]
Figure 7. Creating and configuring a VM.
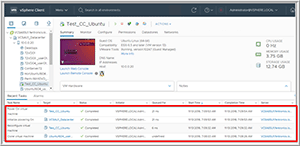
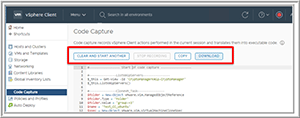
I then clicked the flashing red button again to stop recording my actions. At this point, I was directed to a Code Capture section that displayed the code that was created. The top of the screen had buttons for various actions: Clear and Start Another, Stop Recording (this was grayed out), Copy and Download (Figure 8).
 [Click on image for larger view.]
Figure 8. Code Capture actions.
[Click on image for larger view.]
Figure 8. Code Capture actions.
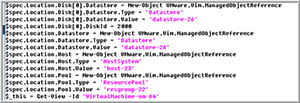
I clicked Download and then opened the downloaded file (power-cli-script) using VIM. Upon examining the code, I noted that Code Capture did produce low-level code rather than high-level cmdlets. Modifying this type of code is much more difficult than modifying codes containing cmdlets because low-level code calls out objects such as VMs and datastores by their identifying number instead of their common names (Figure 9). I saved the file as Create_Test_CC_Ubuntu_Clone.
 [Click on image for larger view.]
Figure 9. The captured code.
[Click on image for larger view.]
Figure 9. The captured code.
Running Code Capture Code
I powered down and deleted the cloned VM and then attempted to use PowerCLI to run the script that was created by Code Capture (Figure 10). However, this failed with numerus errors; I suspect that was due to the fact that I was trying to execute the exact same code, and some of the objects may have been changed. That said, I was able to inspect the code and follow what it was doing, which will be helpful when I generate my own code.
 [Click on image for larger view.]
Figure 10. Trying to execute the captured code.
[Click on image for larger view.]
Figure 10. Trying to execute the captured code.
Wrapping Up
Code Capture, like all tools, is not a fix-it-all, but it should have a place in your system administrator's toolbox. On the negative side, Code Capture is a fling that needs to be installed and is not guaranteed from vSphere version-to-version to work, and it also kicks out low-level code rather than high-level PowerCLI cmdlets. On the positive side, however, it was easy to install and let me produce code that would have taken a fair amount of time to research, debug and implement. I hope that VMware continues to keep working on this fling and improves it to export higher-level code.
About the Author
Tom Fenton has a wealth of hands-on IT experience gained over the past 30 years in a variety of technologies, with the past 20 years focusing on virtualization and storage. He currently works as a Technical Marketing Manager for ControlUp. He previously worked at VMware in Staff and Senior level positions. He has also worked as a Senior Validation Engineer with The Taneja Group, where he headed the Validation Service Lab and was instrumental in starting up its vSphere Virtual Volumes practice. He's on X @vDoppler.