How-To
Creating AWS Web Applications the Easy Way, Part 2
How to download and modify the code.
In part 1, I showed how Elastic Beanstalk creates an Amazon Elastic Compute Cloud (EC2) instance on which to run Web applications. I also demonstrated that AWS prevents you from being able to log into that instance. This raises the question of how you can go about configuring the instance.
When it comes to modifying the Web application code, the easiest option is probably going to be to use the command-line environment. Visual Studio is also supported, but for the purposes of this article I'll be working from the command line. The catch is that the normal command-line environment that you might be used to working with isn't going to be sufficient. You're going to have to install some additional tools for working with Amazon Elastic Block Storage (EBS).
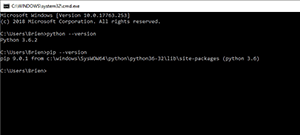
I'm going to assume that you already have the normal Amazon Web Services (AWS) command-line interface (CLI) environment installed (on a Windows desktop). The next thing that you'll need to install is Python (including PIP). You can download Python from here. Once Python is installed, you need to check Python and PIP to make sure that they're working correctly. You can do so by opening a Command Prompt window and running the following commands:
Python –Version
PIP –Version
The results should look something like what's shown in Figure 1. If the tests fail, then you may need to reinstall Python. This time, perform a custom installation and make sure that the Environment Variable option is enabled.
 [Click on image for larger view.]
Figure 1. Make sure that Python and PIP are working.
[Click on image for larger view.]
Figure 1. Make sure that Python and PIP are working.
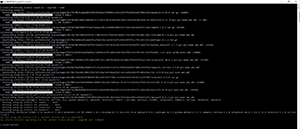
Now you can install the Elastic Beanstalk tools. To do so, run this command:
Python –Version
PIP –Version
You can see what the installation process looks like in Figure 2.
 [Click on image for larger view.]
Figure 2. This is how you install the Elastic Beanstalk tool.
[Click on image for larger view.]
Figure 2. This is how you install the Elastic Beanstalk tool.
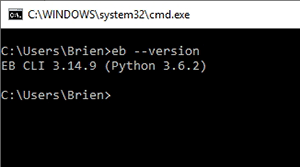
The last thing you'll have to do before the tool is ready to use is add a user environment variable to Windows. If you aren't sure how to do this, enter the phrase Environment Variable into the Cortana interface. You'll need to add the following line of text to the Path variable: %USERPROFILE%\AppData\Roaming\Python\Python36\Scripts. When you're done, close the Command Prompt window and then reopen it. Now, type the following command:
Eb –version
This will allow you to check to make sure that the Elastic Beanstalk tool is working. You can see the results in Figure 3.
 [Click on image for larger view.]
Figure 3. Making sure the Elastic Beanstalk tool is working.
[Click on image for larger view.]
Figure 3. Making sure the Elastic Beanstalk tool is working.
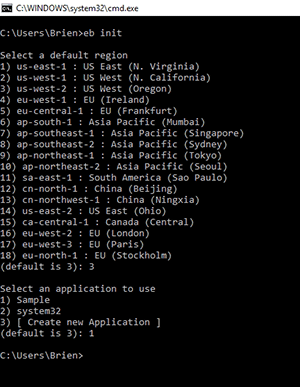
Now that the Elastic Beanstalk tool is working, you'll need to initialize it. To do so, type the following command:
Eb init
This command will bring up a menu-driven interface that asks you to choose your region and to select the Web application with which you want to work. You can see what this looks like in Figure 4. Incidentally, if you have trouble with the EB Init, check to make sure that your PC's clock is set correctly and that your C:\Users\<username>\.aws\credentials file includes the correct key information.
 [Click on image for larger view.]
Figure 4. Select your region and application.
[Click on image for larger view.]
Figure 4. Select your region and application.
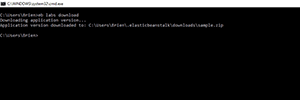
So now that the CLI is linked to the Web application, let's talk about application code. In a production environment you'll no doubt have a copy of the code on your PC. However, we've generated a sample application, so we don't have a copy of the Web application's code. If you want to take a look at the code, enter the following command:
Eb labs download
As you can see in Figure 5, this command downloads the Web application code to a .zip file.
 [Click on image for larger view.]
Figure 5. The entire Web application is downloaded into a .zip file.
[Click on image for larger view.]
Figure 5. The entire Web application is downloaded into a .zip file.
Now that the site has been downloaded, you can modify the code so that it can be uploaded as a new version. The actual upload process is beyond the scope of this article, because the package file must be structured in a very specific way. Even so, I wanted to show you how to download and modify a Web application.
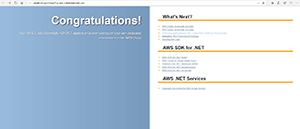
As you may recall, the sample Web site looks like what you see in Figure 6. So what I'm going to do is modify the line that says "Your AWS Elastic Beanstalk ASP.NET application is now running on your own dedicated environment in the AWS Cloud" and change it to say "Posey's AWS Elastic Beanstalk ASP.NET application is now running in the AWS Cloud." You can see my modifications to the recently downloaded source code in Figure 7.
 [Click on image for larger view.]
Figure 6. This is what the default sample Web site looks like.
[Click on image for larger view.]
Figure 6. This is what the default sample Web site looks like.
 [Click on image for larger view.]
Figure 7. The modified application's source code.
[Click on image for larger view.]
Figure 7. The modified application's source code.
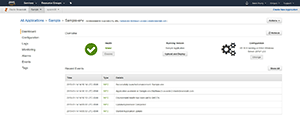
If I actually wanted to upload these changes, I would package the application and then go back to the Elastic Beanstalk console and click on my application. As you can see in Figure 8, the application's Dashboard contains an Upload and Deploy button that you can use to upload a zipped copy of a Web application.
 [Click on image for larger view.]
Figure 8. The Beanstalk Dashboard.
[Click on image for larger view.]
Figure 8. The Beanstalk Dashboard.
As previously noted, packaging an application is a relatively involved discussion, but it's something that I may write about in the future if there's enough interest.
About the Author
Brien Posey is a 22-time Microsoft MVP with decades of IT experience. As a freelance writer, Posey has written thousands of articles and contributed to several dozen books on a wide variety of IT topics. Prior to going freelance, Posey was a CIO for a national chain of hospitals and health care facilities. He has also served as a network administrator for some of the country's largest insurance companies and for the Department of Defense at Fort Knox. In addition to his continued work in IT, Posey has spent the last several years actively training as a commercial scientist-astronaut candidate in preparation to fly on a mission to study polar mesospheric clouds from space. You can follow his spaceflight training on his Web site.