How To Configure Citrix Provisioning Services To Target More Devices
Lately, I have been coming across many customers that are not leveraging the full potential of Citrix provisioning services simply because they are not configuring the product the right way. Basically, they are using it with all the defaults configured during installation.
One of those defaults, if not modified, will limit Citrix Provisioning Services to support only 160 devices. These devices can range from physical or virtual, but if you are planning on using the product for VDI, for instance, and you will be supporting more than 160 devices, I suggest you keep reading.
During the initial configuration of provisioning services, you are prompted to configure the number of UDP ports that you want to make available for use by target devices. If left unchanged, the default is 20 ports. These are ports on the PVS server for which devices can connect to and stream virtual disks.
Also by default, the advanced settings configure the server for 8 threads per UDP port. Translation: Each one of the 20 UDP ports that were configured earlier can support up to eight devices, which makes the total number of supported devices that this PVS Server can support using the following formula:
20UDP ports x 8 threads per port = 160 devices
Now, I am sure you are asking, "Will the 161st device get a denial of service?" Not exactly, the 161st device will not find an open port or thread and will go into a state of constantly requesting to connect to the PVS server. And this means you will see a lot of network retransmits and increased CPU utilization on the server, and this in turn will, of course, affect the devices that are currently connected and streaming.
In order to avoid this situation, you need to figure out how many devices you intend on supporting per PVS server. Best practice calls for anywhere from 700 to 1,000 devices per 1GB physical NIC on the server. Assuming you want to support 1,000 devices, the math would look like this:
50UDP ports x 20 threads per port = 1,000 devices
To change the default values, open the Citrix Provisioning Services Console and expand the farm, the site and the servers node, highlight the server in question and go to Properties. Once the Properties window is open, select the Network tab and then increase the number of available UDP ports (see Fig. 1).
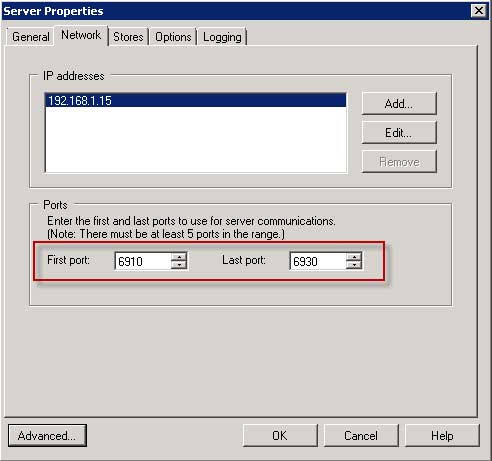 |
Figure 1. Increase the number of available UDP ports. (Click image to view larger version.) |
To change the number of threads per port, click on the Advanced button on the lower left-hand corner and a window will pop up that allows you to increase the number of threads per ports (see Fig. 2).
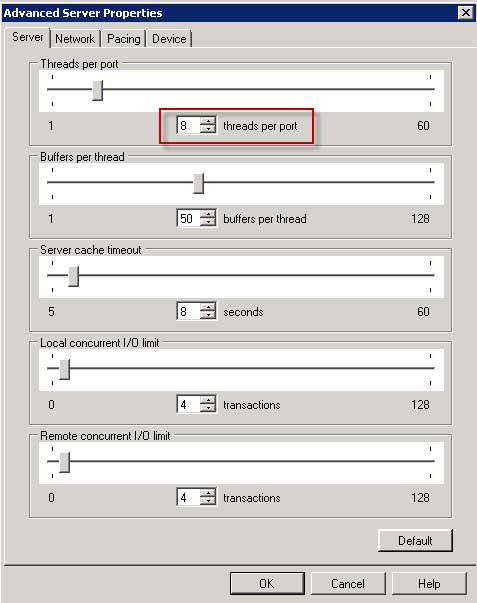 |
Figure 2. Pop-up to increase the number of threads per ports. (Click image to view larger version.) |
The advanced properties offer the ability to fine-tune the performance of provisioning services. In a future blog I will discuss the other values and how you can modify them. For now, if you are a Citrix PVS administrator, then having intimate knowledge of these values is crucial to running a successful infrastructure. Simply put, the default values that you see are in most cases are almost always not good enough (with the exception of a few). Experience has shown that these values are set at a default that is lower than where they should be.
If you have experience with these values and can report back to the community, please share your thoughts with us in the comments section what values you have configured and what your environment looks like.
Posted by Elias Khnaser on 07/16/2012 at 12:49 PM