How To Back Up Hyper-V VMs Natively in Windows Server 2012
Did you know that with Windows Server 2012 you can now backup Hyper-V VMs with very little effort and very little configuration? Now, I'm not recommending that you throw out your existing enterprise backup system and standardize on Windows Server Backup in 2012, especially if you are using products like System Center Data Protection Manager (which is fantastic for backup) or Veeam or others. But, in a pinch Windows Server 2012's backup is quite handy.
Before you can use Windows Server Backup, you must add that feature from Server Manager. To do that, launch the Roles and Features wizard and select the Windows Server Backup feature and follow the wizard prompts.
Once installed, you can then launch it from within Administrative Tools | Windows Server Backup. Now, the cool thing about Windows Server Backup is the ability, when configured, to back up to cloud storage. You can, for example, integrate with Windows Azure for online backups. For the purposes of our discussion, we will focus on local backups and in a later blog I will cover backing up to Azure (before my Azure trial account expires).
From within the Windows Server Backup console, right-click Local Backup. You will be presented with several options for backup, including scheduled backups and Backup Once (see Fig. 1).
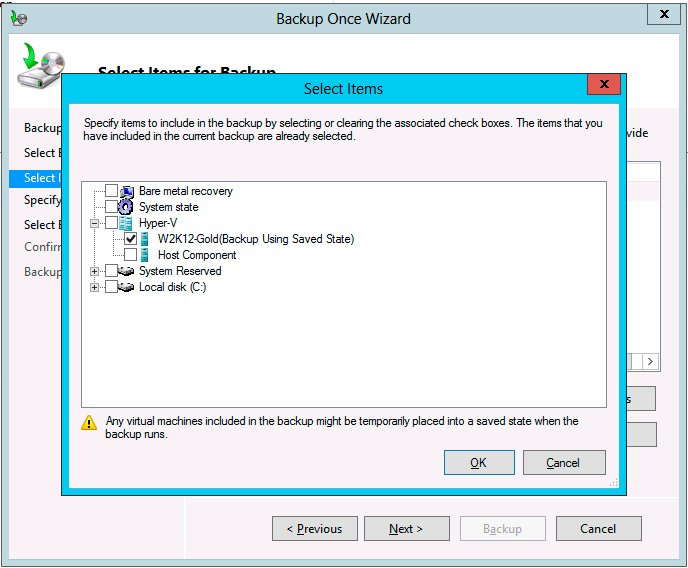 |
Figure 1. Virtual backups done right. (Click image to view larger version.) |
The latter is what we will be using, as it is a somewhat streamlined process aimed at allowing you to back up rapidly. Follow these steps:
- The first screen shows you whether or not you are going to use a scheduled backup or Different options. This is necessary since we are not using any pre-configured options which would be the case with Scheduled Backups. As a result we have to specify a few things. Click Next to continue.
- Next up you have the option of selecting a full server backup or a custom backup in which you can specify volumes and files.
- Select Custom and click Next.
- At this point, the wizard is asking you to specify what it is you want to back up. Click on Add Items, expand Hyper-V, select the VM you wish to backup, and click OK.
Follow the rest of the wizard to finish the backup process. You will be prompted to select a destination for backing up your VM. Confirm your backup settings and finally execute the backup.
Backing up VMs with Windows Server Backup really is not difficult at all and you have probably done it a million times. I did want to draw your attention to this capability, as I find it useful when I need to do a quick backup of a single VM.
Posted by Elias Khnaser on 02/27/2013 at 1:38 PM