How To Guy
How To Create a Workflow in VMware vRealize Orchestrator
The tool has come a long way in its ability to efficiently set up processes in vSphere.
I'm a fan of automating complex IT processes to save me valuable time as a system administrator. I've always utilized the free vCenter Orchestrator automation tool in VMware vSphere. When vCO was first introduced, many admins didn't want to use it because of the tedious workflow creation process, and the work involved in troubleshooting various DNS installation issues. Despite those painful experiences, I faithfully stood by it, and still use it.
vCO has now been renamed VMware vRealize Orchestrator (vRO). vRO still allows for IT automation in vSphere, but now makes the automation process more user friendly. A workflow can now be built with a few mouse clicks, and pre-built workflows are available too. In addition, vRO allows for launching workflows within the VMware Cloud Suite.
If you're new to vRO, the first step is to learn about it. VMware has a series of free vRO online tutorials to get you quickly up to speed. Once vRO's completely installed, you'll use the Orchestrator client to create and run your native workflows. The vSphere Web Client integrates vRO, allowing you to run native and preconfigured workflows. Third-party developers can also incorporate their workflows through the Orchestrator Web Services APIs within vCenter.
 [Click on image for larger view.]
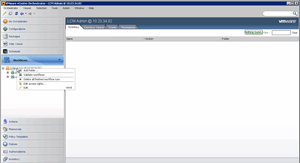
Figure 1. Creating a folder for your workflows.
[Click on image for larger view.]
Figure 1. Creating a folder for your workflows.
Here's how to create a basic workflow in vRO.
1. Log in to the vRO client.
2. Ensure that you're in the vRO Design Mode by selecting the Workflows tab.
3. Create a folder to store your workflows by choosing add folder (see Figure 1).
4. Right-click the folder and choose New workflow.
5. Name your workflow (e.g., Create Change Request).
You'll automatically be taken into edit mode by creating your first workflow. To manually enter or exit edit mode, click on the pencil icon in the vRO window.
6. Drag and drop schema elements and label them.
7. Use the schema editor to make changes on the schema elements and provide a description of the element.
8. Click on the scripting tab to optionally add your own code (e.g., javascript to "Create Change Request"). If your script displays green text, it's been correctly added. It will read similar to this:
System.log ("Create Change Request!");
Server.log ("Create Change Request!");
9. Click the close button.
10. Click save and close.
11. Click continue anyway.
12. Click your validate button to validate the workflow. You're now out of edit mode.
13. Your workflow is now complete. Make sure that you check the general tab to see the results of the workflow.
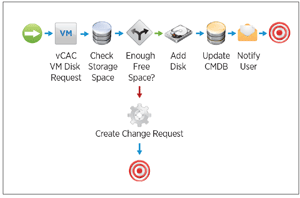
If your workflow successfully completed, you'll have useable workflow, like the one shown in Figure 2.
 [Click on image for larger view.]
Figure 2. The vRealize Orchestrator workflow visualizer
[Click on image for larger view.]
Figure 2. The vRealize Orchestrator workflow visualizer
vRO also provides out-of-the-box workflows with pre-configured plug-in solutions. The plug-in solutions range from automating VMware Site Recovery Manager and vCloud Automation Center management, to typical end-user operations. The plug-in solutions include third-party vendors such as Cisco, Hitachi, HP, NetApp and Infoblox.
About the Author
James Brown, vExpert, VCP, MCSE, is a senior virtualization engineer and CEO of Virtuxperts and VMware Users Group Leader in Las Vegas, NV. James' area of expertise includes virtualization, infrastructure and Windows systems.