How-To
MicroK8s, Part 3: How To Deploy a Pod in Kubernetes
This third article in a three-part series on MicroK8s explains how you can deploy a Pod using nginx in K8s.
In this article, the third in a series on Kubernetes (K8s), I will show you how I used K8s to deploy a Pod. In the first article, I showed you how I installed K8s by using Ubuntu as a base system with the MicroK8s snap plug. In the second article, I went a step further and showed you how I monitored and managed K8s by using a GUI. These articles are a great starting point for understanding how to install and manage K8s, and I recommend you read these prior to this current article if you aren't yet familiar with K8s.
Applications in K8s
As containers provide an isolated workspace to run code, you can create a container to accomplish a task and use it, albeit with some limitations, on other K8s environments. Pods are the basic building blocks of K8s and can have of one or more containers in them. When you instantiate a Pod, you're prompted to specify the number of replica Pods it should have.
Deploying an nginx Pod
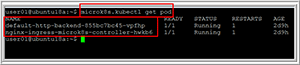
Before I deployed a new Pod, l looked at the existing Pods in my K8s environment; by entering microk8s.kubectl get pod, the output showed that I had two Pods running (Figure 1).
 [Click on image for larger view.]
Figure 1. The existing Pods running in my K8s environment.
[Click on image for larger view.]
Figure 1. The existing Pods running in my K8s environment.
In this example, the Pod that I deploy will use nginx as the application. Nginx is a very popular Web server that can also be used as a reverse proxy, load balancer, mail proxy and HTTP cache. I'll use it to serve up its welcome page.
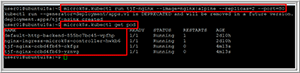
I created and started a new deployment with two Pods of nginx listed on port 80, with the nginx image from the alpine repository, by entering microk8s.kubectl run tjf-nginx --image=nginx:alpine --replicas=2 --port=80. When I enter microk8s.kubectl get pod, I can then see four Pods running (Figure 2).
 [Click on image for larger view.]
Figure 2. Running nginx to see four Pods running.
[Click on image for larger view.]
Figure 2. Running nginx to see four Pods running.
I then deleted the Pods by entering microk8s.kubectl delete pods <full name of pods> (Figure 3).
 [Click on image for larger view.]
Figure 3. Deleting the Pods.
[Click on image for larger view.]
Figure 3. Deleting the Pods.
I then recreated a Pod by reentering microk8s.kubectl run tjf-nginx --image=nginx:alpine --replicas=2 --port=80 (Figure 4). To get more information about the nginx Pods I was running, I entered microk8s.kubectl describe pods tjf-nginx. From the output I could see more information about the Pod, including the IP addresses that were assigned to the two containers running within it: 10.1.1.16 and 10.1.1.17.
 [Click on image for larger view.]
Figure 4. Recreating the Pods.
[Click on image for larger view.]
Figure 4. Recreating the Pods.
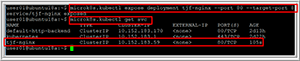
The IP address assigned to the Pods are internal to the Pod's environment and not visible to the outside world. To make them visible, I entered microk8s.kubectl expose deployment tjf-nginx --type=NodePort --name=tjf2-nginx; doing so exposed the service and gave it a port, which I could then use in conjunction with my Ubuntu IP address to access my nginx server. I ascertained my nginx IP port by entering microk8s.kubectl get service.
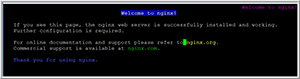
I tested the ability to access my nginx server via Lynx (a text-based Web browser), which I installed by entering sudo apt install lynx. After I entered lynx 10.0.0.177:31984, I was presented with the nginx welcome screen (Figure 5).
 [Click on image for larger view.]
Figure 5. The nginx Lynx welcome screen.
[Click on image for larger view.]
Figure 5. The nginx Lynx welcome screen.
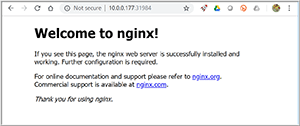
I then went to an external browser and entered the URL 10.0.0.177:31984 and was again greeted with the nginx welcome screen (Figure 6).
 [Click on image for larger view.]
Figure 6. The nginx browser welcome screen.
[Click on image for larger view.]
Figure 6. The nginx browser welcome screen.
Wrapping Up
In this article, the third in my series on K8s, I explained how I deployed an nginx image on my MicroK8s system and then configured K8s to allow me to connect to my nginx Pods through a port. Although K8s is heavily scripted, I've tried to avoid using scripts in my examples; however, as you become more familiar with K8s, you'll want to become familiar with the process and techniques of using scripts and configuration files as they're an integral aspect of its operation. I've also tried to limit explaining K8s concepts to what was relevant and necessary to understand topics in these articles.
About the Author
Tom Fenton has a wealth of hands-on IT experience gained over the past 30 years in a variety of technologies, with the past 20 years focusing on virtualization and storage. He currently works as a Technical Marketing Manager for ControlUp. He previously worked at VMware in Staff and Senior level positions. He has also worked as a Senior Validation Engineer with The Taneja Group, where he headed the Validation Service Lab and was instrumental in starting up its vSphere Virtual Volumes practice. He's on X @vDoppler.