How-To
Using AWS to Manage Your IoT Devices
Brien Posey explains how to manage AWS "things" -- digital representations of IoT devices -- by categorize them so they can be easily tracked.
Amazon Web Services (AWS) provides several different mechanisms that can help you to track and manage your Internet of Things (IoT) devices. One of the most basic things that you can do within the AWS cloud it to create an inventory of the IoT devices that your organization uses.
When you create a device inventory, what you are really doing is creating a collection of "things." Amazon defines "things" as digital representations of IoT devices. Although these things do not have any connectivity to the actual devices (at least not initially), they can be used to categorize devices in a way that makes the devices a bit easier to keep track of.
To get started, select IoT Device Management from the list of services (it's in the Internet of Things section). When you do, you will be taken into the AWS IoT console, with the Things tab selected. You can see what this looks like in Figure 1.
 [Click on image for larger view.] Figure 1: This is the console that you can use to make AWS aware of your IoT devices.
Before you begin adding your IoT device inventory to AWS, I recommend taking a few minutes to create some types, groups and billing groups. These steps are optional, but creating these objects can make your things inventory much more useful.
Begin by selecting the Types tab and then click on the Create Thing Type button. This will take you to the Create Thing Type screen, which you can see in Figure 2. As you can see in the figure, creating a thing type is a really simple process. You need only to enter a name and an optional description. You also have the option of adding tags or searchable attributes if you want. Thing types should generally represent the IoT device types that your organization uses. For example, you might create thing types with names such as Security Cameras, Industrial Sensors or Door Locks.
 [Click on image for larger view.] Figure 2: This is the screen used to define thing types.
Creating a thing group works in nearly the same way as creating a thing type. You need only to select the Thing Groups tab, click on the Create Thing Group button, and then fill in the details. It is worth noting however, that AWS gives you the option of creating either static or dynamic thing groups. A static group is exactly like creating a thing type. A dynamic group however, is a group whose membership changes based on the attributes that are assigned to things.
One more thing that you need to know about creating thing groups is that the interface allows you to create parent/child groups. This can be useful if you are creating a group structure that is based on geographic location. A top-level group might, for instance, be based on the country or state where the building is located. A second level group might correspond to a building floor or perhaps a department within a building.
Billing Groups are also quite simple to create. Just select the Billing Groups tab and click the Create Billing Group button. Next, enter the name of the billing group that you want to create along with an optional description and click Create. Keep in mind that like all of the other group types, billing groups are optional. You would only create a billing group if there is a cost structure associated with your IoT devices.
Once you have set up any types or groups that you might need, it's time to begin defining things. Remember, things are objects that represent the IoT devices within your organization. To do so, select the Things tab and click on the Create Things button. This will take you to the Create Things screen.
The Create Things screen gives you a choice between creating a single thing (creating a digital representation of a single device) and creating many things (setting up a large number of IoT devices). In an enterprise environment, you would typically use the Create Many things option. However, for the purposes of this blog post, I am going to be using the Create Single Thing option because I want to show you how the process works.
When you create a thing, the only piece of information that you absolutely have to provide is a name for the thing that you are creating. However, the interface makes it easy to associate the thing that you are creating with thing groups and billing groups. You can also use this interface to specify a thing type. You can see what this looks like in Figure 3.
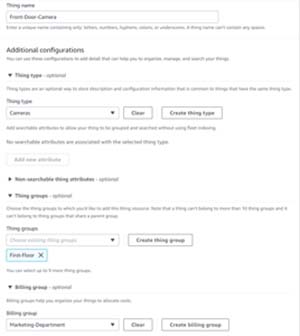 [Click on image for larger view.] Figure 3: This is the screen used to define thing types.
You can associate a thing with a thing type, thing group and billing group.
It is worth noting that the interface allows you to create thing types, thing groups and billing groups on the fly if necessary. A thing can also be added to multiple thing groups.
Scroll down and you will see an option to create a device shadow. A device shadow is used to mirror a device's state to AWS. I will be discussing device connectivity in a separate blog post.
Click Next, and you will be taken to the Configure Device Certificate screen. If you are connecting the thing to a physical device, then a certificate is required. You can either allow AWS to automatically generate the certificate or you can use an existing certificate. Conversely, if you aren't going to be connecting the thing to the device then you can skip the certificate creation process.
Click Next and you will be taken to a screen that lets you assign a policy to the device. Policies are optional, but allow you to specify the types of actions that are authorized for the thing.
When you are done, click on the Create Thing button. Depending on the options that you have chosen, you may be given the opportunity to download a device certificate, key files and a root CA certificate. You will need to go ahead and download these items now, because AWS does not allow you to download key files later on.
When you are done, you will see the new thing added to the list of things, as shown in Figure 4. You can click on a thing to see all of its details or to interact with a thing. There is also a search option available (shown in the figure) that can help you to locate a specific thing within your organization.
 [Click on image for larger view.] Figure 4: This is the screen used to define thing types.
The new thing has been added to the list of things.
Stay tuned for posts on connecting to IoT devices and creating security policies for them.
About the Author
Brien Posey is a 22-time Microsoft MVP with decades of IT experience. As a freelance writer, Posey has written thousands of articles and contributed to several dozen books on a wide variety of IT topics. Prior to going freelance, Posey was a CIO for a national chain of hospitals and health care facilities. He has also served as a network administrator for some of the country's largest insurance companies and for the Department of Defense at Fort Knox. In addition to his continued work in IT, Posey has spent the last several years actively training as a commercial scientist-astronaut candidate in preparation to fly on a mission to study polar mesospheric clouds from space. You can follow his spaceflight training on his Web site.