Sean's Virtual Desktop
VMware App Volumes, Part 3: Configuring an App Stack
In this installment, learn how to create an App Stack, then assign it.
Other Installments:
In Part 2 of this series, I went over how to install and configure the various App Volumes components. Now that it's installed, we can start to create App Stacks and assign them to users and/or computers.
What's an App Stack?
Before we step into the process of creating an App Stack, I wanted to quickly review what an App Stack is.
As I mentioned in Part 1, an App Stack is the term VMware uses to describe the application layers created by App Volumes. An App Stack consists of a virtual disk that contains everything an application needs to run. This can include the executables, DLL files, and registry keys. When an App Stack is loaded, the contents of the virtual disk are seamlessly merged into the system. As far as the user can tell, the applications are natively installed on their system.
Prerequisites for Creating an App Stack
There are a few things that we need to have before we can create an App Stack. First, we need a fully configured App Volumes environment. The steps for setting that up were covered in Part 2 of this series.
We'll also need a machine to capture the applications. This should be a virtual machine (VM) with a clean OS install; only the Horizon View or XenDesktop Agent and the App Volumes agent should be installed. There should be no other applications installed on the capture machine. It's best to take a snapshot of the capture machine after installing the App Volumes agent, so you can roll the machine back to a clean state after the App Stack is created.
App Stacks can be assigned to Active Directory users, groups, computers, and/or organizational units. Although there may be cases where you only need to assign an application to a single user or virtual desktop, in most cases, you'll want to create Active Directory groups for managing user application assignments. This enables applications to be assigned by members of the help desk without having to grant them access to the App Volumes Web interface. If you need to assign an application to multiple computers, such as an RDSH farm, you can assign the application to an Active Directory Organizational Unit (OU) and place all the targeted computers into that OU.
An App Stack captured on one version of Windows may work on other versions. This isn't a recommended practice, though, as some applications may not play nicely with newer, or older, versions of Windows, and App Stacks should be created on the version of Windows that they'll be used on. So if you're planning to deploy an application to Windows 7, then upgrade to Windows 8.1, you should consider recreating the App Stack to ensure that everything works correctly.
Creating An App Stack
The steps for creating an App Stack:
1. Ensure that your capture machine is powered on.
2. Log into the App Volumes Web interface.
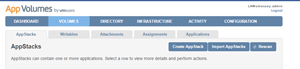
3. Click on the Volumes tab. The first sub-tab is App Stacks. We'll do all of our provisioning and management from this tab.
 [Click on image for larger view.]
4. Click the Create AppStack button.
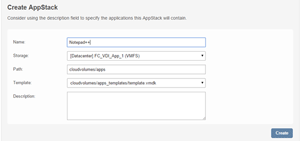
5. Give the App Stack a name and select the datastore where it will be stored. Click Create to start create the blank disk.
 [Click on image for larger view.]
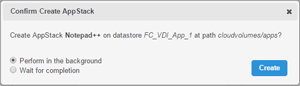
6. App Volumes will ask if you want to create the disk in the background or wait for it to complete before moving to the next screen. Click Perform in Background and then click Create.
 [Click on image for larger view.]
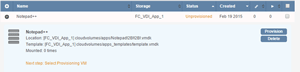
7. After the App Stack has been created, it will show up in the list of App Stacks with a status of Unprovisioned.
 [Click on image for larger view.]
8. Click on the plus sign to the left of the App Stack name, to reveal the details of the App Stack. Click provision to start the provisioning process.
 [Click on image for larger view.]
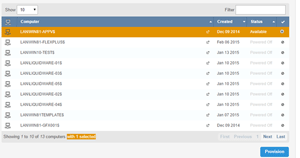
9. You will need to select a VM with the App Volumes agent installed to act as the provisioning machine. Enter the name of your capture machine in the search box and click Search.
 [Click on image for larger view.]
10. Select your capture machine by clicking the radio button in the far right-hand column. Click Provision to continue.
 [Click on image for larger view.]
11. Sign into your capture machine.
12. When you sign in, you'll be presented with a dialog box stating that you're in provisioning mode. Click OK to continue.
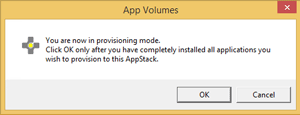 [Click on image for larger view.]
13. A second box will pop up asking if you have finished installing your application. Ignore this box for now, but do not close it.
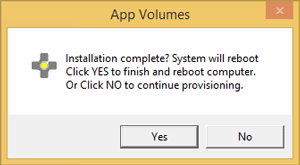 [Click on image for larger view.]
14. Install your application or applications.
15. When you have finished installing your applications, click Yes on the "Installation Complete?" dialog box.
16. You will be prompted to reboot your computer. Click OK.
 [Click on image for larger view.]
17. Sign into your capture machine after it reboots. After signing in, you'll be presented with a dialog box informing you of the status of your application provisioning. Click OK.
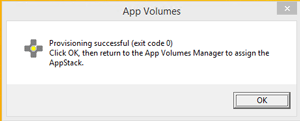 [Click on image for larger view.]
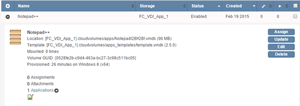
18. Go back to the App Volumes Web interface. Find your new application on the App Stacks tab and click the plus sign to the left of the name. You should now see options to assign, update, and edit the App Stack.
 [Click on image for larger view.]
19. Click Assign to assign the application.
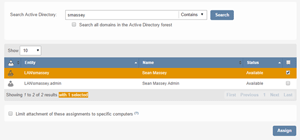
20. Enter the name of the Active Directory object that the App Stack will be assigned to and click Search.
 [Click on image for larger view.]
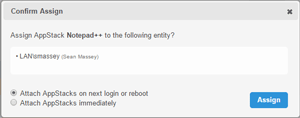
21. Select the AD object and click Assign. Note: You can select multiple objects.
22. After clicking assign, you'll be prompted on when the assignment should take effect. The two options are to take effect on the next login or reboot or to take effect immediately. Select the best option for the application and click Assign.
 [Click on image for larger view.]
Once you click Assign, the application will be available to users.
This wraps up the basics of configuring App Volumes. From this point forward, you should be able to quickly provision and assign applications to users and/or virtual desktops without having to manually install the applications or recompose desktop pools.
About the Author
Sean Massey is a systems administrator from Appleton, Wisc. He blogs about VDI, Windows PowerShell, and automation at http://seanmassey.net, and is active on Twitter as @seanpmassey.