Sean's Virtual Desktop
VMware App Volumes, Part 4: Updating an App Stack
Now that you've learned how to create and deploy App Stacks, you need to know how to update and patch them.
Previous Installments:
- Part 1
- Part 2
- Part 3
In the Part 3 of this series, I covered how to create an App Volumes App Stack and deploy it to users. Applications rarely remain static, though. Applications may have updates and patches that need to be deployed to users, and applications packaged in App Stacks are no exception.
The process of updating an App Stack isn't much different from the process of creating an App Stack. When you update an App Stack, the original is cloned and mounted for provisioning on your provisioning computer. This provides a nice rollback mechanism; if the update fails or causes other issues, it's easy to roll users back to the previous iteration until a resolution is found.
The update process doesn't automatically provision the new App Stack for all users it was assigned to. This gives administrators the ability to test the package and control when it's rolled out and who it's rolled out to. Users will need to have the old package removed before the new package can be assigned to avoid any conflicts. App Volumes currently doesn't check for conflicts, so you'll need to make sure to remove users from the old App Stack.
The process for updating an App Stack:
1. Ensure that your capture and provisioning machine is powered on.
2. Log into the App Volumes Web interface.
3. Click on the Volumes tab.
4. Click on the App Stacks sub-tab.
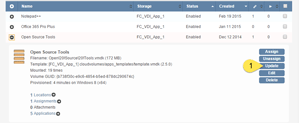
5. Find the App Stack that you need to update and click the "+" next to it.
6. Click the Update button (the number 1 in the graphic).
 [Click on image for larger view.]
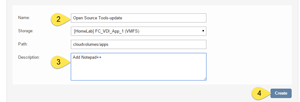
7. Give the package a new name (2) and add a description with the changes that you're making (3).
8. Click Create (4).
 [Click on image for larger view.]
9. App Volumes will clone the existing App Stack so changes can be made. Once this is done, the new App Stack will show up in an unprovisioned state.
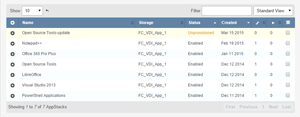 [Click on image for larger view.]
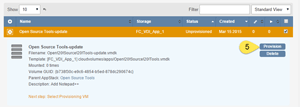
10. Select the unprovisioned App Stack and click Provision (5)
 [Click on image for larger view.]
11. Select the provisioning machine that you'll use for the update and click Provision.
 [Click on image for larger view.]
12. Click Start Provisioning. (6)
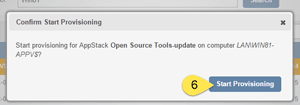 [Click on image for larger view.]
13. Log into your provisioning machine and install the updates or additional applications. Once the installation is complete, click OK to finalize the provisioning and reboot the machine. After the machine reboots, you'll need to log in one last time to verify that provisioning was successful. If it was, click OK. (7)
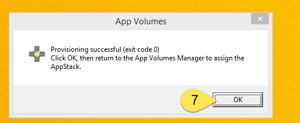 [Click on image for larger view.]
14. Now you'll need to assign the App Stack. Go back to the App Volumes Manager Web interface. Expand the updated App Stack by clicking the "+" button. Click Assign. (8)
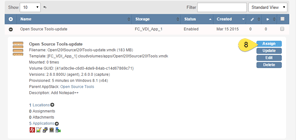 [Click on image for larger view.]
15. Search for the AD Users, Groups, or OUs where the App Stack will be assigned. Select the objects and click Assign.
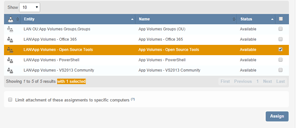 [Click on image for larger view.]
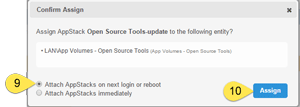
16. Select the "Attach AppStacks on next login or reboot" option (9) and click Assign (10). Users will receive the updated package the next time they log in.
 [Click on image for larger view.]
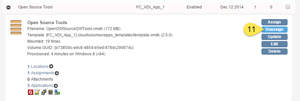
17. Find the old App Stack and expand it by clicking the "+" button. Click Unassign (11).
 [Click on image for larger view.]
18. Select the users and groups who should no longer receive this App Stack. Click Unassign (12).
 [Click on image for larger view.]
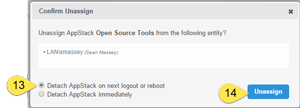
19. Select "Detach AppStack on next logout or reboot" (13) and click Unassign. Users will no longer receive the outdated package.
 [Click on image for larger view.]
This covers the basics of how to update an existing App Stack. It's important to remember that the update process creates a clone or copy of the existing App Stack; App Stack assignments are not automatically propagated to the updated package, so any changes that you make won't take effect until you assign the new package to users. You'll also need to remove any assignments from the old package to ensure that there are no collisions or conflicts from overlapping packages.
About the Author
Sean Massey is a systems administrator from Appleton, Wisc. He blogs about VDI, Windows PowerShell, and automation at http://seanmassey.net, and is active on Twitter as @seanpmassey.