How-To
How To Create Nested Virtual Machines in Microsoft Azure
They can do a lot more than just test and dev.
Last month we looked at how to set up nested VMs in Hyper-V on Windows Server 2016. Azure, of course, runs on Hyper-V and some regions already have some of their hosts upgraded to Windows Server 2016.
Microsoft announced support for nested VMs at its Build conference, and expanded on this in a blog post in July 2017. Supported machine sizes are Dv3 and Ev3; both support newer Intel processor architectures, and the Ev3 series supports more memory-to-vCPU ratio. The largest Dv3 machine has 64 vCPUs and 256GB RAM, whereas the biggest Ev3 has 64 vCPUs and 432GB RAM.
In this article, I'm going to use a virtual machine (VM) in Azure with nested virtualization for a Microsoft Official Curriculum (MOC) course. I teach part-time at a Microsoft Imagine Academy, and I'm exploring the possibility of using Azure instead of local hardware to deliver courses. As we covered last month, there are many uses for nested virtualization (apart from training labs), such as dev and test, demos, containers and user isolation.
Creating the VM
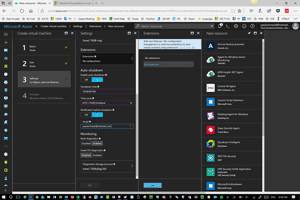
Sign in to portal.azure.com (or if you're really adventurous, try preview.portal.azure.com). Click New, Compute, Windows Server 2016 Datacenter and follow the normal process to create a VM (
Figure 1). Make sure you pick one of the regions that has the new VMs sizes and support for nesting (US West 2 and East, Europe West and APAC Southeast; there may be additional regions by the time you read this).
 [Click on image for larger view.]
Figure 1. Creating a virtual machine in Azure.
[Click on image for larger view.]
Figure 1. Creating a virtual machine in Azure.
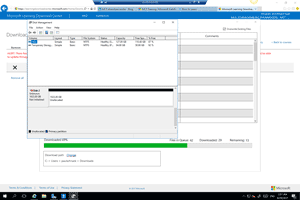
Fill in the basic information about the VM, then pick a size. I opted for the E4s v3, which comes with 4 vCPUs and 32GB RAM, to match the requirements at Hardware level 8 for MOC courses (multi core CPU, SSD storage and 32 GB RAM). I also created a separate data disk on SSD storage (Figure 2) to host the VMs, opting for the P30/1 TB size because of the associated performance (5000 IOPS and max throughput of 200 MB/second).
Another option would have been to create smaller premium managed disks and pool them together in the OS using Storage Spaces. I could also have opted for HDD-based storage disks, but the performance would not be great for the nested VMs inside the host.
Once the VM was up and running, I initialized and formatted the data disk.
 [Click on image for larger view.]
Figure 2. Preparing the SSD-based data disk in the host virtual machine.
[Click on image for larger view.]
Figure 2. Preparing the SSD-based data disk in the host virtual machine.
I then downloaded the course VMs and material, and enabled the Hyper-V role. Note that unlike on-premises Hyper-V, there's nothing you need to do to prepare the VM for being a virtualization host; it's already been done by Azure.
After restarting the VM I unpacked the VMs that make up the sample course (20-740B Installation, Storage and Compute with Windows Server 2016). (As a side note, the download times of the 43GB files for the course took only a few minutes, whereas it would have taken hours on my own (Australian) Internet connection.)
Nested VMs
If you don't have ready-made VMs to run on your new Hyper-V host, you can use the
script by Cheng Ding; simply edit the script to provide a name for the VM, and it'll create it for you. You can also enable further levels of virtualization and create a nested VM inside a nested VM, and so on (
Figure 3).
 [Click on image for larger view.]
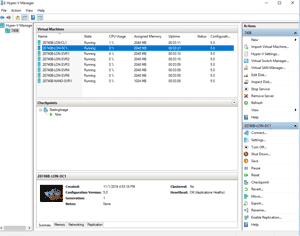
Figure 3. All 740B lab machines running on the host virtual machine.
[Click on image for larger view.]
Figure 3. All 740B lab machines running on the host virtual machine.
Note that MAC address spoofing isn't supported in Azure, so if your nested VMs need Internet connectivity, you'll need to use NAT or fixed IP addressing. Microsoft provides a VM for this in the MOC course (MT17B-WS2016-NAT), but it'll need Internet access configured according to the instructions by Ding before the other VMs can connect through it.
A fellow trainer reading this article might point out that the VM in Azure won't let students complete all the labs in the 20-740B course, as you can't set up a VM in Azure to boot from an alternate VHDX file easily, and the VM doesn't have a TPM 2.0 chip. This was more a proof-of-concept than an actual implementation, but I think the concept demonstrated here shows that the future of IT training will include some options for using nested VMs in Azure.
There are a few things for Microsoft Learning to tackle to make this a reality, like an easy way to capture the VM once it's been prepared with all the relevant courses so that it can be deployed multiple times for a classroom full of students.
Fortunately, Azure already has some technologies to help with this such as managed images, DevTest Labs and of course ARM templates and DSC with Azure Automation. DevTest Labs comes with quotas and policies, along with automated shutdown (which is now also available for vanilla VMs).
 [Click on image for larger view.]
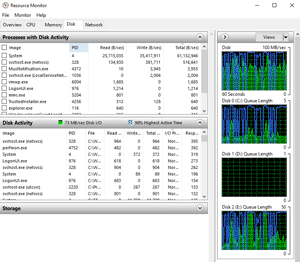
Figure 4. Disk performance when starting all lab virtual machines simultaneously was 73 MB/sec.
The Need for Speed
[Click on image for larger view.]
Figure 4. Disk performance when starting all lab virtual machines simultaneously was 73 MB/sec.
The Need for Speed
Overall, I found this approach really easy; the lab VMs start and run incredibly fast in Azure (
Figure 4). It'll be interesting to see if Microsoft Learning (and third-party training environment providers) jump on board with nested VMs in Azure.
About the Author
Paul Schnackenburg has been working in IT for nearly 30 years and has been teaching for over 20 years. He runs Expert IT Solutions, an IT consultancy in Australia. Paul focuses on cloud technologies such as Azure and Microsoft 365 and how to secure IT, whether in the cloud or on-premises. He's a frequent speaker at conferences and writes for several sites, including virtualizationreview.com. Find him at @paulschnack on Twitter or on his blog at TellITasITis.com.au.