How-To
How To Set Up Hyper-V Nested Virtualization in Windows Server 2016
Do more with your Windows virtual machines and containers.
Welcome to this Hyper-V column, where I'll give you practical guidance to using new features and tips and tricks on running it efficiently. In this first article, we'll look at nested virtualization, available in both Windows Server 2016 and Windows 10 (Pro and higher).
This has been available on the VMware side of the fence for some time, but it's not supported in production. The main reason Microsoft fully supports nested virtualization in the latest version of Hyper-V is Windows/Hyper-V containers.
In case you missed it, Windows Server 2016 (and Windows 10) offer Windows containers, which are very similar to Linux containers. Docker is ported to Windows, so you use the same tools to manage containers on both platforms. These two OS containers offer isolation, but it's not a hardened security boundary, which is probably OK in your development phase and perhaps if you deploy containers in production on your own in-house metal.
If you're looking to run your code in containers in a public cloud, though, you'll want to go with Hyper-V Containers. Inside, these are identical to Windows containers, and your code will work exactly the same in both; but since each container is isolated in its own very lightweight virtual machine (VM), you get the full benefit of Hyper-V isolation from any other container on the same host.
Another benefit of nested Hyper-V virtualization is for labs and training scenarios where you can, for instance, build a cluster of several virtual Hyper-V hosts on a single physical computer.
Note that only Hyper-V is supported in a nested VM; Microsoft won't support VMware's ESXi or another virtualization platform inside a Hyper-V VM and be supported (although it works).
Getting Started
Your physical machine needs hardware-assisted virtualization, called Intel VT or AMD-V, in your UEFI/BIOS setup. Data Execution Prevention (DEP) needs to be enabled, and your 64-bit processor must support second-level address translation (SLAT). If you haven't enabled Hyper-V yet and would like to see if your box is up to it, open a PowerShell prompt and type
Systeminfo.exe; toward the end it'll list your hardware and if the requirements are met. Find the Windows 10 requirements
here and the Windows Server 2016
here.
Nested virtualization isn't a feature enabled system wide; rather, you create a VM and expose the virtualization features on the virtual processors on that VM, which then allows you to run Hyper-V in that VM.
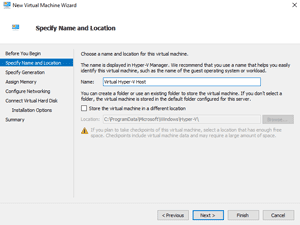
So, head over to Hyper-V Manager to create a new VM (Figure 1):
 [Click on image for larger view.]
Figure 1. Naming the new Hyper-V Virtual Host.
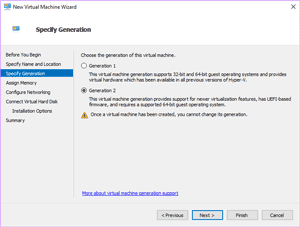
Make sure you pick a "Generation 2" VM, as shown in Figure 2.
 [Click on image for larger view.]
Figure 2. Selecting a Generation 2 VM.
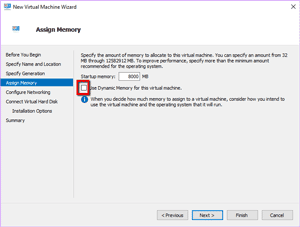
Next you'll need to assign memory. This will vary based on the amount of memory in your physical host and how many VMs you're planning to run inside the VM. In this example I picked 8GB. Make sure you turn OFF dynamic memory (see Figure 3), as this can't be used with nested virtualization VMs.
 [Click on image for larger view.]
Figure 3. Assigning memory and turning off dynamic memory.
Connect the VM to an appropriate virtual switch and configure a virtual hard disk. If you're planning on storing VMs on an internal disk, make it big enough to fit them, then install Windows Server 2016 from an ISO file.
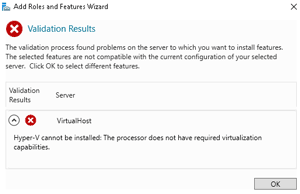
Once your VM has been created, if you start it and try to add the Hyper-V role in Server Manager you'll get the error shown in Figure 4.
 [Click on image for larger view.]
Figure 4. An error in Server Manager before the processor's enabled.
So instead (this must be done with the VM turned off), open an administrative PowerShell command prompt on your physical host and type:
Set-VMProcessor -VMName Name-ExposeVirtualizationExtensions $true
Note that if you get an error message here, it's most likely because you've imported a VM from an earlier version of Hyper-V (rather than creating a new one as per above), in which case the configuration version needs to be updated to 8, with a simple right-click in Hyper-V Manager.
Start the VM and install the Hyper-V role. After the obligatory restart after a Hyper-V role installation, open Hyper-V Manager and create a VM inside your host VM.
There are some limitations today: dynamic memory for the host isn't supported, and you can't change the amount of memory while the VM is running. You can't Live Migrate the host (although live migrations of VMs between clustered virtual VM hosts works), and you also can't checkpoint the virtual host.
You also need to choose an option for networking. Either enable MAC Address Spoofing on your host virtual switch (that the virtual VM is connected through), or if you don't have access to those settings, you'll need to configure NAT.
To enable MAC Address Spoofing, type the following at a PowerShell command prompt:
Get-VMNetworkAdapter -VMName Name | Set-VMNetworkAdapter -MacAddressSpoofing On
Microsoft announced support for VMs in Azure (running on Windows Server 2016) that support nested virtualization back at Build 2017 and recently provided more details. It'll be interesting to see the different scenarios people will use this new capability for. I have some ideas, which I'll cover in my next article.
About the Author
Paul Schnackenburg has been working in IT for nearly 30 years and has been teaching for over 20 years. He runs Expert IT Solutions, an IT consultancy in Australia. Paul focuses on cloud technologies such as Azure and Microsoft 365 and how to secure IT, whether in the cloud or on-premises. He's a frequent speaker at conferences and writes for several sites, including virtualizationreview.com. Find him at @paulschnack on Twitter or on his blog at TellITasITis.com.au.