SmartDeploy Enterprise Cuts Costs, Saves Time Pushing Out Windows Images
Prowess SmartDeploy Enterprise can create and install Windows images to a number of platforms, even virtualized ones.
Many IT admins these days are looking to cut costs and save time, yet it seems like they face an ever-growing list of users to migrate or set up. If this sounds familiar, Prowess SmartDeploy Enterprise may be the solution you're seeking. SmartDeploy Enterprise allows IT staff to create images of custom Windows servers/client installations and easily install them across the enterprise. It also allows seamless migration from previous versions of Windows to the latest and greatest. The product works in five phases, as defined by Prowess.
For starters, it enables images to be preconfigured with any number of applications and deployed across different makes/models of laptops, desktops and servers. SmartDeploy is hardware-independent and uses Platform Packs to group drivers for any system of your choosing. This allows any combination of application setups, which can be very helpful when configuring images based on job role or function.
The total time from download and install to image deployment is estimated by Prowess to be one to two hours, which I found to be accurate once I got the hang of it. Obviously, hardware and network performance plays a factor, but even when testing on older host machines this claim held true.
Licensing starts at $2,294.95, which includes basic support for one year, with other support options also available. While that may seem expensive, you should take note that once an image is created, any user can install it without the need for an additional license. This enables flexible options like creating offline media for remote users on a DVD or external hard drive that users can deploy in conjunction with an online backup software to ensure they can always get themselves back up and running.
The five phases of how the product works are: install SmartDeploy, build a master image, capture an image, create a Platform Pack and deploy the image. These phases are outlined in the well-written user guide, and presented along with other useful information.
Phase 1: Setup and Installation
Getting SmartDeploy Enterprise up and running is straightforward: Simply obtain a copy through the download section of the company's Web site. Installation requirements are fairly basic: 1Ghz CPU (x86 or x64, based on the types of virtual machines, or VMs, you'll be deploying), 2GB of RAM and 20GB of free hard drive capacity. (Note: Remember to add space for any additional VMs.) Also, based on your deployment method, you'll need a CD/DVD writer or USB port for portable drives. The actual installation process itself is quick and easy. Once complete, the user guide (located in Programs) provides all the setup instructions you need to get your first image created. SmartDeploy can be installed on a client or server version of Windows and supports the following systems: Windows XP SP3, Windows Vista SP2, Windows 7, Windows Server 2003 R2 SP2, Windows Server 2008 SP2 and Windows Server 2008 R2.
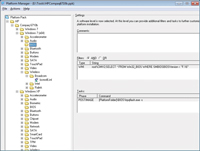
[Click on image for larger view.] |
| Figure 1. Prowess created Platform Packs for multiple laptops or desktops, servers and virtualization software. |
Phase 2: Master Image
Once you've installed SmartDeploy, you'll need to fire up your virtualization software to create the master image. SmartDeploy supports quite a few virtual environments, which are outlined in the user guide after installation. The list includes Microsoft Virtual PC 2007, Microsoft Virtual Server 2005 R2, Microsoft Hyper-V, Parallels Workstation 2.2, Sun VirtualBox 2.2, VMware Workstation 6.5, VMware Player 2.5, VMware Server 1.0 and Citrix XenServer 5.0. Supported guest VMs include anything from Windows 2000 Server and later; the full list can be found in the user guide.
You first need to create a new VM and install any required applications or updates. After you've got the VM how you want it, shut it down. Caveat: You shouldn't install anything that's hardware-specific during this phase. Any drivers for hardware will be added during the fourth phase.
Phase 3: Capture
With your VM powered off, you can now start the Capture Wizard located in the Prowess Programs folder. It will ask you for the location of your VM hard drive file, which you can browse to. From there, you can enter the Product Key and Local Administrator password, both of which will be hidden during deployment. You'll then come to the Image Type screen, where there are two options: Standard and Differencing. Standard creates a regular base Windows Imaging Format (.wim) file, while Differencing allows you to make changes to the original VM for things such as Windows Updates or new application versions, and then links them to the original .wim file. This works well for pushing new items to .wim files without the need to re-capture VMs. Finally, you're asked for a location, image name and image description. You'll want to be as detailed as you can, because things could get messy if you decide to add more than one image to the .wim file, causing confusion down the line when you're trying to select the correct image.
Phase 4: Platform Packs
As I mentioned earlier, Platform Packs are basically groupings of drivers for particular systems. They're based on a well-conceived design that allows you to add drivers for all systems in your organization without the need to create multiple images for specific system models and OSes. The best part about this feature is that Prowess has had the foresight to create Platform Packs for a bunch of different laptops/desktops, servers and even virtualization software. You can find these in the download section of the company's Web site, which makes this a great time-saving feature. In the event that your system isn't listed, you can use Platform Manager to create your own. The process is fairly easy and shouldn't take too long. Using Platform Manager, you can also add all your organization's systems into one Platform Pack that can be utilized for all your images.
Phase 5: Deployment
Based on your method of deployment, the final phase involves creating a Boot Media. The first method includes placing .wim files on a network share and then creating a SmartDeploy Windows PE ISO, which can be placed on a CD/DVD or USB drive. This ISO is used to boot the machine, connect to the network share with the .wim file and install the image. The second option allows you to create a contained install including all required items to boot, and install the image to a machine. This option is useful for users
located in remote offices with slow connections to primary office servers. It provides a great recovery disk option with all required applications ready to go. Deployment can also be automated with answer files. In order to do this, you must run through the wizard manually on one of your systems, and then export that config to a file.
Migration
Migrating machines to the latest OS is an important capability of SmartDeploy. Many organizations have yet to deploy Windows 7 for various reasons, including hesitant users and incompatible apps.
SmartDeploy provides a solution to both, because it has the option to create a VM of any existing OS already on the desktop/laptop. This lets users utilize their legacy environments while providing the latest and greatest features via new OSes.
Overall, I was impressed with SmartDeploy Enterprise. Its small yet powerful footprint and many deployment options make it ideal for IT shops of almost any size. Also, because it can work in conjunction with Windows Deployment Services, it can easily scale to large environments. With more Platform Packs being added -- and the ability to create your own Platform Packs -- it supports limitless combinations of system components. Because of the way licensing works, purchasing one license allows one person to create any number of images, which can be deployed by anyone without the need for more licenses -- potentially leading to large savings for larger companies.
An issue that may be problematic relates to not having a separate utility to create an answer file. However, this is a minor inconvenience and is definitely outweighed by all the other aspects of this excellent program.
About the Author
Kevin Da Silva provides system admin support for a midsize enterprise software consulting company. He has MCSE certification and is a Microsoft Certified Small Business Specialist.