Virtual Microsoft
Hyper-V Replica, Part 1: Use Cases and Configuration
Gotchas and advice for proper setup of Microsoft's backup and disaster recovery platform.
First introduced in Windows Server 2012 as an easy-to-configure, virtualization-based disaster recovery (DR) solution, Hyper-V Replica is now an integral part of DR in many businesses, small and large.
Back in those days, VMware was king of the hill and its replication solution (Site Recovery Manager, or SRM) was a distinctly big business approach with complex configuration and hardware requirements. Hyper-V Replica is a much simpler beast; you can replicate from one server to another, either within the same datacenter or to a remote site, given sufficient bandwidth.
You can also replicate from a cluster to another cluster, or from a cluster to a standalone host. Configuration is on a per-VM basis. The underlying storage is irrelevant; it could be SAN on one end and local disks on the other. Windows 2012 R2 allows replication every 30 seconds, five minutes or 15 minutes, as well as extending replication with a third "hop."
Clearly, VMware felt that there was a need in its platform for a similar solution, eventually releasing VMware vSphere Replication. This demonstrates that the market leader doesn't always innovate first. (VirtualizationReview.com has previously tackled vSphere Replication.)
Sometimes admins are confused as to the distinction between backup and DR. This is probably because in the "good old days" they were one and the same. Back up the server to a tape drive: if someone deleted a file by mistake or a disk died, restore the data from the tape. If the whole server failed -- a DR situation -- then restore the whole server from the same backup.
Today these are two separate functions: DR means to have a working, standby copy of a workload that can be activated if the primary server or datacenter is out of action; backup is a way to save data to an offsite location for data recovery in case of deletion or corruption, going back months or years.
Another difference is that DR is generally only concerned with up-to-date data. So if a file is deleted by mistake on the VM, it'll be deleted from the replica VM within a very short amount of time; hence the need for both backup and DR technologies.
I use Hyper-V Replica in production regularly. In this two-part series, I'll introduce the technology, give some tips around configuration and most importantly, what not to do.
Configuring the Servers
To enable a Hyper-V host to send or receive replicated VMs, go to Hyper-V settings in Hyper-V Manager (
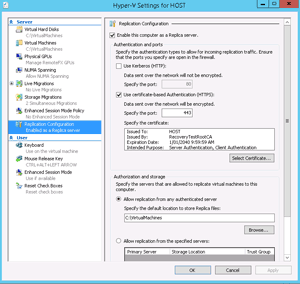
Figure 1) and scroll down to Replication Configuration on the left. Here is where you enable Replica and pick the authentication method. If both the primary server (where the VM is currently running) and the replica server are in the same domain, you should definitely use Kerberos (HTTP). If you're replicating within the same datacenter or over a private WAN link this transport is also appropriate; you also determine if any server can replicate to this server, or provide a list of those that can.
 [Click on image for larger view.]
Figure 1. Configuring a Hyper-V Replica server.
If your servers aren't in the same domain (or in a trusted domain), you have to use the second option: certificate-based authentication (HTTPS). This is also the one to pick if you're going to send the replication traffic over the Internet or another untrusted network to another site.
On each server, you'll also need to enable the appropriate rule in Control Panel/Windows Firewall/Advanced Settings/Inbound Rules. For HTTP (Kerberos) use Hyper-V Replica HTTP Listener (TCP-In), and for certificate based use Hyper-V Replica HTTPS Listener (TCP-In), as shown in Figure 2.
 [Click on image for larger view.]
Figure 2. Enabling the appropriate inbound traffic rules.
Configuring a VM for Replication
Before enabling replication on a VM, separate your page file onto a separate virtual disk, rather than leaving it on the C: volume so you can choose not to replicate this VHDX. The benefits are clear: the churn of disk changes written to the page file do not need to be replicated, especially as the VM will create a new page file anyway if it's started on the replica server. Not only will you save network bandwidth between the hosts, you'll also have less disk IO on the replica server.
Here's the sequence:
- Shut down the VM
- Create a fixed size virtual disk
- Attach it to the VM (if the VM is running Windows Server 2008 R2, make the disk an IDE attached disk, not SCSI)
- Start the VM
- Inside the VM go to Disk Management and initialize the new virtual disk and format it
- Go to System/Advanced/ Performance Settings/Advanced/Virtual Memory and click on Change
- Define a new page file on the new drive so that it takes up less than 90 percent of the space; otherwise, you'll keep getting warnings about lack of disk space
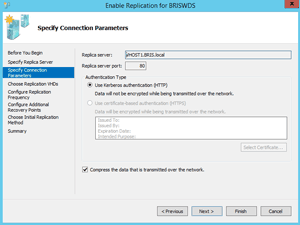
Once the setup's complete, you can right-click on a VM in Hyper-V manager and go through the wizard to enable replication. First you have to pick the server where the VM is going to be replicated; on the next screen select whether to use compression or not: in a LAN environment, probably not, over a WAN connection or the Internet, definitely), as Figure 3 shows.
 [Click on image for larger view.]
Figure 3. Adding compression to replication.
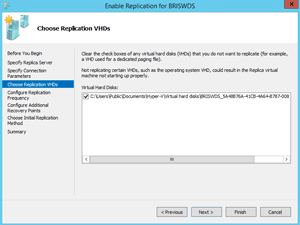
The next screen, shown in Figure 4, gives you the option to pick which disks of the VM to replicate. This is where you'll uncheck your new page file virtual disk.
 [Click on image for larger view.]
Figure 4. Uncheck any VHDs that you don't want to replicate.
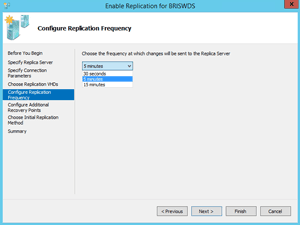
Next, define the frequency of replication (Figure 5). If replication is via LAN select 30 seconds; otherwise five or 15 minutes. Microsoft pitches the latter for unreliable, slow networks.
 [Click on image for larger view.]
Figure 5. Set replication frequency. For slow or unreliable networks, choose 15 minutes.
The next screen in the wizard (Figure 6) gives you the option to maintain the most up-to-date version of the VM, or alternatively take VSS snapshots every x hours for up to 24 hours. This can be very handy if your VM becomes corrupt (say through ransomware or other malware), and lets you pick an earlier point in time to failover to.
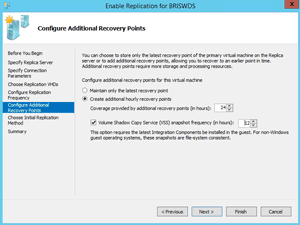 [Click on image for larger view.]
Figure 6. Setting snapshot frequency.
The final screen (Figure 7) lets you define how the initial data copy should occur. If you have the bandwidth, you can replicate the full data set over the wire; alternatively, you can export a copy of the VM from the source to a removable hard drive and ship that drive to the replica server side. This would leave only the changes that occurred during the shipping period to replicate over the wire.
If you've already restored a copy of the VM on the replica side, you can pick that one to use. If you're going to do the initial replica over the network, you can choose to schedule it for non-business hours.
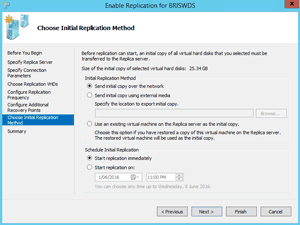 [Click on image for larger view.]
Figure 7. Setting the initial conditions for replication.
Certificate-Based Replication
If both hosts are in a trusted domain, pick Kerberos and your setup is done. If you're looking to replicate between workgroup hosts in a small business, for example, or if you're going to replicate over the Internet, you'll need to set up certificates.
One option is to purchase certificates for each server from a public CA; this is certainly appropriate if, for instance, you're going to have VMs from several different clients replicating to a server in your office.
On the other hand, if all you're looking for is setting up replication between two hosts, self-signed certificates can be cost effective. The basic principle is that you need to create a root authority self-signed certificate as well as a leaf certificate. You'll also need to disable revocation checking, as self-signed certificates don't support this. The process is outlined here, and the steps to use makecert.exe to create self-signed certificates are documented here.
Looking Ahead to Part Two
In the next installment I'll look at enabling extended replication; a popular setup is to have a VM replicated from one host to another in the same datacenter, with a second replication to a third server in an offsite location.
We'll also look at the Hyper-V Replica Broker and how it's used when VMs are replicated to and from clusters. Adding the cloud to the mix in the form of replicating to Azure will also be covered, as well as using Azure Site Recovery for orchestration; particular application considerations for replication; and the different types of failover. Adding System Center Virtual Machine Manager for orchestration will also be investigated, in addition to the changes in Hyper-V Replica in Windows Server 2016.