How-To
How To Artificially Constrain the Network in a Virtual Environment
For those times when latency needs to be added for testing purposes.
It's usually the case that we try and minimize the amount of latency in our datacenter. However, recently I had the opportunity to design a troubleshooting and performance optimization class for Horizon View, VMware's Virtual Desktop Infrastructure (VDI) product, in which I needed to do the exact opposite: introduce latency into my network.
When planning a VDI deployment, there are many calculations and rules-of-thumb to take into consideration. Although these numbers are a good starting place for initial planning and design, they are only that: a starting point. Specifically, one of the rules-of-thumb that we deal with is 250ms as the acceptable latency between a virtual desktop and the client. The question is what the end user's experience will be like with a 250ms delay.
To find out if this configuration is acceptable, there are various tools that can be used to implement controls and limits on network resources. These tools range from very expensive proprietary hardware tools that plug into the network stream to free tools that run as software. The one I chose, after investigating many of the available possibilities, was Dummynet running in FreeBSD. I chose it due to its cost (free), its ease of use, and relatively broad acceptance and appeal.
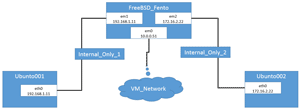
This article will show how to install, set up, and use Dummynet to introduce latency into a network. My testbed consisted of a virtual machine (VM) running on FreeBSD to run Dummynet, and two Linux VMs to communicate through dummynet. The topology of this layout is shown in Figure 1. Although this example was with vSphere, with modifications these instructions will apply to other hypervisors or physical systems.
 [Click on image for larger view.]
Figure 1. Testbed topology.
Dummynet for Dummies
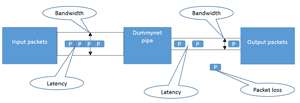
Dummynet was originally designed to only test network protocols, but is now used for a variety of network testing scenarios as well as enforcing bandwidth management. In its current incarnation, it can be used to simulate and enforce queues, bandwidth limitations, delays and packet losses using various scheduling algorithms.
Figure 2 shows how dummynet can affect the network.
 [Click on image for larger view.]
Figure 2. How Dummynet can affect networks.
Dummynet supports a range of operating systems, including FreeBSD, OSX, Linux, and Windows; it works by intercepting traffic on its way through the network stack, and by passing packets to objects. These objects are called "pipes." Each pipe will have its own set of queues, scheduler and so on, all with configurable features such as bandwidth, delay, loss rate, queue size and scheduling policy.
Traffic selection is done by using the ipfw firewall. Ipfw allows the selection of traffic that will be modified by Dummynet. Dummynet allows for multiple pipes to be created, traffic to be sent to different pipes, and even multiple layers of pipes.
Installing FreeBSD
Dummynet was originally written for FreeBSD, but has since been ported to OSX, Linux and Windows. I decided to use FreeBSD as it seems to have the best support for Dummynet and comes as a standard component on FreeBSD.
My installation of Dummynet was on a virtual machine (VM) running FreeBSD 10.3. I choose to host the VM on ESXi 6.0 running on a Dell R610. The Dell R610 had two Xeon CPU X5660/2.80GHz, for a total of 12 cores, 80GB RAM, 4 Maxtor 450GB SSD drives and 8 physical NICs. The only other VM running on the system during the testing was the vCenter Service Appliance, a Windows Server 2012 (64-bit) machine running Active Directory services and two Ubuntu VMs that will be used to test Dummynet.
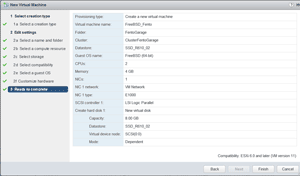
The FreeBSD 10.3 ISO image (FreeBSD-10.3-RELEASE-amd64-dvd.xz) was downloaded from here. After uncompressing the XZ image and uploading it to my ESXi server datastore, I created a two-proc, 4GB RAM, 8GB thin-provisioned hard drive, one NIC VM. The NIC was connected to the standard "VM Network." The Guest OS type for the VM was FreeBSD (64-Bit). The VM settings are shown in Figure 3. Two additional NICs will be added to the VM at a later time.
 [Click on image for larger view.]
Figure 3. The FreeBSD VM settings.
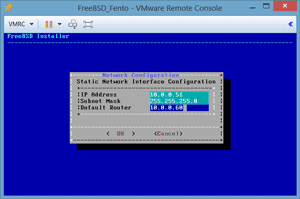
The FreeBSD image was installed in a VM named FreeBSD_Fento. During installation, the NIC (em0) was presented and configured with a static IP address of 10.0.0.51, subnet 255.255.255.0, and a router of 10.0.0.60 (my AD server; see Figure 3). This VM was not configured for IPv6, but NTPD was enabled on the system. All other defaults during the installation were accepted. It took less than 10 minutes to install FreeBSD.
 [Click on image for larger view.]
Figure 4. Configuring a FreeBSD NIC.
After installing FreeBSD, the system was rebooted and the network verified to ensure it was working as expected using
ping,
ifconfig and
netstat –rn . The
/etc/rc.conf file was inspected to show the networking configuration. The contents of the
/etc/rc.conf file:
hostname="FreeBSD_Fento"
ifconfig_em0="inet 10.0.0.51 netmask  255.255.255.0"
defaultrouter="10.0.0.60"
sshd_enable="YES"
ntpd_enable="YES"
After rebooting the VM and logging into it as root, networking was verified and SSH was enabled for root by editing /etc/ssh/sshd_config and changing "#PermitRootLogin no" to "PermitRootLogin yes". I then restarted the SSHD service with /etc/rc.d/sshd restart. This allows the root user to login using an SSH client (such as putty) to access the system.
VMware tools were not installed, because various forums are reporting that there may be issues with running the VMware tools on FreeBSD 10.X systems.
Setting up Dummynet
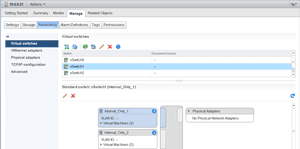
In order to test Dummynet, I created two virtual standard switches in vCenter: internal_only_1 and internal_only_2. These switches were created on a vSwitch that didn't have a physical adapter attached. The switch configuration in shown in
Figure 5.
 [Click on image for larger view.]
Figure 5. Switch Configuration.
The FreeBSD VM was then powered down from the command line with the
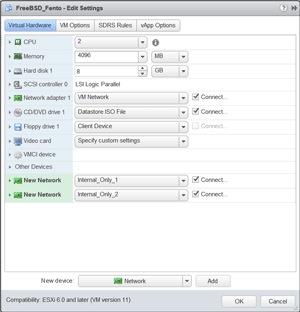
init 0 command and two additional NICs were added to it, each assigned to one of the Internal_only networks.
Figure 6 shows the VM with the two new NICs. After the system booted up, the first new NIC (em1) was given a static IP address of 192.168.1.11, and the second was given a static IP address of 172.16.2.22. This was done by adding the following lines to the
/etc/rc.conf file:
ifconfig_em1="inet 192.168.1.11 netmask  255.255.255.0"
ifconfig_em2="inet 172.16.2.22 netmask 255.255.255.0"
The system was rebooted from the command line with the init 6 command and the system booted up. The ipfconfig command was used to verify that the new NICs had the correct IP addresses.
 [Click on image for larger view.]
Figure 6. Virtual Machine Settings with three NICs.
Dummynet is loaded into the kernel by typing in
kldload dummynet. If Dummynet has already been loaded into the kernel, a message will indicate this.
If it is was loaded by the kldload rather than being already in the kernel, the following needs to be added into the
/boot/loader.conf file to load it in during boot time:
dummynet_load="YES"
kern.hz=10000
The ipfw firewall is needed to run Dummynet. To do this, the following lines need to be placed into the /etc/rc.conf file:
firewall_enable="YES"
firewall_type="open"
gateway_enable="YES"
The default setting for the IPFW firewall is to deny all connections. To allow all connections, the /etc/rc.firewall file should be replaced with a file containing the following:
#!bin/sh
ipfw add allow all from any to any
If you're not running this VM in a secure lab environment, other firewall rules that match your lab policies or corporate governance should be also be applied to the base firewall rules.
After these steps have been properly completed, the system will be correctly and successfully configured to run Dummynet after it's rebooted.
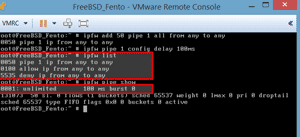
The system was rebooted and it was verified that ipfw was operating and did have a basic rule set by issuing the ipfw list command (Figure 9). This showed two rules: the first rule, 00100, allows all connections while the second rule, 65535, denies all. As IPFW uses a "first match wins" rule, all packets will pass through successfully.
Using DummynetDummynet was tested by setting up two Ubuntu VMs: Ubuntu_001 and Ubuntu_002. Ubuntu_001 was placed on internal_only_1 network and given an IP address of 192.168.1.111, with a route of 192.168.1.11. Ubuntu_002 was placed on the internal_only_2 network and given an IP address of 172.16.2.222, with a route of 172.16.2.22.
It was verified that Ubuntu_002 could ping Ubuntu_001 and Ubuntu_001 could ping from Ubuntu_002; the RTT of the ping was 0.541. It was also confirmed that all the NICs in the FreeBSD VM could be pinged from Ubuntu_001 and Ubuntu_002. Tracepath was used to verify that path was, in fact, traversing through the FreeBSD system.
Once it was established that the networking between the two Ubuntu systems was configured correctly, and a baseline latency between the two systems was obtained with the ping, the act of interjecting latency using Dummynet could be tested. A pipe was created and configured to introduce a latency of 100ms to the network using these commands:
ipfw add 50 pipe 1 all from any to any
ipfw pipe 1 config delay 100ms
The ipfw ruleset was shown using ipfw list and the parameters of the pipe by using ipfw pipe show.
Figure 7 shows the configuration and verification of the Dummynet pipe that was created.
 [Click on image for larger view.]
Figure 7. The Dummynet configuration.
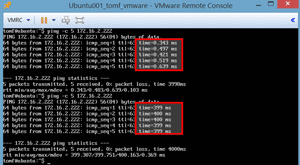
After the Dummynet pipe was created and activated, ping was again used to test the latency. The first five pings in
Figure 8 show the time before the rules were applied, while the next five show the response after the rules were applied.
 [Click on image for larger view.]
Figure 8. RTT from ping Command.
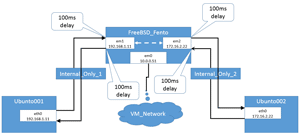
The 400ms may seem considerably longer than what is expected, but since the "from any to any" rule was used, all of the network packets flowing into and out of the FreeBSD VM were affected.
Figure 9 shows a diagram of the network path that the ping command takes and shows why it has a latency of 400ms between the two systems. The 400ms time is the result of 100ms of delay for each time the NIC is passed through. The packet hits the FreeBSD NIC once on initial entry to em1, and again as it exits em2. It is then received by Ubuntu_002 and returned to em2, and then finally exits em1 as it's returned to Ubuntu_001. The math is 4 x 100ms = 400ms. Figure 9 shows the latency in the Dummynet system.
 [Click on image for larger view.]
Figure 9. Latency introduced to network.
Going Farther
This article has outlined how to setup and configure a FreeBSD VM with Dummynet in order to artificially constrain a network stream. The next article in this series will explain other features of Dummynet, such as how to use Dummynet to limit bandwidth and how to introduce jitter in to the network stream.
About the Author
Tom Fenton has a wealth of hands-on IT experience gained over the past 30 years in a variety of technologies, with the past 20 years focusing on virtualization and storage. He previously worked as a Technical Marketing Manager for ControlUp. He also previously worked at VMware in Staff and Senior level positions. He has also worked as a Senior Validation Engineer with The Taneja Group, where he headed the Validation Service Lab and was instrumental in starting up its vSphere Virtual Volumes practice. He's on X @vDoppler.