How-To
Monitor Your IoT Devices with AWS
Organize, manage and monitor your Internet of Things devices with Amazon Web Services.
Those of us in the tech industry constantly hear talk of the so-called Internet of Things (IoT) revolution. While it's easy to dismiss all of this talk as being little more than vendor hype, two things have recently become apparent to me.
First, IoT has become far more pervasive than I had ever stopped to think. Recently, the main IP address scope used by my DHCP server ran out of addresses. When I started digging into the problem, I realized that the problem was largely being caused by the IoT devices on my network. Keep in mind that I work out of my home, but even so, there were enough IoT devices in use that the devices managed to deplete all of the available IP addresses on my network.
The other thing that I've been thinking about lately is that traditional management and monitoring techniques don't really work for IoT devices. Think about it for a moment. As IT pros, we might use an SNMP-based tool to monitor our network infrastructure hardware. Similarly, we might use an agent-based or WinRM-based tool to keep tabs on the PCs and the Windows Servers on our network. However, these techniques don't work very well for IoT devices. Few IoT devices support SNMP, and I've never seen an IoT device that supports WinRM or that allows a management agent to be installed.
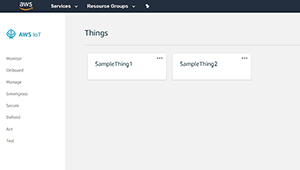
Thankfully, Amazon Web Services (AWS) provides a way to keep tabs on your IoT devices. The AWS IoT Device Management service lets you organize, manage and monitor your IoT devices. You can, for example, group your IoT devices into a series of categories, and you can check device health or perform bulk operations such as applying firmware updates to a collection of devices. You can see an example of what the AWS IoT dashboard looks like in Figure 1.
 [Click on image for larger view.]
Figure 1. This is what the AWS IoT dashboard looks like.
Although the AWS IoT dashboard holds tremendous potential, the device onboarding process can be challenging, to say the least. There are a couple of reasons for this.
The first reason why device onboarding is a bit of a challenge is because of connectivity. Your IoT devices are designed to communicate across your network, but they were probably never designed to communicate with the AWS cloud. As such, you'll need some sort of mechanism to allow the devices on your network to talk to AWS IoT.
The other reason why device onboarding can be somewhat difficult is that, as previously mentioned, traditional management mechanisms such as SMTP or WinRM don't work with most IoT devices.
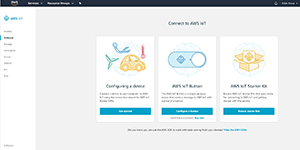
If you look at Figure 1, you'll notice that the console contains an Onboard option. Clicking on this option doesn't take you to a simple onboarding wizard as might be expected, but rather to a screen that gives you a choice of configuring a device, configuring an AWS IoT Button or browsing AWS IoT Starter Kits. You can see what this looks like in Figure 2.
 [Click on image for larger view.]
Figure 2. This is what the Onboard screen looks like.
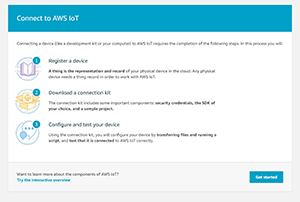
As you can see in Figure 3, connecting to AWS IoT is a three-step process. You have to register a device, download a connection kit, and then configure and test your device.
 [Click on image for larger view.]
Figure 3. Connecting your device is a three-step process.
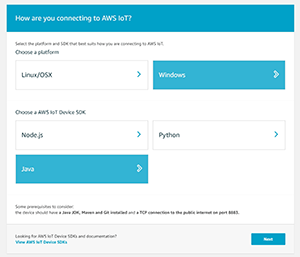
The connection process requires you to choose a platform and an SDK. For example, you might choose Windows as the platform and Python as the SDK type. One thing to keep in mind is that your choices have to match the device's capabilities. If you pick the Java SDK, for example, you'll see a list of prerequisites, such as the requirement for the device to support Maven and Git, and to communicate over port 8883. You can see what this looks like in Figure 4.
 [Click on image for larger view.]
Figure 4. You'll need to choose a platform and an SDK.
The connection kit that AWS makes available varies depending on the choices you make. Generally speaking, it's made up of a policy and a script (each of which are used for sending and receiving messages), as well as a certificate and a private key.
If you instead choose the Button from the screen shown back in Figure 2, you're given the option of purchasing a button. A button is a hardware device that kind of looks like a garage door opener. This hardware button connects to your Wi-Fi network, and can be configured to connect to AWS IoT core. When you press the button, the device sends a message of your choosing. This message can be fed to an AWS Lambda function, which can then execute custom code in response to the button press. Hence, the button isn't really designed to manage your IoT devices, but rather is an IoT device that you can add to your AWS account.
Similarly, the starter kits are hardware-based kits for building your own IoT devices. Some of these kits are general purpose in nature, while others could potentially act as a bridge between existing sensors or devices and the AWS cloud.
About the Author
Brien Posey is a 22-time Microsoft MVP with decades of IT experience. As a freelance writer, Posey has written thousands of articles and contributed to several dozen books on a wide variety of IT topics. Prior to going freelance, Posey was a CIO for a national chain of hospitals and health care facilities. He has also served as a network administrator for some of the country's largest insurance companies and for the Department of Defense at Fort Knox. In addition to his continued work in IT, Posey has spent the last several years actively training as a commercial scientist-astronaut candidate in preparation to fly on a mission to study polar mesospheric clouds from space. You can follow his spaceflight training on his Web site.