How-To
Patch Management for Amazon EC2 Instances: Organizing, Scheduling and Monitoring Patches
Brien Posey walks through the next steps involved in automating patch management for your Amazon Elastic Compute Cloud (EC2) instances.
In the first part of this series, I showed you how to create a patch baseline that would act as a collection of rules for automatically approving OS patches based on your organization's needs. It is worth noting, however, that creating a patch baseline is really just the first step in the process. There are three additional steps involved in automating patch management for your Amazon Elastic Compute Cloud (EC2) instances.
Organize Instances into Patch Groups
The second step in the process is to create a series of patch groups. This step is actually optional, and you may not need to do it at all, but patch groups do have their place. Let's suppose for a moment that you had several different workloads running on Windows Server 2016 instances. If you were to simply create a patch baseline with rules pertaining to Windows Server 2016, then that baseline would apply to all of your Windows Server 2016 instances. If, however, you needed to treat workloads differently from one another (from a patch management standpoint), then you could group workloads with similar patching requirements into patch groups.
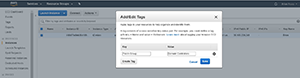
Creating a patch group is a simple process, but it works a bit differently from what you might expect. Rather than using a wizard within the Amazon EC2 dashboard to create a patch group, the whole thing is done using tagging. Just create an Amazon EC2 instance tag named Patch Group and then assign it a value with the name that you wish to assign to the patch group. You can see what this looks like in Figure 1.
 [Click on image for larger view.]
Figure 1. Patch groups are assigned by tagging Amazon EC2 instances.
[Click on image for larger view.]
Figure 1. Patch groups are assigned by tagging Amazon EC2 instances.
Schedule Patching
The next step in automating patch management for your Amazon EC2 instances is to create a patching schedule. You can do this by creating a maintenance window. A maintenance window essentially just defines a time period when it's OK to perform maintenance (such as patch management) on the instance.
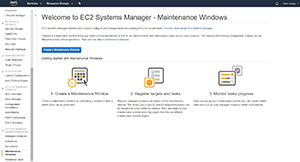
To set up a maintenance window, expand the Systems Manager Shared Resource section of the Amazon EC2 dashboard (it's in the console tree), and click on the Maintenance Windows container. This will take you to the screen shown in Figure 2.
 [Click on image for larger view.]
Figure 2. This is where you go to set up a maintenance window.
[Click on image for larger view.]
Figure 2. This is where you go to set up a maintenance window.
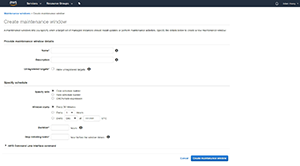
Click the blue Create a Maintenance Window button, and you'll be taken to the screen shown in Figure 3.
 [Click on image for larger view.]
Figure 3. This is the Create maintenance window interface.
[Click on image for larger view.]
Figure 3. This is the Create maintenance window interface.
As you can see in Figure 3, there's nothing complicated about setting up a maintenance window. You'll need to assign a name and a description to the maintenance window, and then specify a maintenance schedule that meets your needs.
Once the maintenance window is created there are two more things you need to do. First, you'll need to register some targets. You can do this by going back to the main Maintenance Window screen, selecting the maintenance window that you've created, and select the Targets tab at the bottom of the screen. From there, click Register New Targets.
Registering targets is a simple process. Just assign a name and description to the group of targets, and then select the Patch Group tag, followed by the name of the patch group that you want to register. When you're done, click the Register Targets button.
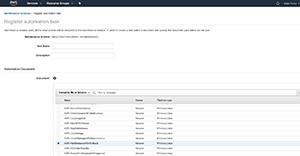
The second thing you have to do is associate the patching action with the maintenance window. Select the Tasks tab at the bottom of the screen and click Register New Tasks, followed by Run Automation Task. Enter a task name and description, and then choose the AWS-PatchInstanceWithRollback option, show in Figure 4.
 [Click on image for larger view.]
Figure 4. Choose the AWS-PatchInstanceWithRollback automation.
[Click on image for larger view.]
Figure 4. Choose the AWS-PatchInstanceWithRollback automation.
Before you will be able to register the automation task, you will have to fill in a few extra parameters such as the number of targets on which the automation should execute concurrently. You'll also have to go to the Registered Targets section, and select the target that you registered earlier. When you're done, click the Register Automation Task button at the bottom of the screen.
Monitor Patching
The final step in automating patch management is to monitor the patching process. Monitoring allows you to make sure that the required patches are being applied to your Amazon EC2 instances according to the rules specified in your patch baseline.
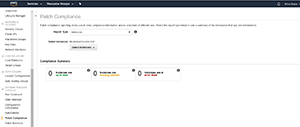
You can view the patch compliance state for your instances by choosing the Patch Compliance option from the console tree. When you do, you'll be taken to the screen shown in Figure 5.
 [Click on image for larger view.]
Figure 5. This is where you go for patch compliance reports.
[Click on image for larger view.]
Figure 5. This is where you go for patch compliance reports.
As you can see in Figure 5, this screen gives you a compliance summary showing you how many instances are up-to-date, as well as the number of instances that are missing updates or that are in an error state. The interface also contains a dropdown that allows you to check the compliance status of a specific instance.
About the Author
Brien Posey is a 22-time Microsoft MVP with decades of IT experience. As a freelance writer, Posey has written thousands of articles and contributed to several dozen books on a wide variety of IT topics. Prior to going freelance, Posey was a CIO for a national chain of hospitals and health care facilities. He has also served as a network administrator for some of the country's largest insurance companies and for the Department of Defense at Fort Knox. In addition to his continued work in IT, Posey has spent the last several years actively training as a commercial scientist-astronaut candidate in preparation to fly on a mission to study polar mesospheric clouds from space. You can follow his spaceflight training on his Web site.