How-To
Create a Mailing List with AWS Pinpoint
You can easily set up an e-mail campaign with the customer engagement service from Amazon Web Services.
While it's true that nobody likes to receive spam, bulk e-mail does have its place. For example, one of the professional associations that I belong to uses a mailing list to send a monthly newsletter to its members. Amazon Web Services (AWS) makes it relatively easy to create an e-mail campaign through a service called Pinpoint.
Before I get started with showing you how to use Pinpoint, there are two things that you need to know. First, Pinpoint isn't limited solely to sending e-mail. You can also use it to send SMS text messages. Second, the cost is based on the number of messages that you send. Like most other AWS services, Amazon bills you based on your usage. With that said, let's go ahead and get started.
The first step in the process is to create a Pinpoint project. To do so, open the Pinpoint service within the AWS console (it's in the Customer Engagement section). When the Pinpoint interface opens, enter a name for your project in the space provided, and click on the Create a Project button, as shown in Figure 1.
 [Click on image for larger view.]
Figure 1. Enter a name for your new project and click on the Create a Project button.
[Click on image for larger view.]
Figure 1. Enter a name for your new project and click on the Create a Project button.
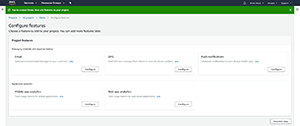
At this point, you'll be taken to the Configure Features screen, which you can see in Figure 2. This screen lets you set up various aspects of your mail campaign. Earlier I mentioned that Pinpoint can be used to send both e-mail and SMS text messages. Although SMS messages are beyond the scope of this article, I wanted to at least point out that the SMS configuration option appears on this screen.
 [Click on image for larger view.]
Figure 2. This is the screen used to configure the mail campaign.
[Click on image for larger view.]
Figure 2. This is the screen used to configure the mail campaign.
Forgetting about Pinpoint for a moment, consider how e-mail normally works. When you receive a message in your own mailbox, the first things that you probably notice are the sender and the subject line. When you create a mail campaign using Pinpoint, the messages that Pinpoint sends out will also specify a sender and a subject line. The reason why I mention this is because Pinpoint requires that the From address on your bulk messages match a real-world e-mail address that you actually own. As such, the next thing that you'll have to do is verify your ownership of the e-mail address from which the messages that you send out will appear to have originated.
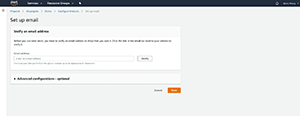
To verify your ownership of the sender mailbox, click on the Configure button located in the e-mail section of the screen in Figure 2. Upon doing so, you'll be prompted to enter an e-mail address. The messages sent by Pinpoint will appear to have originated from this address. Click the Verify button, shown in Figure 3, and a verification message will be sent to the specified address.
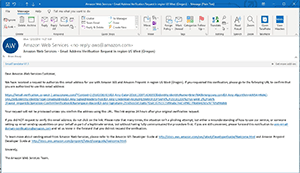
As you can see in Figure 4, verifying the e-mail address is a simple matter of clicking a link within an e-mail message.
 [Click on image for larger view.]
Figure 3. Enter the sender e-mail address for your mail campaign.
[Click on image for larger view.]
Figure 3. Enter the sender e-mail address for your mail campaign.
 [Click on image for larger view.]
Figure 4. This is what the verification e-mail message looks like.
[Click on image for larger view.]
Figure 4. This is what the verification e-mail message looks like.
Once you've verified the sender e-mail address, the next thing you'll need to do depends on the nature of the messages that you plan to send. The reason for this is that AWS puts some pretty stringent limitations on Pinpoint as a way of preventing it from being used for spam or fraud. The default limitations are:
- You must send messages from a verified mailbox (and that mailbox should have already been verified at this point)
- You can only send messages to verified addresses
- You can only send 200 messages within any 24-hour period
- You can only send one message per second
AWS does allow you to work around these limitations, but to do so you must open a case with AWS and request limit increases or removal. You can do so here.
One of the best ways to shortcut the verified address requirement is to verify an entire domain. Let's suppose, for example, that you want to send out a company newsletter or something like that. Most of the recipients would presumably have e-mail addresses within your company's domain. Verifying the domain would allow you to send messages to those recipients without having to verify them individually.
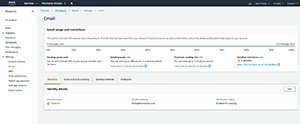
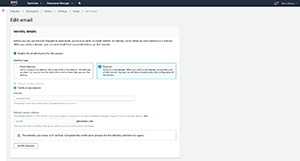
If you want to verify an entire domain, go to the Web interface for your project and click Settings, followed by e-mail, as shown in Figure 5. Now, click the Edit button found in the Identity Details section. When you reach the following screen, set the Identity Details setting to Domain, as shown in Figure 6, and then follow the remaining prompts to complete the domain registration process.
 [Click on image for larger view.]
Figure 5. The e-mail usage and restrictions page.
[Click on image for larger view.]
Figure 5. The e-mail usage and restrictions page.
 [Click on image for larger view.]
Figure 6. Editing the identity details for verification.
[Click on image for larger view.]
Figure 6. Editing the identity details for verification.
So now that I've talked about the E-mail verification process, I want to move on and talk about the process of setting up the actual mail campaign. I will cover that in part two.
About the Author
Brien Posey is a 22-time Microsoft MVP with decades of IT experience. As a freelance writer, Posey has written thousands of articles and contributed to several dozen books on a wide variety of IT topics. Prior to going freelance, Posey was a CIO for a national chain of hospitals and health care facilities. He has also served as a network administrator for some of the country's largest insurance companies and for the Department of Defense at Fort Knox. In addition to his continued work in IT, Posey has spent the last several years actively training as a commercial scientist-astronaut candidate in preparation to fly on a mission to study polar mesospheric clouds from space. You can follow his spaceflight training on his Web site.