How-To
Creating a Storage Gateway for AWS, Part 3: How to Set Up a Virtual Appliance
Brien Posey already showed you how to create a Virtual Private Cloud endpoint and a storage gateway. In this third part of the series, he'll show you how to set up the virtual appliance and activate the storage gateway.
So far in this series, I showed you how to create a pair of endpoints, and how to perform a portion of the storage gateway configuration process. Now, I want to show you how to set up the virtual appliance. This process will work differently depending on which hosting platform you have selected. For the purposes of this blog post, I will be using Hyper-V.
So with that said, locate the ZIP file that you downloaded as a part of the gateway configuration process, and copy it to your Hyper-V server. Once copied, unzip the file and place its contents in a location that is suitable for use by Hyper-V.
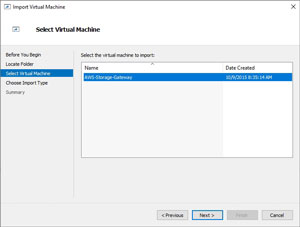
Now, open the Hyper-V Manager and click on the Import Virtual Machine wizard. When the wizard begins, click Next to bypass its Welcome screen. You will now be taken to the wizard's Locate Folder screen. Click on the Browse button, and then select the AWS-Appliance-HyperV-2012\AWS-Appliance folder that you extracted from the ZIP file. Click Next, and then make sure that the wizard displays a virtual machine, as shown in Figure 1. Select this virtual machine, and click Next. The wizard will now ask you what type of import you wish to perform. Choose the Restore the Virtual Machine (Use the existing unique ID) option, and click Next, followed by Finish.
 [Click on image for larger view.]
Figure 1. Select the virtual machine that you want to import.
[Click on image for larger view.]
Figure 1. Select the virtual machine that you want to import.
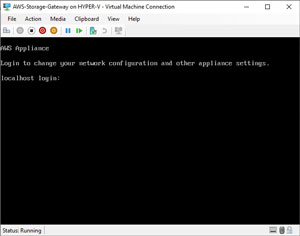
At this point, Hyper-V will create a brand new VM named AWS-Storage-Gateway. Before you power on the VM, you will need to connect the VM's virtual network adapter to a virtual switch. Once you have added network connectivity, go ahead and connect to the VM and then power it on. You can see the running VM in Figure 2.
 [Click on image for larger view.]
Figure 2. Connect to the new VM and power it on.
[Click on image for larger view.]
Figure 2. Connect to the new VM and power it on.
It is worth noting that it takes quite a while for the VM to display the screen shown above. Initially, I thought that my VM was locked up, but after leaving it unattended for about half an hour, I finally reached the login prompt.
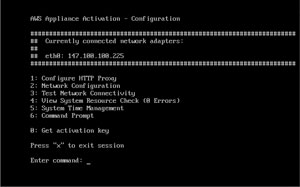
For the initial gateway login, you will have to use the default credentials, which vary depending on the type of gateway that you are creating. If you are creating a file gateway, the default user name is admin and the password is password. Otherwise, the username is sguser and the password is sgpassword. Once you have logged in, you will be taken to the configuration screen, shown in Figure 3.
 [Click on image for larger view.]
Figure 3. This is the gateway appliance's configuration screen.
[Click on image for larger view.]
Figure 3. This is the gateway appliance's configuration screen.
Choose option 2, and then enter the name of the virtual Ethernet adapter that you want to use (there should only be one, and it is listed on screen). Next, enter the IP address that you want to associate with the gateway appliance. Remember, you don't have to use a public IP address. While you are logged into the console, don't forget to change its credentials to something other than the default.
Now, switch back over to the AWS console and enter your gateway appliance's IP address into the Connect to Gateway screen.
The next step in the process is to activate the gateway. This step is largely just a matter of selecting your gateway time zone and entering a name for the gateway.
Click Next, and you will be taken to a screen that asks you to configure local disks for cached storage. This screen should already list storage that is local to your gateway appliance. The only thing that you need to do here is to select the Cache option from the Allocated To drop down list, and then click the Save and Continue button.
When you are done, click Next and your gateway will be ready to use. You can now begin creating SMB file shares that can be used with your gateway. You can find instructions for doing so here.
About the Author
Brien Posey is a 22-time Microsoft MVP with decades of IT experience. As a freelance writer, Posey has written thousands of articles and contributed to several dozen books on a wide variety of IT topics. Prior to going freelance, Posey was a CIO for a national chain of hospitals and health care facilities. He has also served as a network administrator for some of the country's largest insurance companies and for the Department of Defense at Fort Knox. In addition to his continued work in IT, Posey has spent the last several years actively training as a commercial scientist-astronaut candidate in preparation to fly on a mission to study polar mesospheric clouds from space. You can follow his spaceflight training on his Web site.