How-To
Getting Started with the AWS Firewall Manager
Brien Posey begins a series on providing protection against Web-based attacks with the AWS Firewall Manager, designed to simplify firewall-related administrative tasks across your organization.
Like any other Web-based resource, it is critically important to protect your AWS account and the objects within it from Web-based attacks. Although you should ideally leverage a variety of mechanisms, a firewall is a great place to begin.
The problem that organizations sometimes experience, however, is that firewall rules may be created in an inconsistent manner throughout an organization's AWS resources. Fortunately, there is a tool that can help with this problem. The AWS Firewall Manager is designed to simplify firewall-related administrative tasks across your organization.
You can access the AWS Firewall Manager by signing into your AWS account, going to the list of services, and then selecting the WAF and Shield option. It's located in the Security, Identity, and Compliance section.
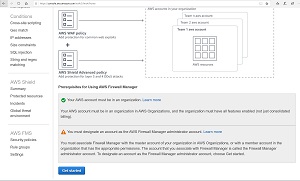
Before you can get started, there are two prerequisites that you will have to meet. First, you will have to make sure that your AWS account is a part of an organization. The AWS console will tell you whether or not your account is currently a part of an organization, as shown in Figure 1. If not, you will need to go to https://console.aws.amazon.com/organizations/. From there, sign in as the root user, and then choose the option to create an organization. You can find the full instructions for this process here.
 [Click on image for larger view.]
Figure 1. Make sure that your account is part of an AWS organization.
[Click on image for larger view.]
Figure 1. Make sure that your account is part of an AWS organization.
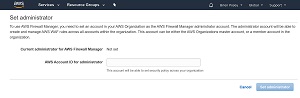
The second prerequisite is that you will need to designate an account to act as the AWS Firewall Manager administrator account. To do so, go to the AWS Firewall Manager console screen (https://console.aws.amazon.com/wafv2/fms#/home) , locate the Prerequisites section (it's at the bottom of the screen), and then click the Get Started button. Now, just enter the AWS Account ID for the account that you want to designate as the firewall administrator, and click on the Set Administrator button, as shown in Figure 2. It is worth noting that the account ID is different from the user name. The account ID is a number that corresponds to the user name. You can find a list of users and their corresponding account IDs at https://console.aws.amazon.com/organizations/home?#/accounts.
 [Click on image for larger view.]
Figure 2. Enter the account ID of the account that you want to designate as the firewall manager and click the Set Administrator button.
[Click on image for larger view.]
Figure 2. Enter the account ID of the account that you want to designate as the firewall manager and click the Set Administrator button.
Once you set the AWS firewall Manager, it can take a minute or two for the change to take effect. You can tell whether or not your changes have taken effect by going back to the main Firewall Manager console screen, and looking for the two green checkmarks at the bottom of the page, indicating that the prerequisites have been met, as shown in Figure 3.
 [Click on image for larger view.]
Figure 3. Take a moment to verify that both of the prerequisites have been met.
[Click on image for larger view.]
Figure 3. Take a moment to verify that both of the prerequisites have been met.
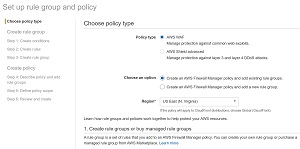
Now that the prerequisites are both in place, you can begin creating AWS Firewall Manager policies. Begin by clicking the Create Policy button that is shown in the previous figure. This will take you to the Set Up Rule Group and Policy screen, which you can see in Figure 4.
 [Click on image for larger view.]
Figure 4. This is the Set Up Rule Group and Policy screen.
[Click on image for larger view.]
Figure 4. This is the Set Up Rule Group and Policy screen.
The first thing that you will have to do on this screen is to specify the type of policy that you want to create. AWS gives you two choices. You can create an AWS WAF policy, which protects against common Web exploits, or you can create an AWS Shield Advanced policy, which is designed to guard against layer 3 and 4 DDoS attacks.
The remaining options that will appear on this screen vary depending on which policy type you select. If you choose the AWS WAF option for example, you will be asked if you want to create a new rule group or use an existing rule group. If you choose the AWS Shield Advanced option however, then you only have to specify your region. I will cover the policy creation process in more depth in Part 2 of this article series.
About the Author
Brien Posey is a 22-time Microsoft MVP with decades of IT experience. As a freelance writer, Posey has written thousands of articles and contributed to several dozen books on a wide variety of IT topics. Prior to going freelance, Posey was a CIO for a national chain of hospitals and health care facilities. He has also served as a network administrator for some of the country's largest insurance companies and for the Department of Defense at Fort Knox. In addition to his continued work in IT, Posey has spent the last several years actively training as a commercial scientist-astronaut candidate in preparation to fly on a mission to study polar mesospheric clouds from space. You can follow his spaceflight training on his Web site.