How-To
Getting Started with the AWS Firewall Manager, Part 2
In my first blog post in this series, I explained that the AWS Firewall Manager is a helpful tool that can help you to maintain a consistent set of firewall policies across your AWS organization. From there, I talked about the various prerequisites and I began talking about the firewall policy creation process. In this blog post, I want to wrap up the discussion by talking about the policy creation process in greater detail.
As previously noted, you can create a firewall policy by going to the Firewall Manager console, and clicking the Create Policy button. When you do, you will notice that Amazon has added a new option since the time when I wrote the first blog post a week ago. Now, you can create a AWS WAF policy, an AWS Shield Advanced policy, or a Security Group policy. You can see what the change looks like in Figure 1.
 [Click on image for larger view.]
Figure 1. There are three different types of policies that you can create.
[Click on image for larger view.]
Figure 1. There are three different types of policies that you can create.
So with that said, let's take a look at how to create an AWS WAF policy. To do so, select the AWS WAF option, and then choose the option to create an AWS Firewall Manager policy and add a new rule group. Both of these options are shown in the screen capture above.
Scroll down a bit more, and you will see a message indicating that you can opt to create your own rule group, or you can purchase a managed rule group. A managed rule group is simply a rule group that's available through the app store, and has been pre-configured to look for the most common threats. For the purpose of this blog post, we will create a rule group from scratch.
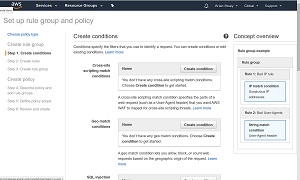
Click Next, and you will be taken to the screen that is shown in Figure 2. This screen lists about half a dozen different conditions that can serve as the basis for rules. For example, you can base a rule on a SQL injection condition or a geographic match condition. Locate a condition that matches the type of rule that you want to create, and then click the corresponding Create Condition button.
 [Click on image for larger view.]
Figure 2. Amazon provides several different conditions that can serve as the basis of a rule.
[Click on image for larger view.]
Figure 2. Amazon provides several different conditions that can serve as the basis of a rule.
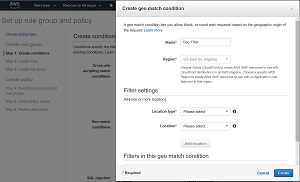
The steps involved in creating a condition will vary depending on the type of condition that you are creating. If you look at Figure 3 for example, you can see the steps that are involved in creating a geo filter that blocks requests from specific countries. As you can see in the figure, you must provide a name for the condition and select the region where you want to create it. From there, just set the location type to Country and then choose the country that you want to block and then click Add Location. Once you are done adding countries, click the Create button.
 [Click on image for larger view.]
Figure 3. This is how you create a geo condition.
[Click on image for larger view.]
Figure 3. This is how you create a geo condition.
At this point, you will be returned to the Conditions screen. When you are done creating conditions, Click Next, and you will be taken to the Create Rules screen. A rule tells AWS what to do when it receives a Web request that matches one of the conditions that you have defined.
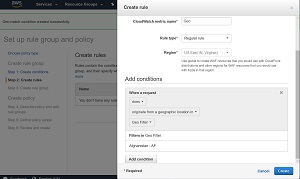
Click the Create Rule button, and you will be taken to the screen shown in Figure 4. Choose how the policy will be applied to your AWS resources. As you can see, you will need to assign a name and a region to the rule. From there, you can create a condition that is based on the criteria that you have already established.
 [Click on image for larger view.]
Figure 4. This is what it looks like when you create a rule.
[Click on image for larger view.]
Figure 4. This is what it looks like when you create a rule.
Click Create, followed by Next, and you will be taken to a screen that allows you to create a rule group. Creating a rule group is simply a matter of providing the group with a name and then selecting the rules that you wish to group together. AWS performs the same action for all of the rules in the group.
The next step in the process is to describe a policy. This process involves providing a name for the policy, and then selecting the rule groups that you want to associate with the policy, as shown in Figure 5.
 [Click on image for larger view.]
Figure 5. Choose the rule groups that you want to include in the new policy.
[Click on image for larger view.]
Figure 5. Choose the rule groups that you want to include in the new policy.
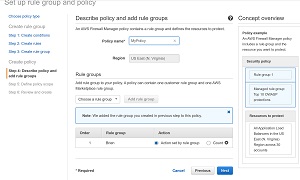
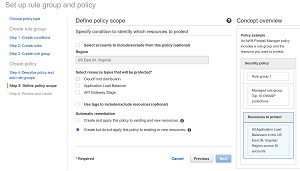
Click Next, and you will be taken to the screen shown in Figure 6. This screen allows you to control which types of AWS resources the new policy will apply to. It also allows you to control whether or not the policy will be applied to existing AWS resources. If you are thinking of applying the policy to existing resources, then it is important to consider how the policy will collectively impact all of the resources that fall within the policy scope.
 [Click on image for larger view.]
Figure 6. Choose how the policy will be applied to your AWS resources.
[Click on image for larger view.]
Figure 6. Choose how the policy will be applied to your AWS resources.
Click Next, and you will be taken to a summary screen that details the various options that you have chosen. Assuming that everything appears to be in order, click the Create button and the new policy will be created.
About the Author
Brien Posey is a 22-time Microsoft MVP with decades of IT experience. As a freelance writer, Posey has written thousands of articles and contributed to several dozen books on a wide variety of IT topics. Prior to going freelance, Posey was a CIO for a national chain of hospitals and health care facilities. He has also served as a network administrator for some of the country's largest insurance companies and for the Department of Defense at Fort Knox. In addition to his continued work in IT, Posey has spent the last several years actively training as a commercial scientist-astronaut candidate in preparation to fly on a mission to study polar mesospheric clouds from space. You can follow his spaceflight training on his Web site.