How-To
How to Create a Customer Contact Center in AWS, Part 2
Brien Posey continues his series on how to use the Amazon Connect cloud service that allows you to connect a phone number to a virtual infrastructure and route calls on an as-needed basis. Here, he covers configuring and managing the contact center you created in part 1.
In the my first blog post in this series, I showed you how to set up a customer contact center using the AWS cloud. Now that I have talked about the initial deployment process, I want to show you how to configure and manage the contact center that you created.
Once the Amazon Connect deployment process is complete, you will be taken to an introductory splash screen. Click on the Let's Go button to begin the configuration process.
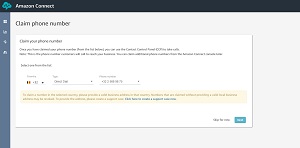
The first step of the configuration process (assuming that you have chosen to allow inbound calls) is to claim a phone number. The interesting thing about this is that you can claim a phone number in a country other than your own. For example, I am in the United States, but if I did a lot of business in Belgium, I might claim a Belgium phone number. As you can see in Figure 1 however, the caveat to this is that Amazon requires you to have a business address in the country of choice.
 [Click on image for larger view.]
Figure 1. You can claim domestic or international phone numbers.
[Click on image for larger view.]
Figure 1. You can claim domestic or international phone numbers.
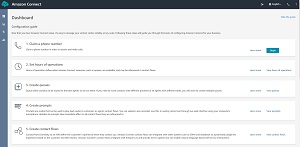
Once you have claimed a phone number (or if you opted to wait until later to claim a phone number), you are taken to the configuration dashboard, which you can see in Figure 2.
 [Click on image for larger view.]
Figure 2. The dashboard guides you through the various configuration tasks that you need to complete.
[Click on image for larger view.]
Figure 2. The dashboard guides you through the various configuration tasks that you need to complete.
As you can see in the figure, the dashboard guides you through a series of seven different configuration tasks. These steps include things like setting the business' hours of operation, creating the message queues, creating prompts, and so on. For each of the tasks, simply click the corresponding View link (View hours of operation, view queues, etc.) and then follow the prompts. Although Amazon does not strictly enforce it, it is best to perform these configuration tasks in order.
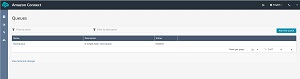
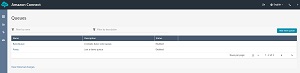
Wherever possible, Amazon populates the various dashboard items with default values in an effort to make the configuration process easier. For example, the hours of operation are pre-set to "always open." Likewise, Amazon creates a simple, basic queue by default, as shown in Figure 3.
 [Click on image for larger view.]
Figure 3. A basic queue exists by default.
[Click on image for larger view.]
Figure 3. A basic queue exists by default.
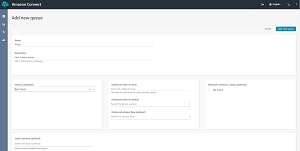
Typically, you will want to replace the default configuration items with your own custom configurations. In the case of the queues for example, you can click the Add a New Queue button, and then follow the prompts shown in Figure 4 to create your own custom queue. Once you have created a new queue, you can hover over the old queue, shown in Figure 5, and then click on the Disable icon to delete it. The process of configuring the other items (things other than queues) works in a very similar manner.
 [Click on image for larger view.]
Figure 4. This is the interface used to create a new queue.
[Click on image for larger view.]
Figure 4. This is the interface used to create a new queue.
 [Click on image for larger view.]
Figure 5. With the new queue created, you can disable the default queue.
[Click on image for larger view.]
Figure 5. With the new queue created, you can disable the default queue.
When you finish configuring a queue or any of the other configuration items, you can return to the dashboard by clicking on the Dashboard icon, and then clicking on the Dashboard menu option. The Dashboard icon is the top icon in the grey bar on the left side of the screen in the previous figure.
As I'm sure you noticed in the figure above, the Dashboard icon is only the first of four icons. The second icon from the top reveals the Metrics and Quality menu. This menu provides options for accessing various usage statistics and reports.
Clicking on the third icon from the top reveals the Routing menu. The Routing menu contains options for claiming additional phone numbers, creating additional message queues, and creating contact flows. Contact flows allow you to do things such as playing hold music or transferring a call to a different queue. Contact flows can sometimes be complex, but Amazon has created a large number of flows as a way of making things easier.
Finally, clicking on the bottom icon reveals the Users menu. This menu allows you to create Amazon Connect users. You can even create a user hierarchy, which allows calls to be escalated if necessary.
Creating a call center is by its very nature, a complex process. However, Amazon has made the process far easier than it might otherwise be, thanks to prebuilt objects and a simple point and click interface.
About the Author
Brien Posey is a 22-time Microsoft MVP with decades of IT experience. As a freelance writer, Posey has written thousands of articles and contributed to several dozen books on a wide variety of IT topics. Prior to going freelance, Posey was a CIO for a national chain of hospitals and health care facilities. He has also served as a network administrator for some of the country's largest insurance companies and for the Department of Defense at Fort Knox. In addition to his continued work in IT, Posey has spent the last several years actively training as a commercial scientist-astronaut candidate in preparation to fly on a mission to study polar mesospheric clouds from space. You can follow his spaceflight training on his Web site.