How-To
Enabling Virtual Multi-Factor Authentication for AWS
Brien Posey shows how to set up multi-factor authentication for an AWS user in a way that allows the use of a smartphone as an access key.
One of the most important things that you can do to ensure the security of your AWS accounts is to enable multi-factor authentication. In this blog post, I will show you how to set up multi-factor authentication for an AWS user in a way that allows them to use their smartphone as an access key.
Before I Begin
Before I get started, there are two important things that you need to know. First, the procedure that I am about to show you requires you to have the user's smartphone in your possession at the time of enrollment.
The other thing that you need to know is that there is a step near the end of the procedure in which the user's smartphone generates one-time-use passwords that you will need to enter into the AWS console. While there is nothing difficult about this process, you will have to enter the codes quickly. The passwords are time sensitive and the process will be thrown out of sync if you fail to enter the passwords quickly enough.
Enabling Multi-Factor Authentication
To get started, log into AWS and open the IAM console (you can find it in the Security, Identity, and Compliance section within the list of services). When the console opens, click on the Users tab to see a list of the user accounts that have been created within your AWS account. Now, click on the user for whom you want to enable multi-factor authentication. This will open an account summary screen similar to the one shown in Figure 1.
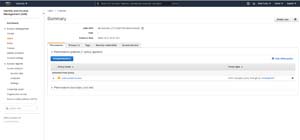 [Click on image for larger view.]Figure 1: Click on the account for which you wish to enable multi factor authentication and you will see a summary screen like this one.
At this point, you will need to click on the Security Credentials tab. If you look at Figure 2, you can see that the Sign-in Credentials section includes an option for Assigned MFA Device. By default, this option is not assigned. In order to enable multi-factor authentication for the user, you will need to click the Manage link that appears to the right of Assigned MFA Device.
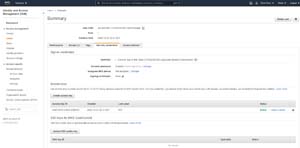 [Click on image for larger view.]Figure 2: Click on the Manage link that appears to the right of Assigned MFA Device.
Upon clicking the Manage link, the console will display a Manage MFA Device dialog box like the one that is shown in Figure 3. As you can see in the figure, the console gives you three different options for multi-factor authentication. For the purposes of this blog post, I am focusing on virtual MFA devices because they allow a user to use a smartphone for authentication. You can however, use a physical device if you want to. AWS supports the use of Yubi key devices, U2F compliant devices and Gemalto tokens.
 [Click on image for larger view.]Figure 3: Choose the option to assign a virtual MFA device and click Continue.
Once you have made your selection, AWS will display the Set Up Virtual MFA Device screen, which you can see in Figure 4. Before you can do anything else, you are going to have to install a multi-factor authentication application on the user's device. There are a number of different applications that you can use for this purpose. AWS supports the iOS and Android versions of Authy, Duo Mobile, LastPass Authenticator, Microsoft Authenticator and Google Authenticator. When you have installed the app, click on the Show QR Code link and then use the device to scan the QR code that appears on the screen. Figure 4 already includes a QR code, but normally a QR code will not be displayed until you click a link.
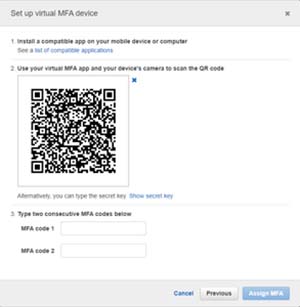 [Click on image for larger view.]Figure 4: You will need to install an app and then scan the QR code.
If for whatever reason you are unable to scan the QR code, then click on the Show Secret Key link. This will cause the dialog box to display a secret key that you can manually type into the device. Once you have either scanned the code or entered the secret key into the device's multi-factor authentication app, it will begin generating one time use passwords. You will need to enter one of these passwords into the MFA Code 1 box and then enter a second password into the MFA Code 2 box. When you are done, click the Assign MFA button. Multi-factor authentication is now ready to use.
Now, when the user logs in, they will enter their credentials in the usual way. Upon doing so however, the user is taken to a secondary login screen where they will be prompted to enter a numeric code that has been provided by the app on their smartphone.
About the Author
Brien Posey is a 22-time Microsoft MVP with decades of IT experience. As a freelance writer, Posey has written thousands of articles and contributed to several dozen books on a wide variety of IT topics. Prior to going freelance, Posey was a CIO for a national chain of hospitals and health care facilities. He has also served as a network administrator for some of the country's largest insurance companies and for the Department of Defense at Fort Knox. In addition to his continued work in IT, Posey has spent the last several years actively training as a commercial scientist-astronaut candidate in preparation to fly on a mission to study polar mesospheric clouds from space. You can follow his spaceflight training on his Web site.