How-To
Creating AWS Backups, Part 2: Tie Resources to Backup Plan
After earlier showing how to more easily create a backup plan by using a template, Brien Posey continues his series by associating that plan with the AWS resources you need to protect.
In the previous part of this article series, I showed you how to create a backup plan by using a template to simplify the creation process. However, a backup plan does not do anything by itself. Before you will be able to create a backup, you will have to associate your backup plan with the AWS resources that you need to protect. In this blog post, I will show you how it's done.
To get started, log into the AWS console and select the AWS Backup option from the list of services. This will take you to the AWS Backup Dashboard. As you can see in Figure 1, there are three buttons near the top of the dashboard that allow you to manage your backup plans, create an on-demand backup, or restore a backup. Since our goal is to associate resources with an existing backup plan, click on the Manage Backup Plan button.
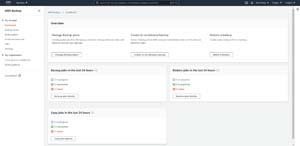 [Click on image for larger view.]Figure 1: Click on the Manage Backup Plans button.
At this point, the console will display a list of your existing backup plans (it also gives you the option of creating a new backup plan). Go ahead and click on the backup plan that you want to work with and you will be taken to a screen that displays a summary of the backup plan. As you can see in Figure 2, this screen looks somewhat similar to the screen that you used to create the backup plan, but unlike that screen this one gives you an option to assign resources to the backup plan.
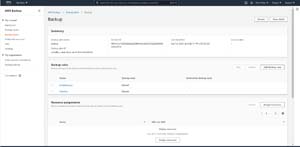 [Click on image for larger view.]Figure 2: Click the Assign Resources button.
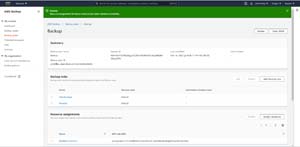
Click the Assign Resources button, and you will be taken to the Assign Resources screen, which you can see in Figure 3. The first thing that you need to understand about resource assignments is that in a production environment, it is relatively common for multiple resources to be assigned to a single backup plan. As such, you will need to give each resource assignment a name. This name should convey the purpose of the resource assignment. If for example, you were creating a resource assignment that is to be used in backing up Windows EC2 instances, then you might call the resource assignment Windows-Instances.
 [Click on image for larger view.]Figure 3: This is what the resource assignment screen looks like.
The next step in making a resource assignment is to specify the IAM role that will give AWS Backup the permissions that it needs to back up the resource. You can specify an IAM role of your choosing, but the simpler option is to use the Default Role option.
The third step in making a resource assignment is to actually assign the resource. There are a couple of ways of doing this. The default, and typically the easiest option is to use tagging. Just enter the key and value associated with the resources that you want to back up. In my previous example, I mentioned backing up Windows based EC2 instances. If those instances all had a tag named OS with a value of Windows, you could simply enter OS as the key and Windows as the value.
Of course you don't have to use tags if you don't want to. The other option is to make resource assignments by Resource ID. This option is handy if you need to add a one off resource to your backup plan, or if you don't use tagging. If you look at Figure 4, you can see that I have a virtual machine instance named Windows DC. You can see the virtual machine's instance ID just to the right of the virtual machine name. It is this instance ID that you would add to the backup plan.
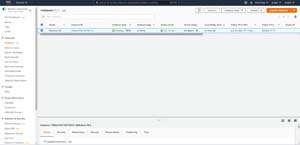 [Click on image for larger view.]Figure 4: The virtual machine instance has been assigned an instance ID.
Incidentally, Amazon doesn't make you copy and paste instance IDs. If you want to add a resource by instance ID, choose the Resource ID option from the Assign By drop-down list, then specify the type of resource that you want to add. The Instance ID field will automatically be populated with the instance IDs of your various resources. In the case of an EC2 instance, the instance name is shown as well, making it easy to figure out which instance ID goes with which instance. You can see a completed resource assignment in Figure 5.
 [Click on image for larger view.]Figure 5: You can add a resource by its ID.
Now, click on the Assign Resource button and the resource assignment will be completed. You should see the new resource assignment appear in the Resource Assignments section of the backup plan's summary screen, along with a message indicating that the assignment was successful.
 [Click on image for larger view.]Figure 6: The resource assignment was successfully made.
Keep in mind that the resource will not actually be backed up until the backup is scheduled to occur. If however, you need a more immediate backup, you can use the previously mentioned button to create an on-demand backup.
About the Author
Brien Posey is a 22-time Microsoft MVP with decades of IT experience. As a freelance writer, Posey has written thousands of articles and contributed to several dozen books on a wide variety of IT topics. Prior to going freelance, Posey was a CIO for a national chain of hospitals and health care facilities. He has also served as a network administrator for some of the country's largest insurance companies and for the Department of Defense at Fort Knox. In addition to his continued work in IT, Posey has spent the last several years actively training as a commercial scientist-astronaut candidate in preparation to fly on a mission to study polar mesospheric clouds from space. You can follow his spaceflight training on his Web site.