How-To
Using the AWS Launch Wizard to Simplify Application Deployment, Part 2: Secret Names and More
After explaining how to use the AWS Launch Wizard to deploy a new Active Directory environment, Brien Posey shows you the rest of the process, beginning with the requirement to create a domain administrator secret name.
In the previous article, I began showing you the process for using the AWS Launch Wizard to deploy a new Active Directory environment. Now, I want to show you the rest of the process, beginning with the requirement to create a domain administrator secret name.
In AWS, a secret is essentially just a set of stored credentials. To create a secret, go to the list of services and select the Secrets Manager option. It's found in the Security, Identity and Compliance section. When the Secrets Manager opens, click on the Store a New Secret button. Select the Other Type of Secrets option, and then select the Plaintext tab, shown in Figure 1.
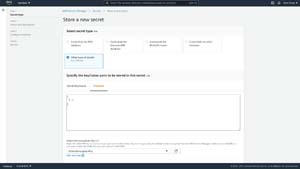 [Click on image for larger view.] Figure 1: Choose the Other Type of Secrets option.
Click Next, and you will be taken to the Name and Description screen. Here you will be prompted to enter a name for your secret. The name that you choose must begin with the word LaunchWizard.
Once you have given the secret a name, click Next and you will be taken to a screen that gives you the option of setting up automatic rotation. Choose whether or not you want to use automatic rotation, and click Next. You will now be taken to the review screen. Take a moment and look over the sample code to make sure that it appears to be correct. If all is well, click the Store button.
Now, go back to the Launch Wizard and click the Refresh button that appears just to the right of the Domain Administrator Secret Name drop down. You should now be able to select your secret, as shown in Figure 2. As you look at the figure, you will notice that there is a copy button in this section. Click the Copy button to copy the code to the clipboard.
Now, switch back over to the Secrets Manager and click on the secret that you just created. When the secret opens, click on the Edit Permissions button and then paste the code into the place provided, as shown in Figure 3. Be sure to click the Save button when you are done.
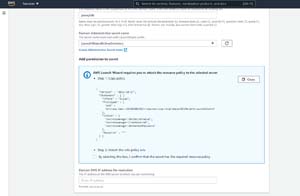 [Click on image for larger view.] Figure 2: CYou will need to copy the code in the blue box by clicking the Copy button.
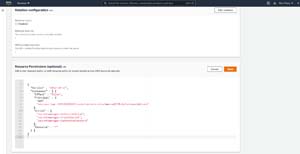 [Click on image for larger view.] Figure 3: Paste the code into the Resource Permissions section.
Switch back over to the Launch Manager screen, and select the checkbox confirming that the secret has the required resource policy.
The remaining tasks on this screen include specifying your DNS server, choosing the key pair that will be used in the creation of the EC2 virtual machines and selecting the VPC that you want to use.
Step 3: Define Infrastructure Requirements
The third step in the process is to define the infrastructure requirements. This is the step where you size the application (in this case, Active Directory) based on your needs. As you can see in Figure 4, you can base the storage and compute requirements either on a specific instance type or on your infrastructure requirements. It's usually best to choose the Based on Infrastructure Requirements option since it allows you to specify the number of users that you need to support.
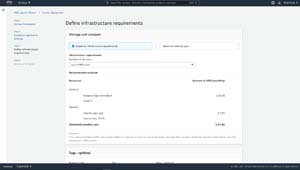 [Click on image for larger view.] Figure 4: You will need to tell the Launch Wizard whether to base the storage and compute resources on an instance type or on your infrastructure requirements.
As you enter your requirements, the console will display an estimated monthly cost for running your application. When you are done, click Next.
Step 4: Review and Deploy
At this point, you will see a summary screen outlining the proposed configuration and the estimated cost. Take some time to review this screen to make sure that all of the information is accurate. Assuming that everything looks good, click on the Deploy button to deploy your application. The AWS Launch Wizard will now begin creating EC2 virtual machine instances and any additional resources that may be required to support the application that you are deploying.
About the Author
Brien Posey is a 22-time Microsoft MVP with decades of IT experience. As a freelance writer, Posey has written thousands of articles and contributed to several dozen books on a wide variety of IT topics. Prior to going freelance, Posey was a CIO for a national chain of hospitals and health care facilities. He has also served as a network administrator for some of the country's largest insurance companies and for the Department of Defense at Fort Knox. In addition to his continued work in IT, Posey has spent the last several years actively training as a commercial scientist-astronaut candidate in preparation to fly on a mission to study polar mesospheric clouds from space. You can follow his spaceflight training on his Web site.